Conversation List
How to use Two-Way Audio for Cameras
What is Two-Way Audio?
Two-Way Audio is a feature that works on all SimpliSafe® Cameras. While using the SimpliSafe® Mobile App, Two-Way Audio allows you to hear audio from your camera and speak through it while viewing live streams.
How to Turn On Two-Way Audio
To enable Two-Way Audio, you’ll need to ensure that the Mic & Audio setting is toggled on for your camera, in its respective camera settings.
Open the SimpliSafe® Mobile App on your phone or tablet
Choose My System from the bottom navigation bar
Select Camera Settings
Tap on the camera you wish to manage
Scroll down to General
Toggle Mic & Audio ON
Tap SAVE in the upper right corner to save your selections
How to Use Two-Way Audio
Outdoor Cameras and Smart Alarm Indoor Camera
To use Two-Way Audio with your Outdoor Camera and Smart Alarm Indoor Camera, simply tap the speaker button. If you press and hold the speaker button like you would with the SimpliCam® and Video Doorbell, Two-Way Audio will not work.
SimpliCam® and Video Doorbell Pro
To use Two-Way Audio with your SimpliCam® and Video Doorbell, press the microphone button in the SimpliSafe® Mobile App while talking and release it to hear what is being said. If you hold the microphone button while someone is speaking to you through the camera, you will not be able to hear them.
Please note: If you use Two-Way Audio through your Outdoor Camera or Smart Alarm Indoor Camera while it is recording, the audio will be included in the video. If you use Two-Way Audio through your SimpliCam® or Video Doorbell while it is recording, the video will only include audio detected through the camera, not what was said through the SimpliSafe® Mobile App.
Related Articles
Help Center Article
•
Cameras
How to Flip your Camera Image 180 Degrees
Overview
The image of your Outdoor Camera Series 2 or Outdoor Camera can be rotated to 180 degrees, in the event you mount the camera upside down. This can be done within the SimpliSafe® Mobile App by navigating to your camera’s settings.
Supported Cameras
The following cameras support this functionality:
Outdoor Camera Series 2
Outdoor Camera
Using the SimpliSafe® Mobile App
Open the SimpliSafe® Mobile App on your phone or tablet
Choose My System from the bottom navigation bar
Select Camera Settings from the list of menu options
Tap on the Outdoor Camera you wish to manage
Scroll down to the section titled General
Toggle Flip Image 180 degrees ON or OFF as needed
Don’t forget to tap SAVE in the upper right corner to save your selections
Help Center Article
•
Cameras
Turn On or Off Night Vision for Cameras
Overview
Night Vision is a feature that allows the camera to use infrared technology to see in low-light conditions. This setting is especially helpful for capturing camera footage at night, or if your camera is located in a low-light setting such as a basement or darkened room.
Supported Cameras
Outdoor Camera Series 2
Night Vision is locked to Standard when the camera is enrolled in SimpliSafe® Active Guard Outdoor Protection
Wireless Outdoor Security Camera
Video Doorbell Pro
Smart Alarm Wireless Indoor Security Camera
SimpliCam® Wired Indoor Security Camera
Turn Night Vision On or Off Using the SimpliSafe® Mobile App
Open the SimpliSafe® Mobile App on your phone or tablet
Choose My System from the bottom navigation bar
Select Camera Settings
Tap on the camera you wish to manage
Choose Night Vision
Adjust the Night Vision settings as needed
Select SAVE in the upper right corner to save your selections
Camera Placement Tips for Night Vision
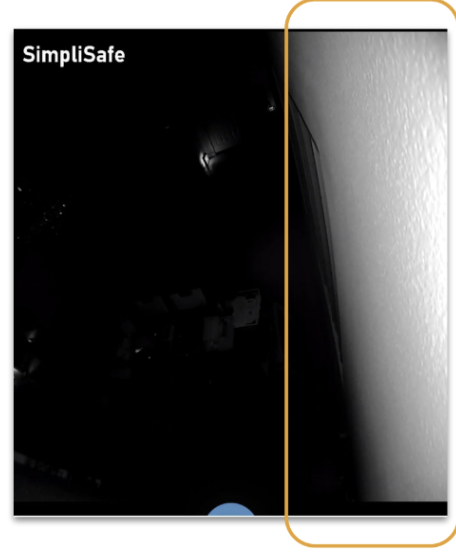
We recommend ensuring that your camera is not pointed towards or near a wall, ceiling, or flat surface underneath. Large surfaces like this reflect IR light and wash out the remaining video (see the image below for an example of this). If the camera is on a shelf, place it near the edge to avoid obstructions. Additionally, confirm that the protective film has been removed from the camera lens. This should have been done during the installation process, but sometimes this step can be missed and interfere with your camera capturing footage adequately!
Related Articles
Help Center Article
•
Cameras
Outdoor Camera has a Blinking Blue Light
In a normal state, a blinking or flashing blue light indicates that the Outdoor Camera is sending data, specifically actively livestreaming or recording to your timeline.
In very rare instances the Outdoor Camera may become unresponsive after reconnecting its power cable or recharging the battery. You may see the LED on the camera start to flash blue - indicating that the unit is actively attempting to send data - but in-app behavior will highlight that it’s not allowing live streams or sending recordings to your timeline.
To troubleshoot this, you’ll need to remove your camera from your SimpliSafe® system, then factory reset it. Once reset you’ll add the Outdoor Camera back to your system. We also recommend that you ensure that your battery is correctly installed in your Outdoor Camera before proceeding, as well.
Note: It’s important to download any recordings from your SimpliSafe® App before taking the steps below.
Removing the Outdoor Camera From Your System
Open the SimpliSafe® Mobile App on your phone or tablet
Choose My System from the bottom navigation bar
Select Camera Settings
Tap on the Outdoor Camera you wish to remove from the list of available cameras
Scroll to the bottom and choose X Remove Camera
Resetting Your Outdoor Camera
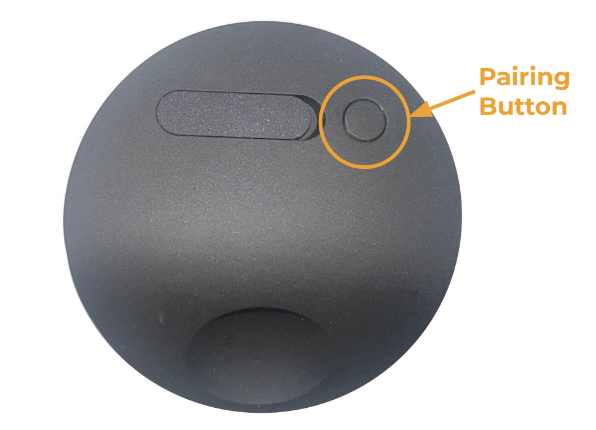
Locate the pairing button on the backside of the Outdoor Camera
This is the smaller, circular button on the backside of the camera
Press and hold the pairing button firmly, using both thumbs if possible for 30 seconds – or until the camera chimes
If the camera does not chime at any point during the 30 seconds of pressing the button, let go and hold and press the button again for another 30 seconds
You’ll know that these steps were successful as the Outdoor Camera will begin to flash white
Reinstalling Your Outdoor Camera
Once the Outdoor Camera has been reset, you'll need to reinstall it using the steps below.
Open the SimpliSafe® Mobile App on your phone or tablet
Choose the three-bar menu in the upper left corner of the app
Select Add Device or Camera
Choose Outdoor Camera from the list of available products
Follow the in-app prompts to add your Outdoor Camera back to your system
Still Need Help?
If you are still having trouble after performing a reset on your Wireless Outdoor Security Camera, please contact our support team for further assistance.
Help Center Article
•
Cameras
How to Remove a Camera from your SimpliSafe® System
You can remove a camera from your system in a few easy steps within the SimpliSafe® Mobile App.
We recommend that you download recordings from your system's timeline before removing the camera from your system, to ensure you preserve any video you may need in the future.
Remove a Camera from the SimpliSafe® Mobile App:
Open the SimpliSafe® Mobile App on your phone or tablet
Choose My System from the bottom navigation bar
Select Camera Settings
Tap on the camera you wish to remove from the list of available cameras
Scroll down and choose X Remove Camera
Help Center Article
•
Cameras
Video Recordings for Camera not showing up on Timeline
Video recordings are only available to users who are subscribed to select monitoring plans. If you do have a monitoring subscription and are not seeing videos from your cameras on your timeline in the SimpliSafe® Mobile App, you’ll need to ensure that “Motion Events” are turned ON within the motion detection settings.
Open the SimpliSafe® Mobile App on your phone or tablet
Choose My System from the bottom navigation bar
Select Camera Settings
Choose the camera you wish to make changes for
Select Motion Detection
Toggle Motion Events ON
Click Save in the upper right corner to save your settings before exiting
Help Center Article
•
Cameras
How to Recharge the Outdoor Security Camera Series 2 Battery
The Outdoor Security Camera Series 2 has a rechargeable battery that lasts up to 3 months depending on settings and usage. If you plan on using your Outdoor Security Camera Series 2 with SimpliSafe® Active Guard Outdoor Protection, you will need to plug your camera into power using the outdoor power cable.
To remove the battery, simply untwist the front of the camera off of your Outdoor Camera Series 2. Then, use the pull tab on the battery to gently remove it from the battery compartment.
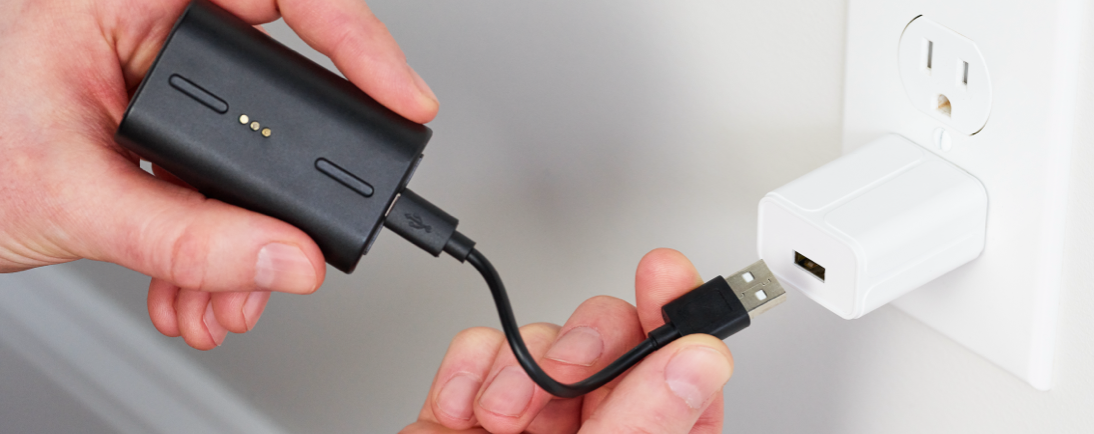
To charge your battery, you’ll need a USB power brick that supports 5V, 1.5A+ (7.5W+) charging. Using the supplied cable, plug the battery into the power brick to charge your battery. To fully charge your battery, it can take up to 6 hours. You’ll know the battery is fully charged once all 3 lights are illuminated and no longer pulsing.
To replace your battery, slide it back into the battery compartment in the Outdoor Camera Series 2 with the 3 gold circles on the battery facing up and the battery’s tab facing outwards. Then, twist the cap back onto the Outdoor Camera Series 2 clockwise until you hear it click.
You’ll know that your Outdoor Camera Series 2 has been assembled properly once it makes a high-pitched chime.
Help Center Article
•
Outdoor Cameras