Conversation List
Maximising Battery Life of the Wireless Outdoor Security Camera
One of the most exciting features of the Outdoor Camera is its wireless power capability and long-lasting battery life. When fully charged, the battery is designed to last for up to 3 months. And since the life of the battery is completely dependent on usage and settings, there are several methods that can be used to maximise the battery of your camera and keep your home protected 24/7.
Camera Location
Your camera is activated by a motion sensor for accurate alerts. If your camera is in the vicinity of a high-traffic area, like a busy road or sidewalk, the motion sensor will be triggered more frequently for unnecessary movement, which can cause the battery to drain.
If your camera is in a high-traffic area:
Reposition the camera so that its field of view does not include the busy road or sidewalk. You can also set up Activity Zones to avoid monitoring these areas.
Make sure there are no tree branches or large plants obstructing the camera's view.
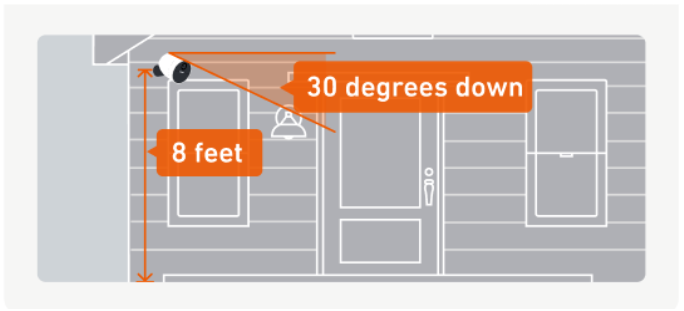
Be sure to mount your camera 6 – 8 feet above the ground, with the lens facing downward at a 30-degree angle.
Camera Settings
There are multiple settings that can be adjusted to help extend the battery life of your camera. To access these settings in the SimpliSafe® Mobile App:
Choose the Camera tab from the bottom navigation bar
Select the gear icon for Camera Settings in the upper right corner
Tap on your Outdoor Camera
Battery-saving settings:
Lower your camera’s motion sensitivity setting to Default or Low. This will impact how frequently the camera is triggered.
Enable People-Only Detection to ensure your camera is only capturing humans, and is not unnecessarily triggered by other moving objects or animals.
Set up Activity Zones to control the areas that the camera will monitor. This is helpful if there is a high-traffic zone in the view that you do not need to monitor.
Use Standard Night Vision mode instead of the Spotlight feature.
Charge the Camera’s Battery Fully
Charge it Completely
If the Outdoor Camera’s battery is not completely charged, it will give the appearance of draining quickly. The Outdoor Camera’s battery takes up to 6 hours to charge completely. When the battery is charging, you will see a blinking white light. You’ll know the battery is fully charged once all 3 lights are illuminated and no longer blinking.
Use the Correct Power Adapter
The Outdoor Camera’s battery requires a USB power adapter with an output of 5.0V, 1.5A+. Failure to use the correct power adapter can result in the battery not charging completely.
A list of power adapters that fit this requirement are:
The SimpliCam® Wired Indoor Security Camera’s adapter
The Smart Alarm Wireless Indoor Security Camera’s adapter
Most iPhone (Apple) adapters
Most Android adapters
If you don’t know the output of your power adapter, most models will have it printed on the device itself, as seen in the image below.

If you are using the correct power adapter, make sure that you are plugging it into an outlet directly in a wall. Using a USB power strip or USB power hub may not supply efficient power to charge the battery.
Help Center Article
•
Outdoor Cameras
Can’t Connect Camera to Wi-Fi After Setup
If your camera had previously been set up but is now failing to connect to your Wi-Fi network, the Connection Check tool in the SimpliSafe® mobile app will tell you if there are any issues between your network and camera.
How to Run a Connection Check:
Open the SimpliSafe® mobile app
Tap on the Cameras tab on the bottom of the screen
Select the gear icon in the upper right corner
Choose your camera
Select Connection Check and follow the on-screen instructions to test your signal strength and upload speeds
Using your results, you can improve your camera’s connection with the tips below.
Camera Wi-Fi Requirements:
Signal strength should be above -55dBm. A lower number means a weaker connection between your camera and Wi-Fi router.
If you have a low signal strength, try troubleshooting your Wi-Fi network
Upload speeds need to be above 2Mpbs
If your upload speed is below 2Mbps, you may need to contact your Internet Service Provider (ISP) to upgrade your Internet package.
If your upload speed is exactly 2Mbps, you should take these steps to improve your upload speed.
Help Center Article
•
Cameras
Delayed Live Streaming for the Wireless Outdoor Security Camera
Live stream delays can occur for a variety of reasons, most commonly stemming due to the camera’s “deep sleep” state it enters when not in use. When a live stream is initiated, the camera must first wake up and then connect to Wi-Fi to start the stream. This process can take up to 10 seconds.
If you are concerned about this delay or are experiencing a delay longer than 10 to 15 seconds, you can try the below steps to troubleshoot your camera’s Wi-Fi and system connectivity
Move the Base Station closer to the camera
Ensure your Base Station is connected to Wi-Fi
Plug your camera into a continuous power source using the Outdoor Camera Power Cable. Doing this will enable performance mode, allowing your camera to remain awake and responsive
Bring the camera and your internet router close together
If the Camera works in this position, there may have been too great a distance between the devices and you will need to install the camera closer to your internet router
You can also purchase a Wi-Fi extender to extend the range of your Wi-Fi
If the camera still does not connect when it is right next to your router, you may be experiencing Wi-Fi connectivity issues; in this case, you can try to troubleshoot your Wi-Fi connection.
Help Center Article
•
Outdoor Cameras
What does “Unable to Stream Video” mean?
What it Means
An "Unable to Stream Video" error means that the app was unable to download and display the streamable video. As this is likely an issue on the app end, our team is notified of these errors and investigates promptly to ensure your video is back up for streaming as soon as possible. You can try streaming this video again later.
Is There Anything I Can Do?
As mentioned above, this is likely due to an error on our end. However, in the meantime you can also check your Wi-Fi connectivity strength and speed as that can affect your camera's ability to stream and record video. This article explains the difference between connection strength and speed, as well as how to make sure both are working as they should to support your SimpliSafe system.
If the issue persists, please contact out customer support team. We'll be happy to help!
Help Center Article
•
Cameras
Wireless Outdoor Security Camera Won't Hold A Charge
The Wireless Outdoor Security Camera has an expected battery life of 3 months; however, its lifespan is dependent on usage and the settings on your Outdoor Camera. You can learn more in this article about preserving the battery life of the Outdoor Camera.
If you notice that your Outdoor Camera’s battery won’t hold a charge, see our recommended troubleshooting steps below.
Make Sure That the Battery is Charging Completely
The Outdoor Camera’s battery takes up to 6 hours to charge completely. When the battery is charging, you will see a blinking white light. You’ll know the battery is fully charged once all 3 lights are illuminated and no longer blinking.
Use the Correct Power Adapter
The Outdoor Camera’s battery requires a USB power adapter with an output of 5.0V, 1.5A+. Failure to use the correct power adapter can result in the battery not charging completely.
A list of power adapters that fit this requirement are:
The SimpliCam® Wired Indoor Security Camera’s adapter
Most iPhone (Apple) adapters
Most Android adapters
If you don’t know the output of your power adapter, most models will have it printed on the device itself, as seen in the image below.

If you are using the correct power adapter, make sure that you are plugging it into an outlet directly in a wall. Using a USB power strip or USB power hub may not supply efficient power to charge the battery.
Assemble the Camera and Battery Properly
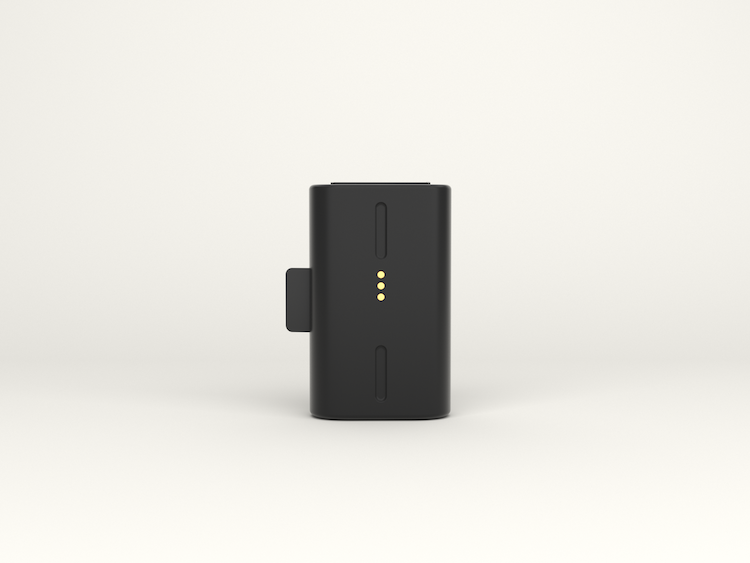
Once the Outdoor Camera’s battery has finished charging, make sure that you put it back into the camera properly. When inserting the battery into the Outdoor Camera, the 3 gold circles on the battery should be facing up and align with the three gold prongs inside the camera’s battery slot. The camera’s battery tab should also be facing you.
After inserting the battery, secure the lens to the camera by twisting it clockwise until it no longer moves.
You’ll know that your Outdoor Camera has been assembled properly once it makes a high pitched chime and begins to flash white.
Keep Your Outdoor Camera’s Firmware Up To Date
We’re always adding updates to the Outdoor Camera’s firmware to keep it running smoothly and to help with its battery life. Firmware updates on the Outdoor Camera are automatic, so make sure that you keep your cameras connected to Wi-Fi to get the latest updates.
If you have taken the above steps and your Outdoor Camera’s battery still won’t hold a charge, we also offer products to keep the battery charged.
Outdoor Camera Solar Panel
With the Outdoor Camera Solar Panel, you won’t have to worry about taking your Outdoor Camera’s battery out to charge it. With just 3 hours of direct sunlight a day, the Outdoor Camera Solar Panel will keep your battery charged! To learn more about this product, visit the Wireless Outdoor Camera Solar Panel article.
Outdoor Camera Charging Cable
If you live in a cloudy region or your home doesn’t get sufficient sunlight, we also offer an Outdoor Camera Charging Cable to help keep your Outdoor Camera’s battery charged 24/7! With a 25ft water-resistant cable this cord will easily be able to reach wherever your Outdoor Camera is installed.
Help Center Article
•
Outdoor Cameras
How to Reset the Wireless Outdoor Security Camera
If your Wireless Outdoor Security Camera encounters an error that can’t be fixed through normal troubleshooting, performing a factory reset* of the camera may be necessary.
First, you’ll need to remove the Outdoor Camera from the SimpliSafe® Mobile App.
To remove the camera:
Open the SimpliSafe® Mobile App on your phone or tablet
Choose the Cameras tab from the bottom navigation bar
Select the gear icon for Camera Settings in the upper right corner of the app
Select your Outdoor Camera
Scroll to the bottom and select Remove Camera
Once the Outdoor Camera has been removed from your system, you’ll need to reset it.
To reset your Outdoor Camera:
Locate the pairing button on the back of your Outdoor Camera
This is the smaller, circular button on the back of the camera

Press and hold the pairing button firmly, using both thumbs if possible, for 30 seconds - or until the camera chimes
If the camera does not chime at any point during the 30 seconds of pressing the button, let go and press and hold the button again for another 30 seconds
When you release the button, the camera should reboot and begin to flash white
For some cameras you may also notice it make a sound
Once the reset is complete, you can set it back up using our Installation Guide.
If you cannot set up your Outdoor Camera after performing a factory reset on it, please contact our support team for additional troubleshooting.
*Please note that you cannot reset the Outdoor Camera remotely. You must be with your camera physically to reset it.
Help Center Article
•
Outdoor Cameras
How to Remove a Camera from your SimpliSafe® System
You can remove a camera from your system in a few easy steps within the SimpliSafe® Mobile App.
We recommend that you download recordings from your system's timeline before removing the camera from your system, to ensure you preserve any video you may need in the future.
Remove a Camera from the SimpliSafe® Mobile App:
Open the SimpliSafe® Mobile App on your phone or tablet
Choose My System from the bottom navigation bar
Select Camera Settings
Tap on the camera you wish to remove from the list of available cameras
Scroll down and choose X Remove Camera
Help Center Article
•
Cameras