‎Outdoor Camera UK | Page 2 | SimpliSafe Support Home

Conversation List

Filter by

  • Camera Motion Detection by System Arming State

    Overview

    You can customize your SimpliSafe® cameras even further by changing the motion detection to coincide with your system’s arming state. This means you can now adjust when your camera records as it is directly tied to your system’s arming state. 

    For example, if you don’t want your camera to record when the system is set to OFF, but do want it to record when it is in AWAY mode, you can now control these settings.

    Motion notifications are determined by your monitoring subscription. You can learn more about which monitoring plans include push or SMS notifications on our Help Center.

    Supported Cameras

    The following cameras are compatible with motion detection set by arming state:

    • Outdoor Camera Series 2

    • Wireless Outdoor Security Camera

    • Smart Alarm Indoor Camera

    How to Change These Settings

    To change your motion detection based on the arming state:

    1. Open the SimpliSafe® Mobile App on your phone or tablet

    2. Choose My System from the bottom navigation bar

    3. Select Camera Settings

    4. Tap on the camera you wish to manage

    5. Under Camera Behavior, tap on your arming state to adjust the settings

    6. Toggle ON or OFF Motion Detection, as needed

    7. Choose SAVE in the upper right corner of the app to save your selections

    NOTE: your camera will not record unless motion is detected in any arming state when the arming state is configured to detect motion.

    Help Center Article

  • Activity Zones for Cameras

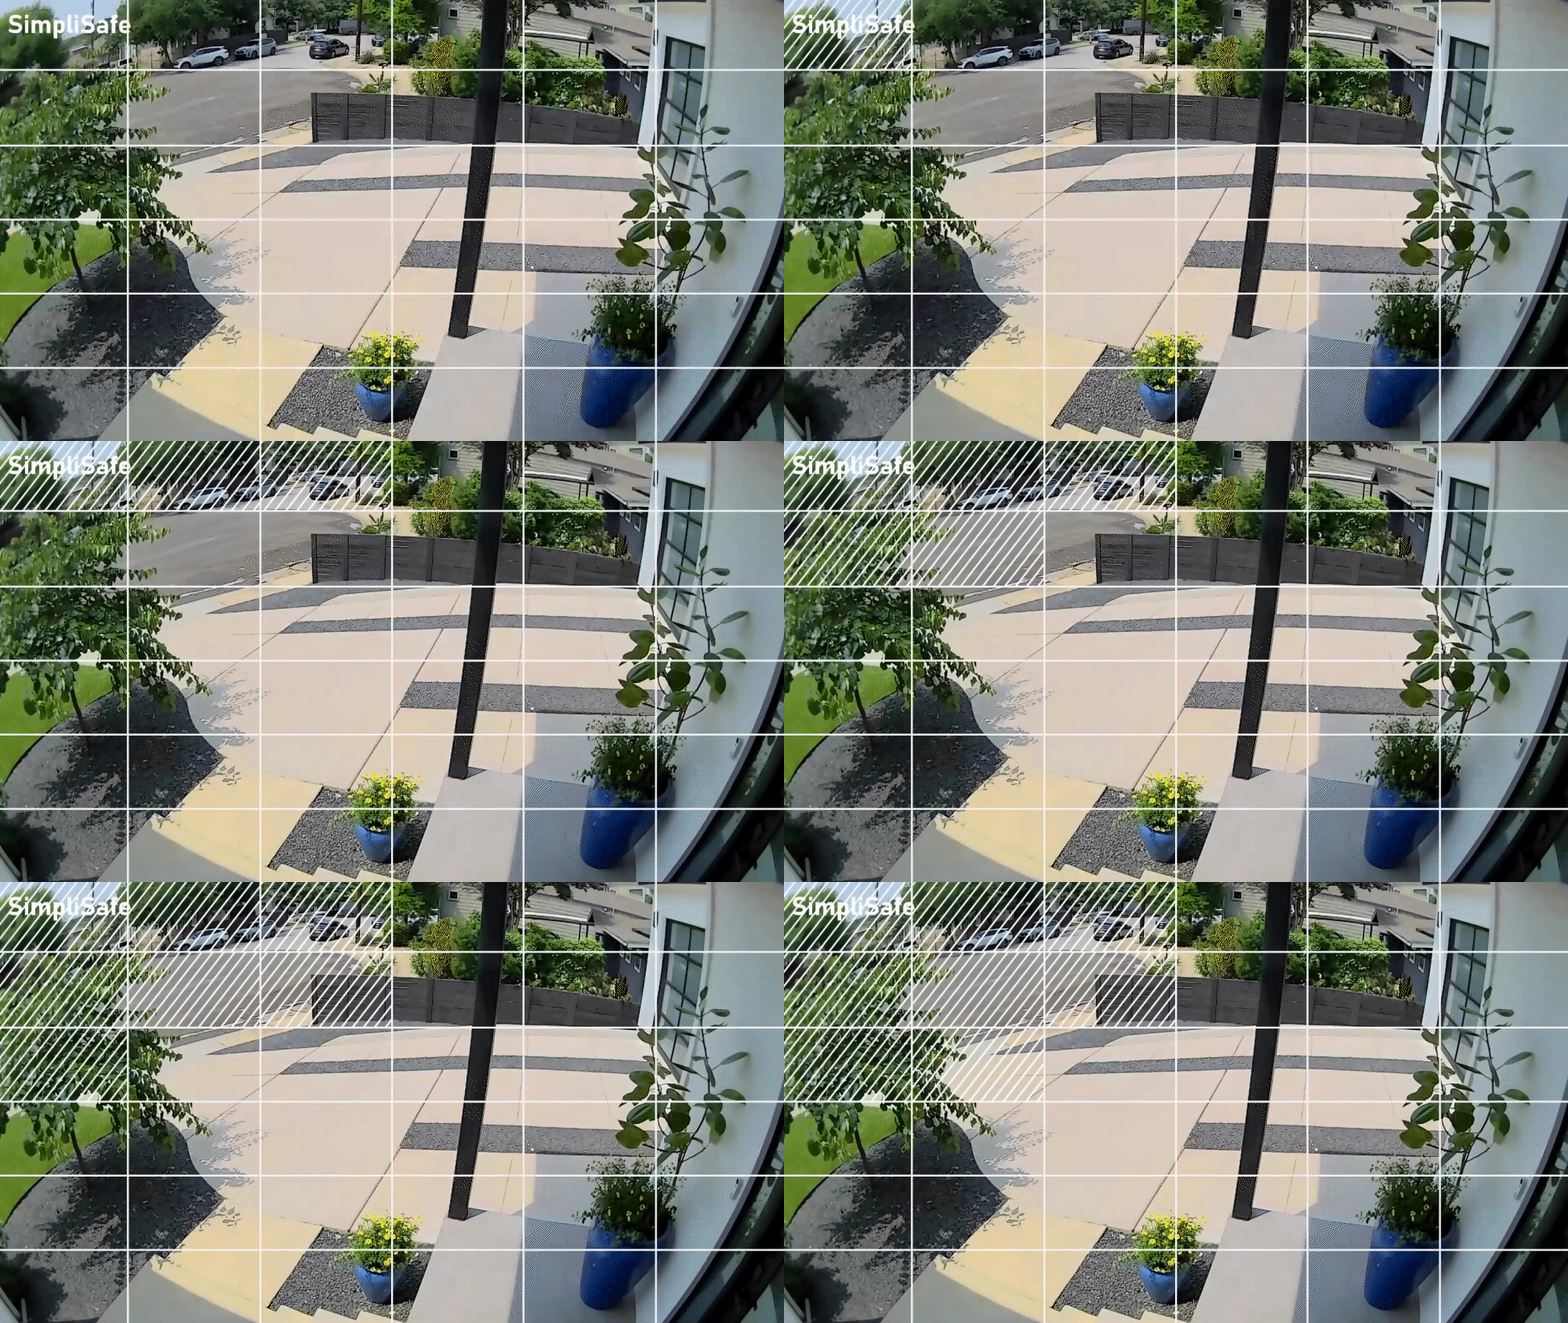
    Activity Zones are a great way to limit the number of motion detection alerts you receive from your camera inside and outside of your home. You’ll simply tap on the squares within your Motion Detection settings to exclude zones from triggering a motion event.
    Supported Cameras

    The following cameras support this functionality:

    • Outdoor Camera Series 2

    • Outdoor Camera

    • Smart Alarm Wireless Indoor Security Camera

    • Video Doorbell Pro

    Setting Up Activity Zones

    Activity Zones are managed under the Motion Detection menu, within the Camera Settings page of the SimpliSafe® Mobile App. You can follow these exact steps to navigate to that menu:

    1. Open the SimpliSafe® App on your phone or tablet and choose My System

    2. Select Camera Settings

    3. Tap on the supported camera from the list of available cameras

    4. Choose Motion Detection and scroll down to Activity Zone

    5. Tap on the squares you wish to exclude from motion detection. The diagonal lines that appear over the square mean that motion will no longer be detected in that zone

      1. Note: you can tap on the squares again to remove the exclusion

    6. Choose SAVE in the upper right corner of the app to save your selections

    Note: Video Doorbell Pro will ignore Activity Zones when All Motion is selected on the Motion Detection settings. You will need to choose People Only for Video Doorbell Pro in order for it to respect your Activity Zone exclusions.

    Turning Off Activity Zones

    If you ever need to turn off the Activity Zone exclusions, you can do so at any time from within the SimpliSafe® Mobile App.

    1. Open the SimpliSafe® App on your phone or tablet and choose My System

    2. Select Camera Settings

    3. Tap on the camera you wish to manage Activity Zones for, then select Motion Detection

    4. Tap on the squares you wish to include in motion detection. The diagonal lines will disappear indicating that motion detection is now on for that zone

    5. Choose SAVE in the upper right corner of the app to save your selections

    Help Center Article

  • How to Find the Serial Number for Your SimpliSafe® Device or Camera

    During troubleshooting or for account verification purposes, you may be required to identify the serial number for a product within your system. You can easily find the serial number for your devices or cameras within the SimpliSafe® Mobile App.

    Locating the Serial Number for your Base Station in the SimpliSafe® App

    1. Open the SimpliSafe® Mobile App on your phone or tablet

    2. Tap on the three-bar menu (hamburger menu) in the upper left corner of the app screen

    3. Choose Help & Support

    4. At the top of the menu you’ll see an Account Number

    5. This is the serial number for your Base Station

    Locating the Serial Number for your Devices or Cameras in the SimpliSafe® App

    1. Open the SimpliSafe® Mobile App on your phone or tablet

    2. Choose My System from the bottom navigation bar

    3. Select either Devices or Cameras to continue

    4. Tap on the Device or Camera you wish to manage

    5. Scroll down to Basic Info

    6. Your device or camera’s Serial Number will be listed here

    There may be a point where you need to find the serial number on the physical device itself. The rest of the article will guide you through finding the serial number for each product. Click to expand the collapsible section for the product type you wish to learn more about.

    Base Station Serial Number highlighted at the bottom of the product

    The serial number for the Base Station can be found on the bottom of the unit, right underneath the QR code.

    Remove the back of the keypad to expose the keypad serial number

    The serial number for the Keypad can be found underneath the battery cover, at the bottom of the device. Simply slide the Keypad off the bracket (battery cover), then turn it around and look towards the bottom of the battery compartment to see it. The serial number will be listed above the manufacturing date.

    The tab on the Key Fob with a red rectangle highlighting the device's serial number.

    The serial number for the Key Fob is found on the tab at the bottom of the device. Flip the Key Fob over so its back is facing you and look at the tab to find its number.

    Entry Sensor

    Entry sensor serial number on the back of product

    To find the serial number on the Entry Sensor, simply remove the Entry Sensor from its bracket. To remove it from the bracket, locate the pairing button on the sensor, then slide the sensor up towards the button. Once the sensor has been removed from the bracket, look at the battery and the serial number will be right above it.

    Motion Sensor Gen 1

    Slide the backing off the Motion Sensor Gen 1 to see the serial number

    The serial number for the Motion Sensor Gen 1 is located right above the sensitivity slider. To expose the battery compartment for viewing, gently grip the Motion Sensor and slide it up and off its bracket. You may need to wiggle it or use light force to push the sensor off the bracket. Once removed, look for the “sensitivity” embossed on the plastic. The serial number will be above it.

    Motion Sensor Gen 2

    Slide the backing off of the Motion Sensor Gen 2 to see the serial number

    The serial number for the Motion Sensor Gen 2 is located on the back side of the sensor in the upper right corner underneath the QR code. To locate it, remove the Motion Sensor Gen 2 from its’ bracket, by either wiggling it side to side then pushing up towards the pairing button. You may need to use light force to accomplish this. Once the battery is exposed, you’ll find the serial number in white text underneath the QR code.

    Glassbreak Sensor

    Slide off the backing of the Glassbreak Sensor to see the serial number

    The serial number for the Glassbreak Sensor is located above the sensitivity slider on the back of the device. To expose this area and the battery compartment, simply slide the Glassbreak Sensor off its bracket by wiggling it back and forth then up towards the pairing button. You may need to use light force to accomplish this. Once exposed, locate “sensitivity” embossed in the plastic, and you’ll find the serial number right above that.

    Panic Button

    Slide the front of the Panic Button up and off its bracket to expose the serial number

    The serial number for the Panic Button is located within the battery compartment for the product. To expose the battery compartment, slide the front of the Panic Button up and off its bracket - being careful not to press the Panic Button during this process! Once exposed, you’ll find the serial number at the bottom of the device.

    Extra Siren

    Serial number for Extra Sirens are on the back of the device, underneath the bracket

    The serial number for the Extra Siren can be found on the back of the device, underneath the bracket. To remove the Extra Siren from the bracket, simply slide it up and off the bracket. You may need to use light force to accomplish this. You do not need to remove the battery cover to see the serial number. You can find it at the bottom of the product, next to the QR code or in between the two screws at the bottom of the product.

    Temperature Sensor

    Serial number can found within the battery compartment on the device

    The serial number for the Temperature Sensor (Freeze Sensor) can be found within the battery compartment on the device. Simply slide the product off its bracket by wiggling it side to side then pushing up towards the pairing button on the product. You may need to use light force to accomplish this. Once the sensor is removed from its bracket, you can locate the serial number next to the QR code, at the bottom of the battery compartment.

    Water Sensor

    Serial Number can be found within the battery compartment.

    The serial number for the Water Sensor is within the battery compartment. To expose this, you’ll need to twist the Water Sensor base and top apart from one another, rotating it counterclockwise. Once they are separated, you’ll find the serial number below the battery, opposite of the QR code. If you need to reassemble the Water Sensor, line up the arrow on the top and bottom pieces, then twist them back together. They should seamlessly rotate to create a water-tight seal, so do not apply pressure or force them to go together if the arrows are not lined up.

    Smoke & Carbon Monoxide Detector

    Serial number can be found on the back of the device once removed from its bracket

    The serial number for the Smoke & Carbon Monoxide Detector can be found on the back of the device, after removing it from its bracket. To remove the Smoke & CO Detector from its bracket, rotate the detector counterclockwise. The serial number will be to the right of the QR code, in white text on the black background, right above the manufacturing date.
    To reassemble the Smoke & CO Detector, twist the detector back onto the bracket moving it clockwise. It should click into place once secured. If it’s not fully attached to the bracket, it could result in a tampering error, which can cause your Base Station to beep repeatedly, signifying the trouble signal.

    Carbon Monoxide Detector

    Serial number can be found on the back of the device once removed from bracket

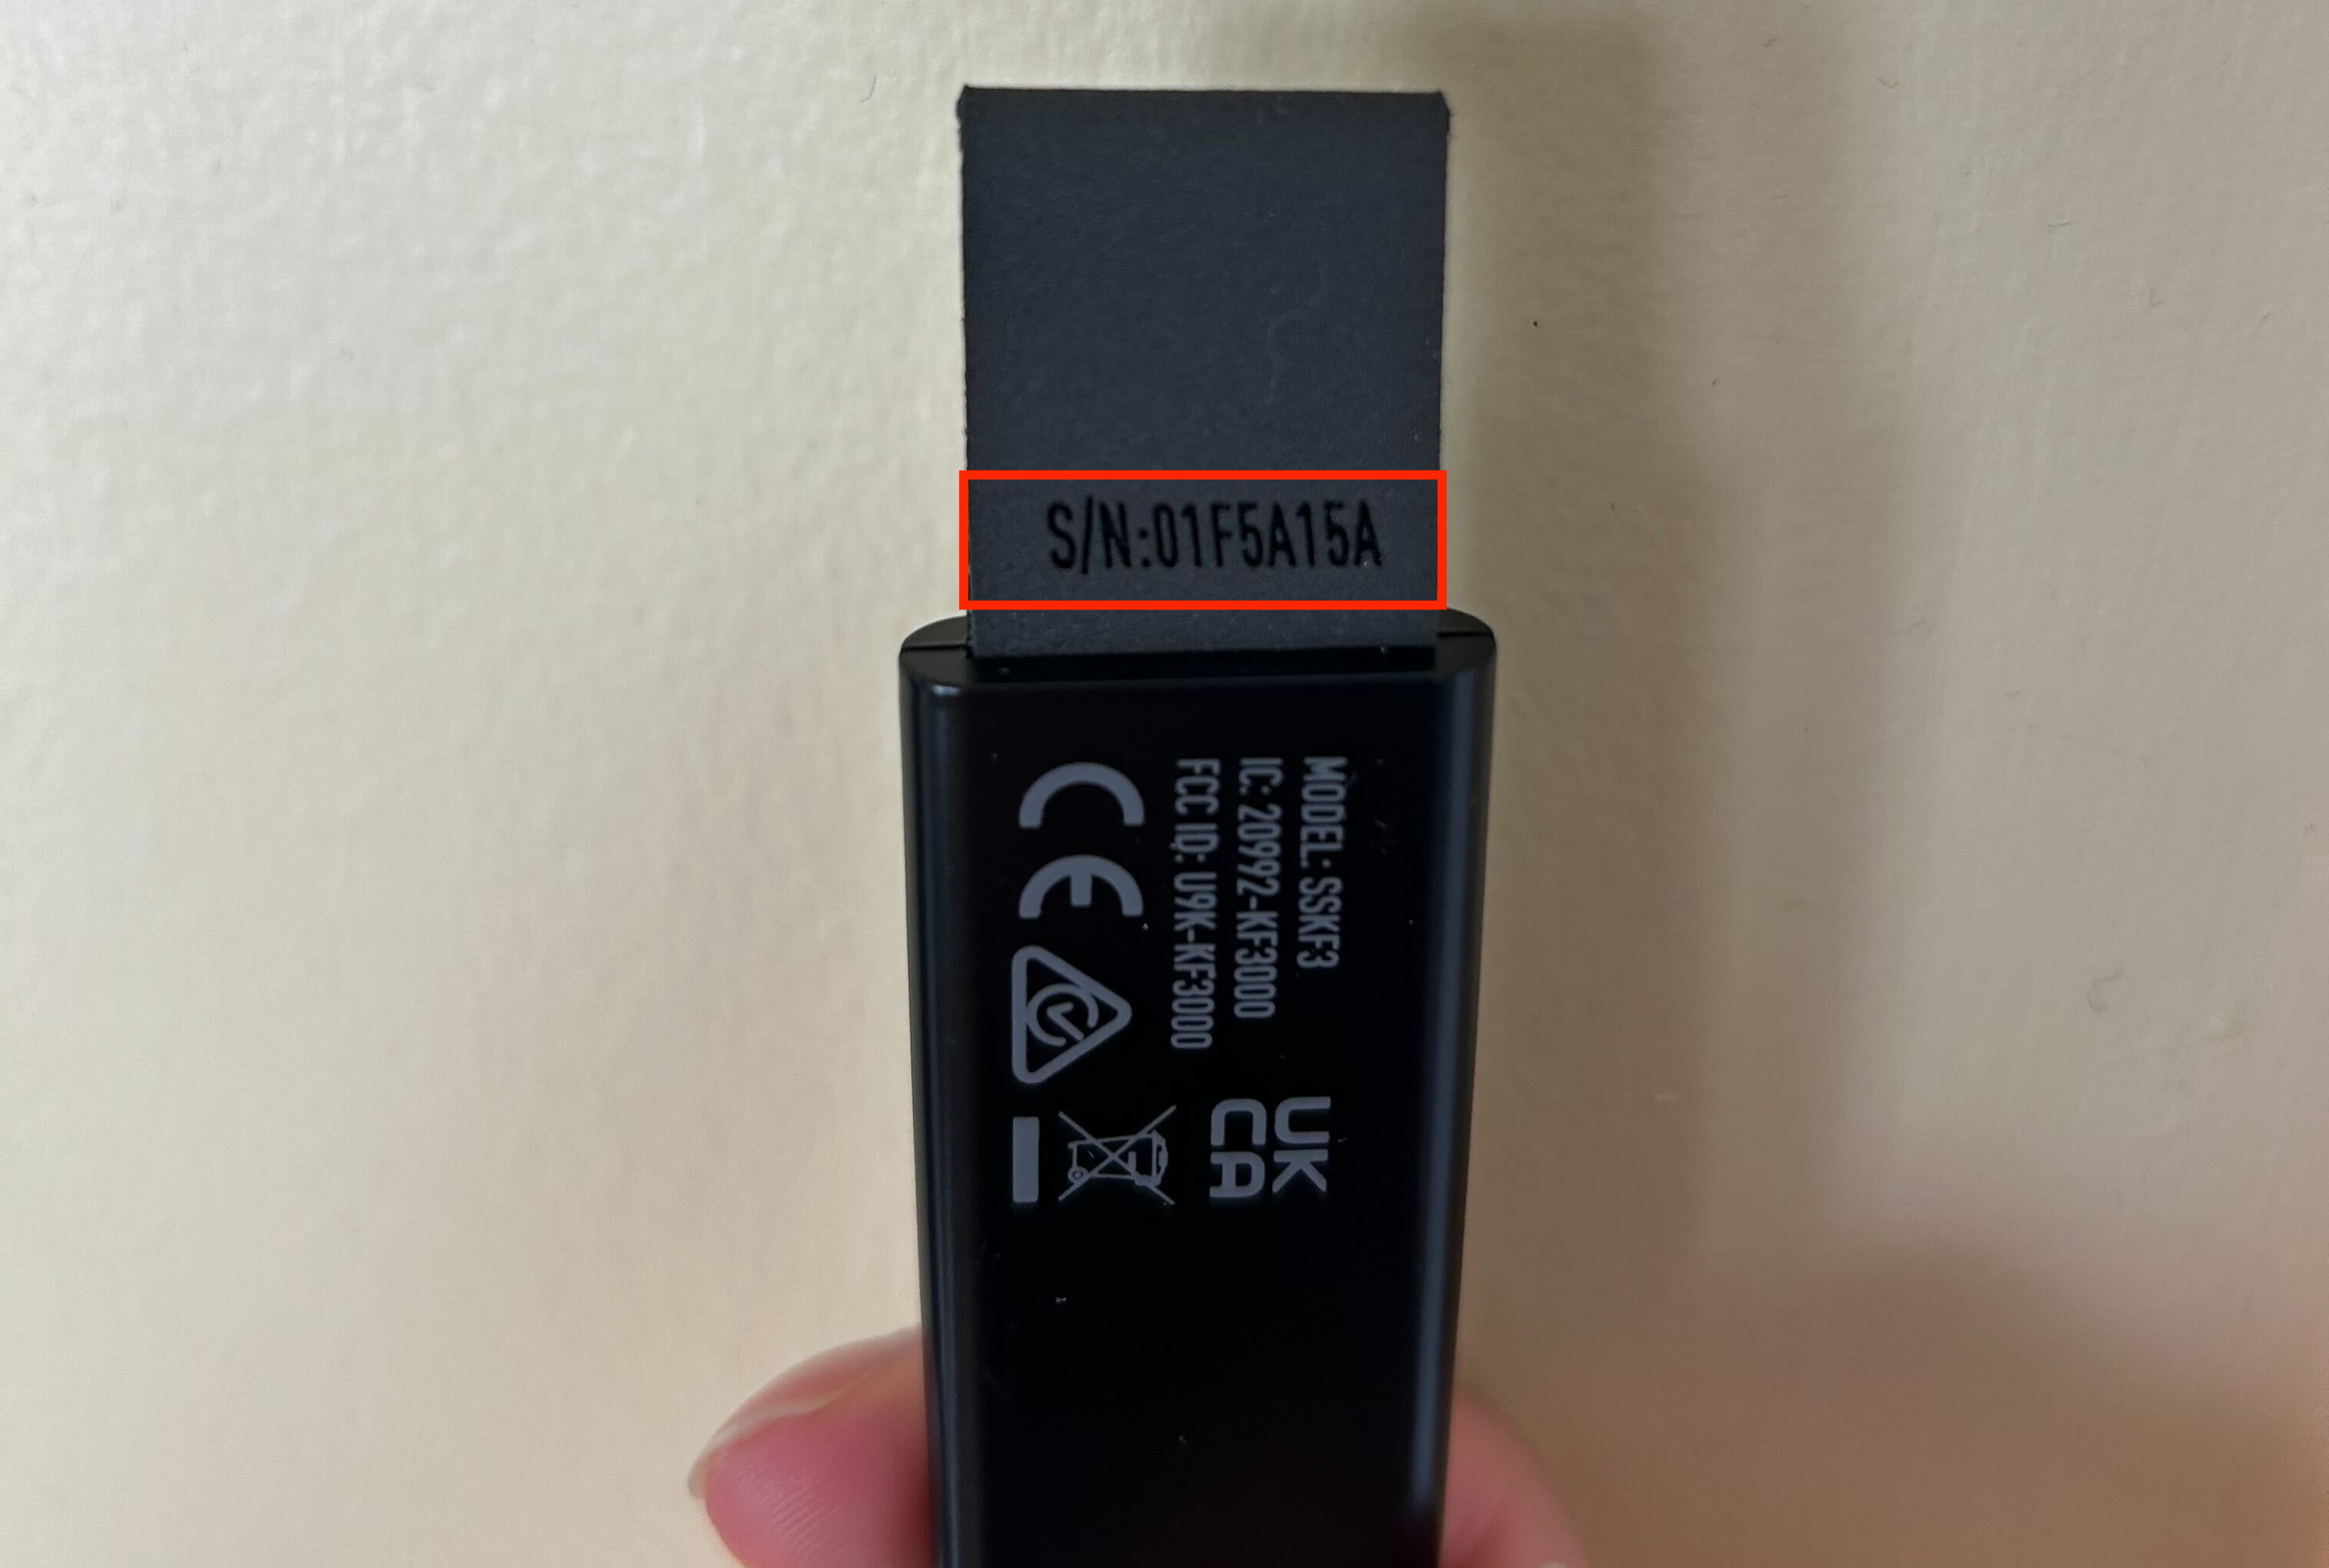
    The serial number for the Carbon Monoxide Detector can be found on the back of the device, after removing it from its bracket. To remove the CO Detector from its bracket, rotate the detector counterclockwise. The serial number is right above the center of the device on the back of the product. You can find it by looking for “S/N:” followed by a string of letters and numbers.

    To reassemble the CO Detector, twist the detector back onto the bracket moving it clockwise. It should click into place once secured. If it’s not fully attached to the bracket, it could result in a tampering error, which can cause your Base Station to beep repeatedly, signifying the trouble signal.

    Smoke Detector

    Serial number can be found on the outside of the device

    The serial number for the Smoke Detector can be found on the outside of the device, on a sticker that denotes “S/N:” followed by a string of numbers and letters. You may or may not need to remove the Smoke Detector from its bracket to view the serial number. If you need to remove it from its bracket, simply twist it counterclockwise.

    To reassemble the Smoke Detector, twist the detector back onto the bracket moving it clockwise. It should click into place once secured. If it’s not fully attached to the bracket, it could result in a tampering error, which can cause your Base Station to beep repeatedly, signifying the trouble signal.

    Outdoor Camera Series 2

    Serial number can be located on the back of the camera lens

    The serial number for the Outdoor Camera Series 2 is located on the back of the camera lens (or cap, as we call it). To remove the lens from the body of the camera, simply rotate the cap clockwise. Then, turn over the cap to expose the product information. You’ll find the serial number underneath the QR code, in white text on the black background.

    Outdoor Camera

    Serial number can be located on the back of the camera lens

    The serial number for the Outdoor Camera is located on the back of the camera lens (or cap, as we call it). To remove the lens from the body of the camera, simply rotate the cap clockwise. Then, turn over the cap to expose the product information. You’ll find the serial number to the left of the QR code, in white text on the black background.

    Video Doorbell Pro

    Serial number can be found on the back of the Video Doorbell Pro

    The serial number for the Video Doorbell Pro can be found on the back of the device. To remove the Video Doorbell Pro to expose the serial number, you’ll need to remove the security screw from the bottom of the device, using a T5 Torx Screwdriver. Once the screw has been removed, gently remove the Video Doorbell Pro faceplate from the bracket. Flip the camera over, and you’ll find the serial number underneath the Model Number, just to the right of the QR code.

    Smart Alarm Wireless Indoor Security Camera

    Serial number can be located on the back of the camera

    The serial number on the Smart Alarm Wireless Indoor Security Camera can be found on the backside of the camera, right underneath the QR code.

    SimpliCam® Wired Indoor Security Camera

    Serial number can be found on the back of the camera

    The serial number for the SimpliCam® Wired Indoor Security Camera can be found on the back of the SimpliCam®. There is a white sticker towards the top, and you’ll find the serial number underneath the Model Number to the right of the QR code.

    Smart Lock Series 2

    Serial number can be found right above the battery compartment on the back of the Smart Lock

    The serial number on the Smart Lock Series 2 can be found right above the battery compartment on the back of the Smart Lock. This is the part that is inside of your home or business, not outside of your door. To access it, slide the battery cover to the right to remove it. Then, locate the serial number in the center on the upper portion of the back of the Smart Lock itself.

    Smart Lock

    Serial number can be found on the back of the Smart Lock

    The serial number on the Smart Lock can be found on the back of the Smart Lock itself, the piece that goes inside your door. To remove this, you’ll need to use the included Release Tool. If you no longer have the release tool, you can always use a small flathead screwdriver, similar to one you would find in an eyeglass kit. 

    To remove the Smart Lock:

    1. Using the Release Tool (or a small flathead screwdriver) slide out the two wing latches on each side of the device

    2. After sliding out the wing latches, you can pull the Smart Lock off the door. 

    Once removed, you’ll find the serial number in the center right above the wing latches, right underneath the FCC ID embossed section.

    When it comes time to place the Smart Lock back on your door, refer to our Smart Lock Installation Guide on the Help Center.

    Help Center Article

  • Outdoor Camera Power Cable Overview and Installation Guide

    Overview

    The Outdoor Camera Power Cable is a great way to keep your Outdoor Camera powered at all times. The Outdoor Camera Power Cable comes with an outdoor rated power cable along with cable clips that can be applied to a clean surface with the built-in adhesives, or permanently attached to that surface using screws. We recommend a 5/64” drill bit to adhere the cable clips to a surface when not using the adhesive option.

    The Outdoor Camera Series 2 comes with a 16 foot cable, however, if you find your setup needs more flexibility, you can purchase a 25-foot cable from our website.

    When the Outdoor Camera is plugged in with the power cable, you’ll see faster live streams and enjoy pre-roll recordings with Performance Mode.

    How to Install

    1. Locate the port cover on the back of your Outdoor Camera

    2. Pull on it gently to remove it and reveal the port

    3. Insert the power cable into the port

    4. Press firmly with both thumbs or the palm of your hand to create a watertight seal

      1. Remember! The Outdoor Camera is weather resistant - not waterproof. Creating this seal is crucial to ensuring the electrical components stay dry!

    5. Plug in your power cable to a nearby outlet that is waterproof or rated for weather

    And that's it! Your Outdoor Camera will now receive power from a continuous power source, ensuring its always on and ready to capture motion events as they occur.


    Shop Compatible Products

    Help Center Article

  • Performance Mode for Cameras

    When connected to a continuous power source, the Outdoor Camera and Smart Alarm Wireless Indoor Security Camera can enter performance mode. 

    When performance mode is enabled for a camera, the camera will remain awake allowing for faster live streams versus battery power. This feature is available to the Outdoor Camera and Smart Alarm Indoor Camera when running firmware version 1.20 or higher, and occurs automatically when the camera is plugged into a power source and it has at least 90% charge. If your camera battery ever drops below 70%, your camera will automatically exit performance mode to conserve battery.

    Performance mode also allows the cameras to begin recording while it determines whether or not the observed motion event was a person or another object (such as a passing car, a tree blowing in the wind, or an indoor pet). This allows for more complete recordings of motion events delivered to your timeline in the SimpliSafe® Mobile App.

    Help Center Article

  • How to Reorder Cameras in the SimpliSafe® App

    An exciting feature of the SimpliSafe® App is the ability to reorder your list of cameras in the Cameras tab in the app*. This is helpful if you want to see your cameras in alphabetical order, or organized in any specific way. 

    An animated GIF showing the steps listed below on how to reorder your camera.

    To Reorder Your Cameras in the SimpliSafe® App:

    1. Open the SimpliSafe® App on your phone or tablet

    2. Select Cameras from the navigation bar on the bottom of the screen

    3. Tap on the reorder icon on the upper right corner of the screen

      The Cameras tab in the SimpliSafe® App, with an orange box highlighting the Reorder Cameras icon located on the top right corner of the app.

    4. Press and hold a camera to drag and reorder it

    5. Follow step 4 again for any other cameras you want to reorder

    *Note: This feature is only to reorder your cameras in the SimpliSafe® app. Changing the order of your sensors is currently not supported. 

    Help Center Article

  • How to Download Recordings From Your Camera

    Video clips from SimpliSafe® cameras can be downloaded to your mobile device using the SimpliSafe® Mobile App. Recordings are available with select monitoring plans

    Please note that if your camera name contains an apostrophe, this may limit your ability to download recordings. We recommend changing your camera’s name to exclude the use of an apostrophe before attempting to download any recordings. 

    How to Download Recordings Using the SimpliSafe® App:

    The SimpliSafe® App navigating to the timeline to select a video and download recordings

    1. In the SimpliSafe® App, tap on Timeline from the bottom navigation bar

    2. Swipe up and down through the Timeline and find the event whose clip you wish to download

    3. Tap on the event and then tap on the video preview within the event

    4. Tap the three-dot icon next to the recording and then choose Download Video

    5. The clip will be saved to your phone

      1. To access saved videos, go to your phone’s camera roll

    How to Download Recordings Using the SimpliSafe® Online Account

    1. Log into the SimpliSafe® Online Account using the browser of your choice

    2. Select Timeline from the navigation menu on the left side of the screen

      1. If you do not see the navigation menu, click the three-bar icon on the top left corner of the screen to reveal it

    3. Scroll through the Timeline and find the event with the video clip you wish to download

    4. Tap on the event and then tap on the video on the right side of the screen

    5. Tap the download icon on the bottom right side of the video player

    6. The clip will be saved to your computer

      1. To access saved videos, go to your downloaded files in your computer

    Is a Timestamp Included?

    When you download a video from your timeline, the date and time that the recording was filmed is found at the end of the file name.

    To find the timestamp, take the following steps:

    1. Open your camera roll

    2. Select the recording you downloaded

    3. Tap the i icon on the bottom of the screen to display the video’s file name

      1. This step may vary depending on your mobile device

    4. At the end of the file name, you will see the date and time the recording was filmed

    Note: the time stamp will be written in numbers, displayed as MM/DD/YYY_HH/MM/SS. So for a recording filmed on August 21, 2024 at 2:31:21 PM, the timestamp will be displayed as: 08212024_023121PM. 

    The recording history timeline for a SimpliSafe® camera in the SimpliSafe® Mobile App. File name of a downloaded SimpliSafe® camera recording with timestamp highlighted.

    Help Center Article