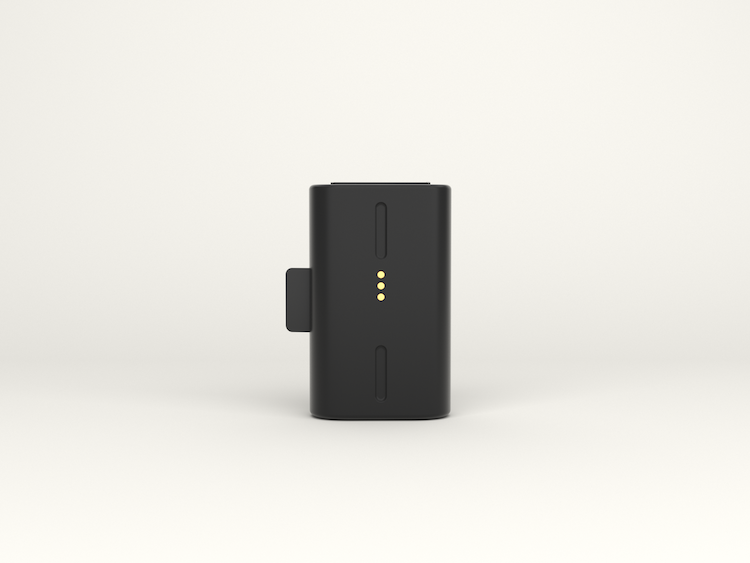
Outdoor Camera
Get the most out of your SimpliSafe system by getting answers to your questions and support for your devices.

Conversation List
Filter by
Can't Connect Camera to Wi-Fi During Setup
If you are having trouble connecting your camera to Wi-Fi during a first-time setup, we recommend making sure that your home network is configured to meet our system requirements.
A short list of requirements can be found below:
Your Wi-Fi network must be broadcasting 2.4GHz
SimpliSafe® cannot connect to 5GHz networks
Your SSID and password cannot exceed more than 31 characters each
Your network must be configured as WPA2 or WPA3/2 Mixed Mode
WPA3 only networks are not compatible with SimpliSafe® at this time
We recommend that you have your 2.4GHz and 5GHz networks separated and not merged together. Most routers and Internet Service Providers (ISPs) by default will create a single network that broadcasts 2.4GHz and 5GHz at the same time. To separate the network, you may need to consult with your ISP or reach out to your router manufacturer for configuration assistance.
COX and Xfinity default their network security settings to the WPA3 protocol. To connect the Base Station to Wi-Fi or install the SimpliSafe® cameras, you’ll need to temporarily change this to WPA2. Once these devices are set up, you can change this setting back to WPA3.
COX subscribers will need to reach out to their Internet Service Provider (ISP) to temporarily switch the network from WPA3 to WPA2 security.
Xfinity subscribers using the Xfinity gateway should be able to make these changes within the Xfinity Mobile App. Click on Wi-Fi from the bottom menu, then select Wi-Fi Details. Choose Edit Wi-Fi Settings. Under Security Mode change this setting to WPA2, then tap on Save to save your changes.
If your phone is currently connected to a 5GHz network and you have a 2.4GHz network available, please use your phone’s Wi-Fi settings to switch the network before trying to connect the camera to Wi-Fi again.
iPhone / iOS Wi-Fi Settings:
Go to Settings on your iOS device
Choose Wi-Fi
Select the 2.4GHz network from the list of available networks
Enter your password
Tap on Join in the upper right hand corner to connect to the Wi-Fi network
Android Wi-Fi Settings:
Go to Settings on your Android device
Navigate to Wi-Fi Network
Select your 2.4GHz network from the list of available networks
Enter your password
Save to connect to the Wi-Fi network
*These steps may vary depending on your Android device. Consult with your phone's manual for further directions.
Still having trouble connecting?
There are steps you can take if your camera keeps losing Wi-Fi Connection after setup. If you continue to have trouble after taking those steps, don’t hesitate to reach out to our Support Team for further assistance.
Help Center Article
•
Cameras
How to Change your Wi-Fi for your SimpliSafe® System
If you change your Wi-Fi network name and/or password for any reason (such as moving into a new home, or receiving a new router), you’ll need to update your SimpliSafe® System with the new credentials. You will always want to update the Base Station Wi-Fi first before proceeding to the camera steps. If you do not update your Base Station’s Wi-Fi first, you will be unable to reconnect Outdoor Cameras or any Smart Alarm Indoor Cameras.
Please note that your network will need to meet our system requirements to connect your system to Wi-Fi. At a very basic level, you will need a 2.4GHz wireless connection that’s configured as WPA2 or WPA2/3 Mixed Mode.
Connecting the Base Station to your new Wi-Fi using the SimpliSafe® Mobile App
Please note that these steps are only if you have a monitoring plan that supports built-in network backup. If you do not have a monitoring plan, please proceed to the Keypad steps below.
Open the SimpliSafe® Mobile App on your phone or tablet
Choose My System from the bottom navigation bar, followed by Base Station Settings
Tap on ‘WiFi Network’ and follow the in-app prompts to connect to your new network
Your app will state “Yay! Your Base Station is connected” if the credentials are correct.
Tap Done to exit the Wi-Fi setup mode
Connecting the Base Station to your new Wi-Fi using the Keypad
Using your Keypad, press the Menu button
Then, enter your Master PIN
Select System Settings
Then press the right side of the screen to choose Wi-Fi, followed by Edit
Next, choose your network from the list of available options by tapping “Use”
Enter your password by using the Keypad’s buttons to type in ABC mode (this is similar to T9 which was used for texting with older cell phones)
Changing Wi-Fi Networks for Cameras
Changing your Wi-Fi using the SimpliSafe® Mobile App
Open the SimpliSafe® Mobile App on your phone or tablet
Choose My System from the bottom navigation bar, followed by Camera Settings
Tap on the Camera you wish to change Wi-Fi for
Scroll down to Wi-Fi network and tap on it
Follow the in-app prompts to connect to your new network
If you run into any issues using the above steps or if your camera remains offline after changing the Wi-Fi network, we recommend removing the camera from your system and reinstalling it.
How to Remove a Camera from your System
Open the SimpliSafe® Mobile App on your phone or tablet
Choose My System from the bottom navigation bar, followed by Camera Settings
Tap on your camera from the list of available products
Scroll down to the bottom and tap on “X Remove Camera”
How to Re-install Your Camera
Using the SimpliSafe® Mobile App, tap on the three-bar menu (hamburger menu) in the upper left corner of the app
Choose “Add Device or Camera”
Then, select “Get Started” to proceed
Tap on the camera you wish to install from the list of available products
And follow the in-app instructions to add it back to your system
Remove your Camera from the SimpliSafe® App
Open the SimpliSafe® Mobile App on your phone or tablet
Choose My System from the bottom navigation bar, followed by Camera Settings
Tap on your Video Doorbell Pro
Scroll down to the bottom and tap on “X Remove Camera”
Re-install your Video Doorbell Pro Using the SimpliSafe® Mobile App
Using the SimpliSafe® Mobile App, tap on the three-bar menu (hamburger menu) in the upper left corner of the app
Choose “Add Device or Camera”
Then, select “Get Started” to proceed
Tap on Video Doorbell Pro from the list of available products
And follow the in-app instructions to add it back to your system
Remove your Camera from the SimpliSafe® App
Open the SimpliSafe® Mobile App on your phone or tablet
Choose My System from the bottom navigation bar, followed by Camera Settings
Tap on your SimpliCam® Wired Indoor Security Camera
Scroll down to the bottom and tap on “X Remove Camera”
Re-install your SimpliCam® Using the SimpliSafe® Mobile App
Using the SimpliSafe® Mobile App, tap on the three-bar menu (hamburger menu) in the upper left corner of the app
Choose “Add Device or Camera”
Then, select “Get Started” to proceed
Tap on SimpliCam® from the list of available products
And follow the in-app instructions to add it back to your system
Related Articles
Help Center Article
•
Cameras
How to Resolve the "No Video" Error for SimpliSafe® Cameras
The error “No Video” means that while recording, the camera disconnected from SimpliSafe® and the video was not able to be saved. This may indicate that a portion or the entirety of the video was lost, and unfortunately will not be able to be recovered.
There are a few steps you can take to get your cameras back up and running smoothly. Please note that while “No Video” errors caused by a loss of power to your location’s Wi-Fi router are not necessarily preventable, your system does have a fallback to run off a built-in network backup connection* and 24-hour backup battery to ensure you’re protected at all times. Note that the built-in network backup connection only applies to the Base Station, and does not relay data to your cameras.
*Built-in network backup connection available with a professional monitoring plan.
Each SimpliSafe® camera needs an upload speed of at least 2Mbps. So if you have 5 cameras, you’ll need at least 10Mbps to allow cameras to record without an issue at the same time should an alarm occur, or if you use certain features within the SimpliSafe® Mobile App.
You can check your upload speed, along with signal strength using the in-app Connection Check tool.
Open the SimpliSafe® Mobile App on your phone or tablet
Choose My System from the bottom navigation bar
Select Camera Settings
Tap on the camera you wish to troubleshoot
Scroll down to Connection and tap on Connection Check
Press the “Start Connection Check” button to begin the test
What do my Results Mean?
Good Upload Speed
A good signal strength or upload speed means that there is a strong connection between your camera and Wi-Fi network.
Fair or Poor Upload Speed
If your upload speed is fair or poor, reduce the camera’s video resolution in its settings in the SimpliSafe® Mobile App. To do this:
Open the SimpliSafe® Mobile App on your phone or tablet
Choose My System from the bottom navigation bar
Select Camera Settings
Tap on the camera you wish to manage video resolution for
Navigate to “Video Quality” and choose a lower resolution
Don't forget to select SAVE in the upper right corner to save your selections
It may also be necessary to upgrade your internet package to improve your upload speed. We recommend reaching out to your internet service provider to learn more about their offerings.
Fair or Poor Signal Strength
If your signal strength is fair or poor, move your camera and Wi-Fi router closer together and then try running the Connection Check tool again. If your signal strength is still fair or poor, we recommend getting a Wi-Fi extender.
It may also help to connect your SimpliSafe® devices to a different Wi-Fi network. We recommend setting up a Guest Network on your Wi-Fi router and only connecting your SimpliSafe® devices to it. To learn more about setting up a Guest Network, reach out to your internet service provider.
If you change your Wi-Fi network name and/or password for any reason (such as moving into a new home, or receiving a new router), you’ll need to update your SimpliSafe® System with the new Wi-Fi credentials. You will always want to update the Base Station Wi-Fi first before proceeding to the camera steps. If you do not update your Base Station’s Wi-Fi first, you will be unable to reconnect Outdoor Cameras or any Smart Alarm Indoor Cameras.
Please note that your network will need to meet our system requirements to connect your system to Wi-Fi. At a very basic level, you will need a 2.4GHz wireless connection that’s configured as WPA2 or WPA2/3 Mixed Mode.
If you notice that multiple recordings for a single camera show a “No Video” error but your connection check is good, we recommend resetting your camera. You can find the steps to reset your camera on our Help Center.
Help Center Article
•
Cameras
App Error: Camera Disconnected
Overview
The app error “Camera Disconnected” can happen for several reasons, including if you’ve changed your Wi-Fi recently or if the camera battery has been replaced. The following article will walk you through a few troubleshooting scenarios to help get your camera back up and running. Use the collapsible sections below to go through each step one by one, as they apply to your situation.
Please note, you will need to be with your system to troubleshoot this issue. Remote troubleshooting is not possible.
If you moved, or changed Internet Service Providers (ISP), you’ll need to teach both your Base Station and Cameras the new Wi-Fi information.
To Connect your Base Station to Wi-Fi:
Open the SimpliSafe® Mobile App on your phone or tablet
Choose My System from the navigation menu at the bottom of the app screen
Select Base Station Settings
Tap on WiFi Network
Choose either Yes, Connect or Choose Another Network to proceed
Enter the password for your Wi-Fi network
Click Connect once finished
Your app will state Yay! Your Base Station is connected if the credentials are correct
Tap Done to exit the Wi-Fi setup mode
To Connect your Cameras to Wi-Fi:
There are different steps for connecting your camera to a new Wi-Fi network depending on the model you own. Please refer to the Changing Wi-Fi Networks for Cameras section in the How to Change Your Wi-Fi for Your SimpliSafe® System article for more details.
Network Configuration
If you’re having trouble connecting to Wi-Fi using the above steps, it is likely that your network does not meet our Wi-Fi Requirements. You must be using a 2.4GHz network, as SimpliSafe® cannot connect to 5GHz networks. Additionally, your network must be configured to support WPA2 or WPA2/3 Mixed Mode - as WPA3 is not supported at this time.
For assistance on configuring your network, contact your Internet Service Provider (ISP) or consult with your router manufacturer.
If you recently recharged your camera or its battery, the camera may display this error while it works to check back in with the Base Station. This can take some time to refresh, but if you want to refresh the connection sooner you can remove the camera from within the SimpliSafe® Mobile App, factory reset the camera, then re-install it. Make sure you download any recordings from your camera prior to taking these steps.
Step 1: Remove the Camera From the SimpliSafe® Mobile App:
Open the SimpliSafe® Mobile App on your phone or tablet
Choose My System
Select Camera Settings
Tap on the Camera you wish to remove from your system
Scroll down and tap on X Remove Camera
Choose YES on the pop up to remove the camera
Step 2: Reset Your Camera:
Each camera has a unique set of steps to factory reset it. Please follow the steps from the links below to reset your camera
Step 3: Re-Install Your Camera:
Once you have factory reset your camera, the last step is to re-install it. To re-install your camera:
Open the SimpliSafe® Mobile App on your phone or tablet
Navigate to the three-bar menu in the upper left corner of the app
Select Add Device or Camera
Followed by Let’s Go
Then choose your camera from the list of available products
And follow the in-app prompts to install it again
If you’ve taken the above steps and are still encountering this issue, it’s possible that you may need to remove the camera from your system, factory reset it, and then add it back to your system. Just make sure you download any recordings from your camera prior to taking these steps.
Step 1: Remove the Camera From the SimpliSafe® Mobile App:
Open the SimpliSafe® Mobile App on your phone or tablet
Choose My System
Select Camera Settings
Tap on the Camera you wish to remove from your system
Scroll down and tap on X Remove Camera
Choose YES on the pop up to remove the camera
Step 2: Reset Your Camera:
Each camera has a unique set of steps to factory reset it. Please follow the steps from the links below to reset your camera
Step 3: Re-Install Your Camera:
Once you have factory reset your camera, the last step is to re-install it. To re-install your camera:
Open the SimpliSafe® Mobile App on your phone or tablet
Navigate to the three-bar menu in the upper left corner of the app
Select Add Device or Camera
Followed by Let’s Go
Then choose your camera from the list of available products
And follow the in-app prompts to install it again
All SimpliSafe® cameras require a Wi-Fi connection to function. We recommend running the Connection Check Tool in the SimpliSafe® Mobile App as the next step to help identify and resolve any underlying network issues with the connection between your router, the Base Station and your Camera(s).
How to Use the Connection Check Tool
Tap the “Cameras” icon at the bottom of the SimpliSafe® mobile app
Choose the gear icon in the upper right corner
Select your camera
Under “Connection” select “Connection Check”
Tap “Start Connection Check” to find your camera’s connection strength
What do the Results Mean?
A good signal strength or good upload speed means that there’s a strong connection between your camera and Wi-Fi network.
Fair or Poor Upload Speeds indicate your bandwidth may not be high enough to support the streaming quality of your camera. You can try reducing your camera’s video resolution under Camera Settings.
Fair or Poor Signal Strength indicates that the router may be too far away, or there’s wireless or structural interference dampening the signal between the router and your camera(s). Try moving the router closer to your camera(s) then test again to see if performance has improved. You can also try purchasing and installing a Wi-Fi extender to relay your network should you be unable to move the router.
Some of our cameras need to check in with the Base Station in order to connect in the app. These cameras are Outdoor Camera Series 2, Outdoor Camera, and Smart Alarm Indoor Camera. You’ll want to ensure that your Base Station is placed in a central location within your home or business, free from any obstructions - both wireless and structural. Moving the Base Station closer to the camera(s) that are impacted can also help to get them back online.
A Wi-Fi Extender is a great way to provide supplemental Wi-Fi coverage to your Base Station and Cameras within your home or business.
Need to purchase a Wi-Fi Extender? You can find the TP-Link Wi-Fi Extender available for purchase on our website.
Help Center Article
•
Cameras
Recording Behavior for SimpliSafe® Cameras
Your SimpliSafe® cameras record* whenever they detect motion and during a number of system events to keep you updated about what is happening at your home or business. Refer to the chart below for a list of events that trigger a recording, and how long your cameras will record for.
How long can a camera record for?
Camera recordings depend on what event has triggered a recording.
Event Trigger
Recording Length
Alarm Event (Including Panic Button presses)
When an alarm is triggered, your cameras will record for 3 minutes
Duress PIN is entered on the Keypad or Smart Lock’s PIN Pad
When the Duress PIN in entered during any armed state, your cameras will record for 3 minutes
Entry Countdown
When the Base Station enters a countdown from an armed state, your cameras will record during the duration of the countdown
Motion
Your cameras will record for 10 seconds, or will continue to record if there is continued motion for up to 1 minute
System Disarmed
Whenever your system is disarmed from Away Mode, your cameras will record for 1 minute
Secret Alert
When a sensor triggers a Secret Alert, your cameras will record for 10 seconds
User-Initiated Test
When you put your system into Test Mode, your cameras will record for 1 minute
User-Initiated Recording
A user-initiated recording will record for up to 1 minute, or until the user cancels it
Power Restored
Whenever power is restored to your system after an outage, your cameras will record for 20 seconds
*Recording availability and storage in the SimpliSafe® Mobile App depends on your monitoring subscription.
Related Article:
Help Center Article
•
Outdoor Cameras
How to Rename a SimpliSafe® Camera
There may be a point where you need to rename a camera for your SimpliSafe® System. Renaming a camera can be done easily through the SimpliSafe® Mobile App, but you can also rename a camera using your Web App. You can select a name from the list of prepopulated names within the SimpliSafe® Mobile app, or choose your own custom name. If using a custom name, we recommend avoiding the use of apostrophes within the camera name - as this can impact the ability to download recordings.
The following article will walk you through these steps for each platform so you can pick whichever one is easiest for you.
SimpliSafe® Mobile App:
Open the SimpliSafe® Mobile App on your phone or tablet
Choose My System from the bottom navigation bar
Select Camera Settings
Tap on the Camera you wish to edit
Press the pencil icon next to your Camera to enter the editor
Choose from the list of preset names or select Custom Name to type in your own name
Depending on your device, you may also need to tap SAVE before exiting to save your selections
SimpliSafe® Online Account:
Log into your online account using the browser of your choice
Select your property from the list on the Account Overview page, if applicable
Choose Devices from the left-hand navigation menu
Click on the Camera you wish to edit
A pop-up will appear to the right of your browser
Select the pencil icon next to your Camera’s name
Enter the new name you wish to use in the field
Select the check mark when done
Be sure to click on Save Changes from the bottom of the pop-up before exiting to save your selection
Help Center Article
•
Cameras
Maximizing Battery Life of the Wireless Outdoor Security Camera
When fully charged, the battery is designed to last for up to 3 months. And since the life of the battery is completely dependent on usage and settings, there are several methods that can be used to maximize the battery of your camera and keep your home protected 24/7.
Camera Location
Your camera is activated by a motion sensor for accurate alerts. If your camera is in the vicinity of a high-traffic area, like a busy road or sidewalk, the motion sensor will be triggered more frequently for unnecessary movement, which can cause the battery to drain.
If your camera is in a high-traffic area:
Reposition the camera so that its field of view does not include the busy road or sidewalk. You can also set up Activity Zones to avoid monitoring these areas.
Make sure there are no tree branches or large plants obstructing the camera's view.
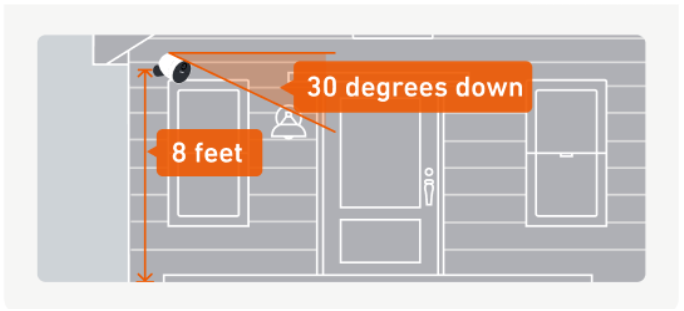
Be sure to mount your camera 6 - 8 feet above the ground, with the lens facing downward at a 30-degree angle.
Camera Settings
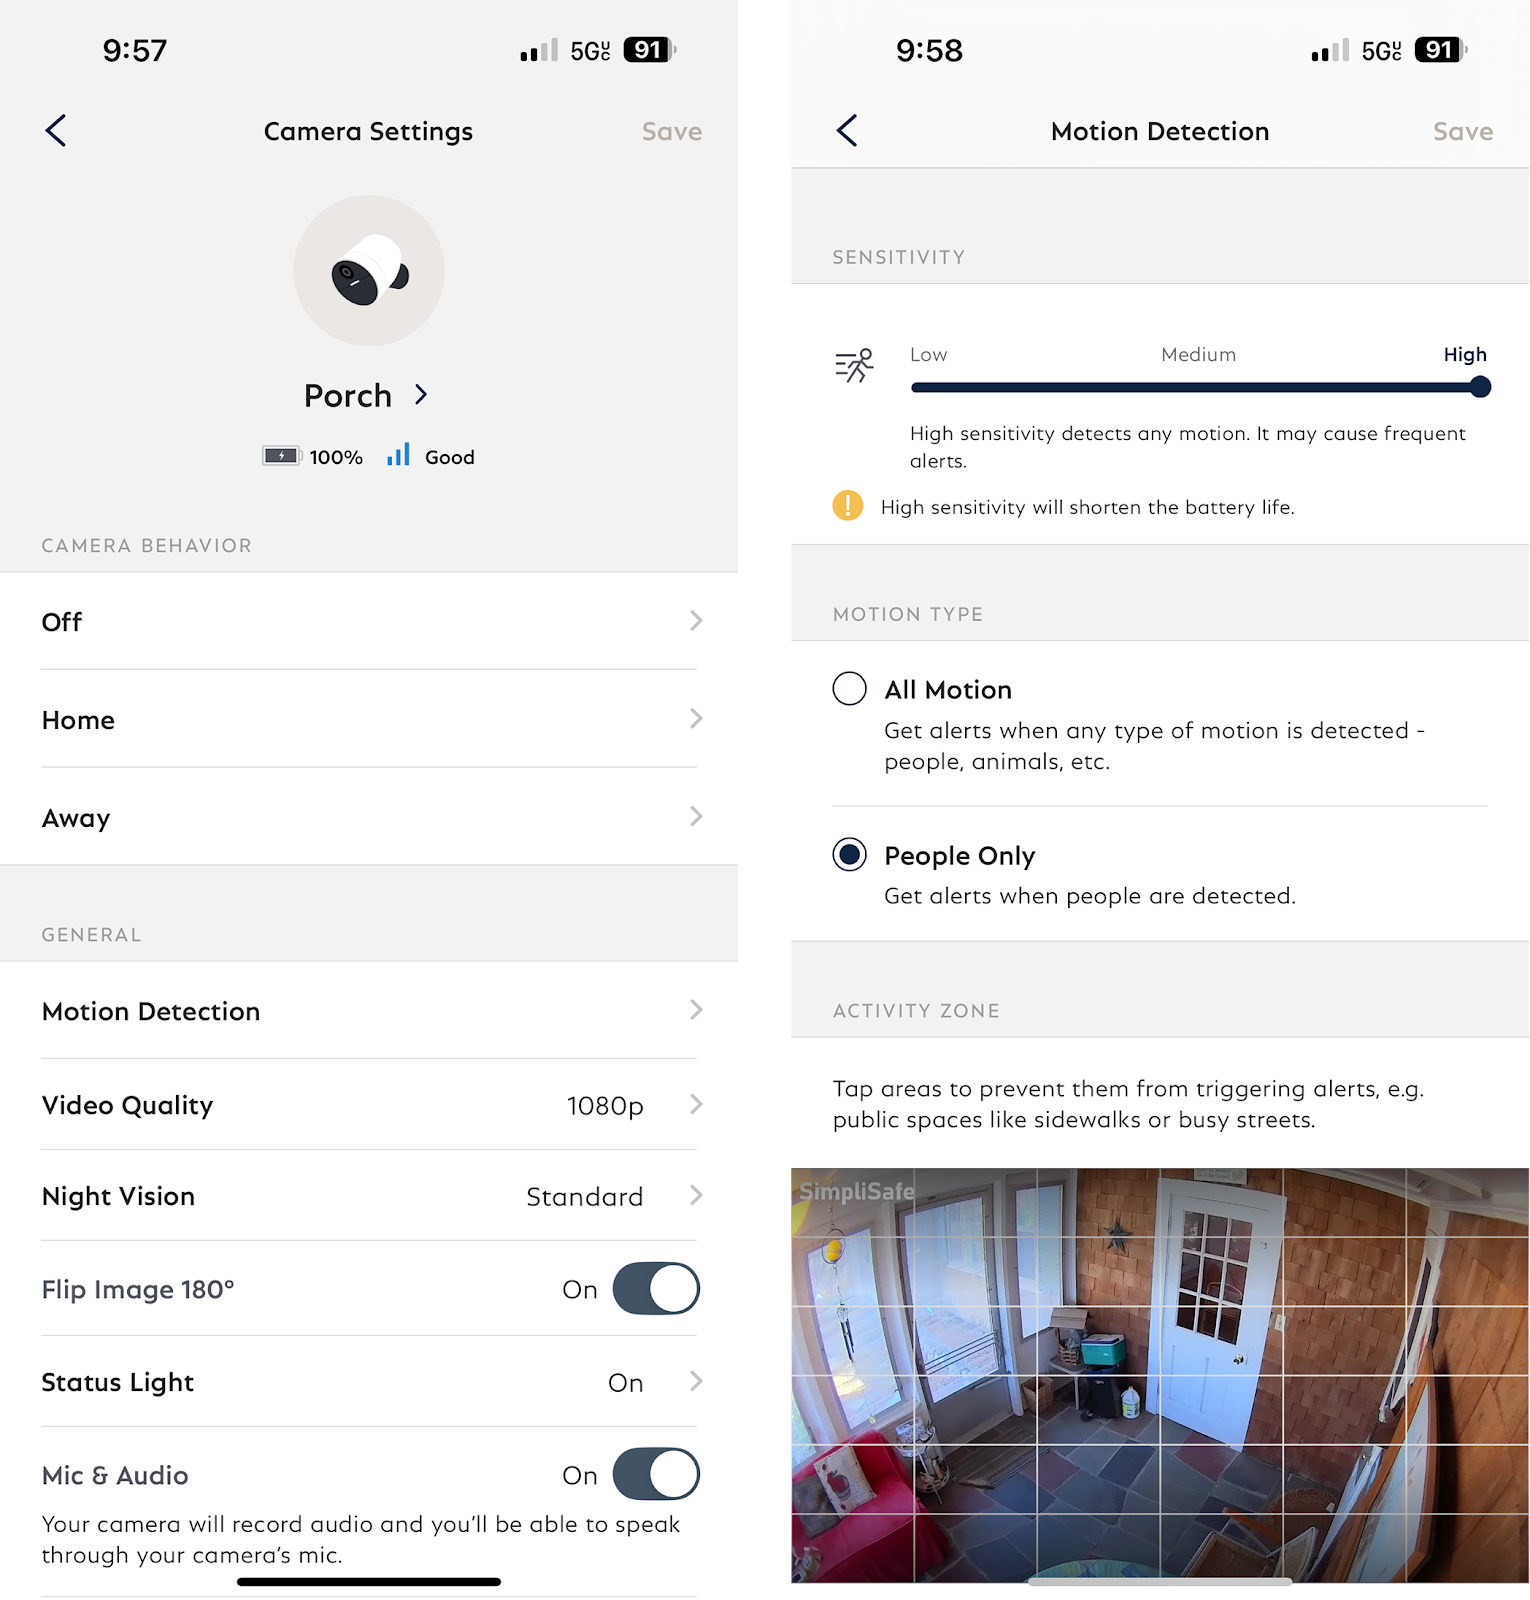
There are multiple settings that can be adjusted to help extend the battery life of your camera. To access these settings in the SimpliSafe® Mobile App:
Choose My System from the bottom navigation bar
Select Camera Settings from the list of menu options
Tap on your Outdoor Camera
Battery-saving settings
Lower your camera’s motion sensitivity setting to Default or Low. This will impact how frequently the camera is triggered.
Enable People-Only Detection to ensure your camera is only capturing humans, and is not unnecessarily triggered by other moving objects or animals.
Set up Activity Zones to control the areas that the camera will monitor. This is helpful if there is a high-traffic zone in the view that you do not need to monitor.
Use Standard Night Vision mode instead of the Spotlight feature.
Charge the Camera’s Battery Fully
Charge it Completely
If the Outdoor Camera’s battery is not completely charged, it will give the appearance of draining quickly. The Outdoor Camera’s battery takes up to 6 hours to charge completely. When the battery is charging, you will see a blinking white light. You’ll know the battery is fully charged once all 3 lights are illuminated and no longer blinking.
Use the Correct Power Adapter
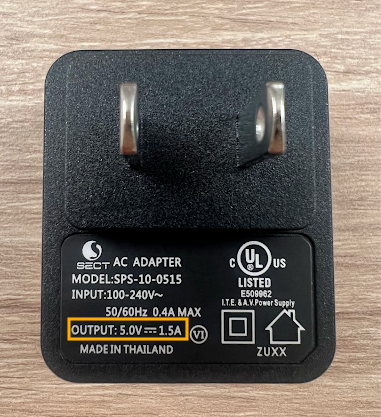
The Outdoor Camera’s battery requires a USB power adapter with an output of 5.0V, 1.5A+. Failure to use the correct power adapter can result in the battery not charging completely.
A list of power adapters that fit this requirement are:
The SimpliCam® Wired Indoor Security Camera’s adapter
The Smart Alarm Wireless Indoor Security Camera’s adapter
Most cell phone power adapters
If you don’t know the output of your power adapter, most models will have it printed on the device itself, as seen in the image below.
If you are using the correct power adapter, make sure that you are plugging it into an outlet directly in a wall. Using a USB power strip or USB power hub may not supply efficient power to charge the battery.
Help Center Article
•
Outdoor Cameras