

Conversation List
Performance Mode for Cameras
When connected to a continuous power source, the Outdoor Camera and Smart Alarm Wireless Indoor Security Camera can enter performance mode.
When performance mode is enabled for a camera, the camera will remain awake allowing for faster live streams versus battery power. This feature is available to the Outdoor Camera and Smart Alarm Indoor Camera when running firmware version 1.20 or higher, and occurs automatically when the camera is plugged into a power source and it has at least 90% charge. If your camera battery ever drops below 70%, your camera will automatically exit performance mode to conserve battery.
Performance mode also allows the cameras to begin recording* while it determines whether or not the observed motion event was a person or another object (such as a passing car, a tree blowing in the wind, or an indoor pet). This allows for more complete recordings of motion events delivered to your timeline in the SimpliSafe® Mobile App.
*Requires a monitoring plan with recordings.
Help Center Article
•
Cameras
How to Reorder Cameras in the SimpliSafe® App
An exciting feature of the SimpliSafe® App is the ability to reorder your list of cameras in the Cameras tab in the app. This is helpful if you want to see your cameras in alphabetical order, or organised in any specific way.

To Reorder Your Cameras in the SimpliSafe® App:
Open the SimpliSafe® App on your phone or tablet
Select Cameras from the navigation bar on the bottom of the screen
Tap on the reorder icon on the upper right corner of the screen

Press and hold a camera to drag and reorder it
Follow step 4 again for any other cameras you want to reorder
*Note: This feature is only to reorder your cameras in the SimpliSafe® app. Changing the order of your sensors is currently not supported.
Help Center Article
•
Outdoor Camera Series 2 UK
Where Should I Place My Smart Alarm Wireless Indoor Security Camera?
Placement of your Smart Alarm Wireless Indoor Security Camera can vary from home to home. To get the most out of your camera, we recommend placing it in a spot that covers a significant portion of a room.
Here are some tips to keep in mind when finding the right location to install your camera:
Place the camera in a room or area where subjects are likely to spend time in if there is an alarm
The motion detector is most sensitive to side-to-side motion with its 125-degree field of view
Do not position the camera so that only a doorway is in frame
Do not position the camera to look outside through a window or doorway
The following is an example of a floor plan and how we would recommend placing the Smart Alarm Indoor Camera within this home.
Help Center Article
•
Smart Alarm Indoor Camera
How to Download Recordings From Your Camera
Video clips from SimpliSafe® cameras can be downloaded to your mobile device using the SimpliSafe® Mobile App. Recordings are available with select monitoring plans.
Please note that if your camera name contains an apostrophe, this may limit your ability to download recordings. We recommend changing your camera’s name to exclude the use of an apostrophe before attempting to download any recordings.
How to Download
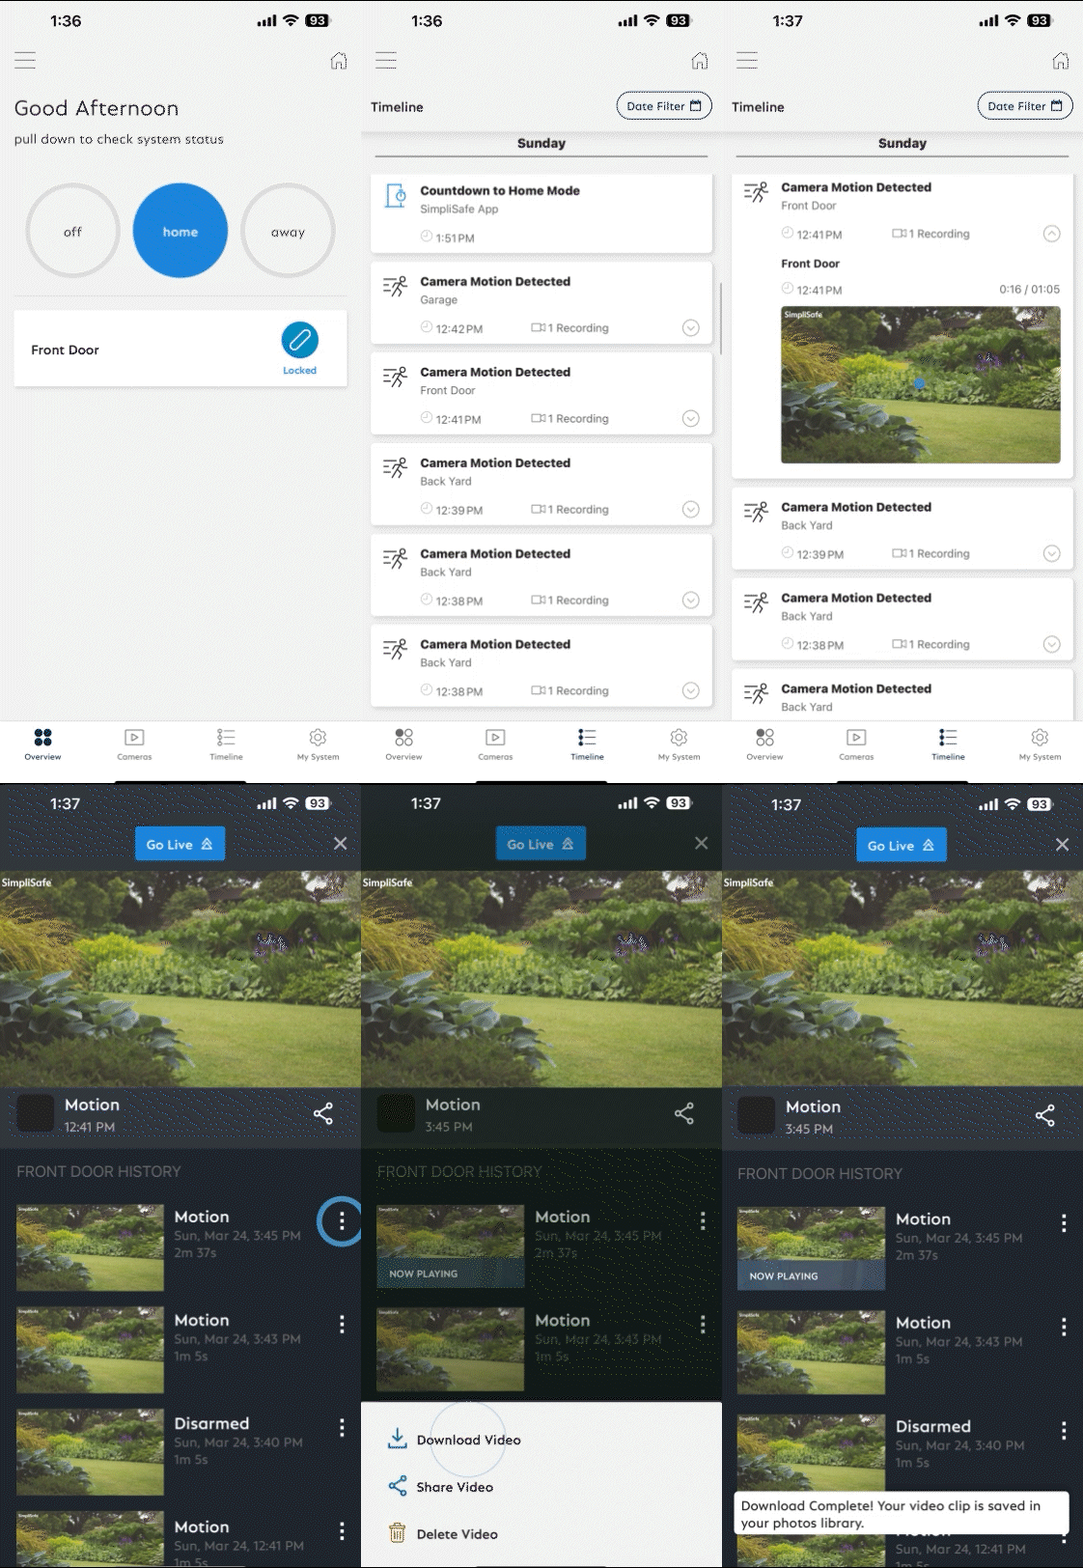
In the SimpliSafe® App, tap on Timeline from the bottom navigation bar
Swipe up and down through the Timeline and find the event whose clip you wish to download
Tap on the event and then tap on the video preview within the event
Tap the three-dot icon next to the recording and then choose Download Video
The clip will be saved to your phone
To access saved videos, go to your phone’s camera roll
How to Download Recordings Using the SimpliSafe® Online Account
Log into the SimpliSafe® Online Account using the browser of your choice
Select Timeline from the navigation menu on the left side of the screen
If you do not see the navigation menu, click the three-bar icon on the top left corner of the screen to reveal it
Scroll through the Timeline and find the event with the video clip you wish to download
Tap on the event and then tap on the video on the right side of the screen
Tap the download icon on the bottom right side of the video player
The clip will be saved to your computer
To access saved videos, go to your downloaded files in your computer
Is a Timestamp Included?
When you download a video from your timeline, the date and time that the recording was filmed is found at the end of the file name.
To find the timestamp, take the following steps:
Open your camera roll
Select the recording you downloaded
Tap the i icon on the bottom of the screen to display the video’s file name
This step may vary depending on your mobile device
At the end of the file name, you will see the date and time the recording was filmed
Note: the time stamp will be written in numbers, displayed as MM/DD/YYY_HH/MM/SS. So for a recording filmed on August 21, 2024 at 2:31:21 PM, the timestamp will be displayed as: 08212024_023121PM.


Help Center Article
•
Cameras
How to Find the MAC Address of a SimpliSafe® Device
In some instances, you may need to add the MAC Address of a SimpliSafe® product to your network’s allow list or firewall in order for it to connect to Wi-Fi. A MAC Address is a unique, 12-character alphanumeric attribute that is used to identify individual electronic devices on a network.
Only the Base Station and the Cameras will provide a MAC Address, as they connect to Wi-Fi. Other SimpliSafe® products connect to the Base Station using Radio Frequency (RF).
Note: If you have MAC Address filtering enabled on your network, you may need to temporarily disable it while setting up your camera, to allow it to connect. You’ll be able to determine the MAC Address to add to your allow list once the device is connected.
Base Station
For the Base Station, you will need to use your Keypad to locate its MAC Address.
Press Menu on your Keypad
Enter your Primary PIN
Using the arrow keys, select System Settings
Then choose Diagnostics
Use the right arrow and toggle to the Wi-Fi screen, where the MAC Address will be listed
Cameras
You can locate the MAC Address of a SimpliSafe® Camera using the SimpliSafe® Mobile App.
Open the SimpliSafe® Mobile App on your phone or tablet
Choose My System from the bottom navigation bar
Select Camera Settings
Tap on the Camera you wish to find the MAC Address for
Scroll to the bottom of this screen. Your Cameras MAC Address will be listed in the MAC Address field.
Help Center Article
•
Cameras
Can't Initiate Live Stream From Within the SimpliSafe® App
If you are unable to initiate a live stream from within the SimpliSafe® Mobile App or Online Account, there are a few steps you can take to try and get things running again.
Using the Connection Check Tool
The Connection Check Tool for Cameras is a great way to better understand your signal strength and upload speed from the router to where your camera is located.
To use the Connection Check Tool:
Open the SimpliSafe® Mobile App on your phone or tablet
Choose My System from the bottom navigation bar
Select Camera Settings
Choose your camera from the list of available cameras
Under “Connection” select “Connection Check”
Tap “Start Connection Check” to find your camera’s connection strength
What do my Results Mean?
A good signal strength and/or upload speed means that there is a strong connection between your camera and Wi-Fi network.
A fair or poor upload speed means that you’ll want to reduce your camera’s video resolution. You can do this within the Camera Settings page for your camera in the SimpliSafe® Mobile App.
Open the SimpliSafe® Mobile App on your phone or tablet
Choose My System from the bottom navigation bar
Select Camera Settings
Choose your camera from the list of available cameras
Tap on Video Quality
Choose a lower resolution
Select SAVE in the upper right corner to save your selections
It may also be necessary to upgrade your Internet package with your Internet Service Provider (ISP) to improve upload speeds. We recommend reaching out to your ISP to learn more about their offerings.
A fair or poor signal strength means your camera may be too far away from your Wi-Fi router. We recommend moving them closer, if possible. If not, you can opt to install a Wi-Fi extender to help bridge the network connectivity gap between the two. You can also move SimpliSafe® to a dedicated network or guest network to alleviate congestion. To learn more about setting up a dedicated or guest network, contact your Internet Service Provider (ISP) or consult with your router’s manual.
Still Need Help?
Don't hesitate to contact our support team for additional troubleshooting or assistance. We're here to help!
Help Center Article
•
Cameras
Smart Alarm Wireless Indoor Security Camera Installation Guide
Overview
The SimpliSafe® Smart Alarm Wireless Indoor Security Camera is a battery-operated security camera that’s designed for indoor use. It records at 1536p and has a wide field of view at 125 degrees. The battery in the Smart Alarm Indoor Camera can also last up to 3 months on a single charge.
Need to purchase a Smart Alarm Indoor Camera? You can find it available for purchase on our website .
Before Getting Started
You’ll want to unbox your Smart Alarm Indoor Camera and plug it into power to charge it before installation. You also have the option to install the camera while it is plugged into an outlet; however, we recommend you fully charge the camera before placing it in its final location.
You will need the following tools before installing your Smart Alarm Indoor Camera:
USB Power Adapter (5V, 7.5W minimum)
Phillips head screwdriver
You'll also need to make sure your system is running the latest firmware version.
Watch the video below for a hands-on experience from our team of experts for the installation process
Troubleshooting
Related Articles
Help Center Article
•
Smart Alarm Indoor Camera

