Conversation List
Can't Connect Camera to Wi-Fi During Setup
If you are having trouble connecting your camera to Wi-Fi during a first-time setup, we recommend making sure that your home network is configured to meet our system requirements.
A short list of requirements can be found below:
Your Wi-Fi network must be broadcasting 2.4GHz
SimpliSafe® cannot connect to 5GHz networks
Your SSID and password cannot exceed more than 31 characters each
Your network must be configured as WPA2 or WPA3/2 Mixed Mode
WPA3 only networks are not compatible with SimpliSafe® at this time
We recommend that you have your 2.4GHz and 5GHz networks separated and not merged together. Most routers and Internet Service Providers (ISPs) by default will create a single network that broadcasts 2.4GHz and 5GHz at the same time. To separate the network, you may need to consult with your ISP or reach out to your router manufacturer for configuration assistance.
If your phone is currently connected to a 5GHz network and you have a 2.4GHz network available, please use your phone’s Wi-Fi settings to switch the network before trying to connect the camera to Wi-Fi again.
iPhone / iOS Wi-Fi Settings:
Go to Settings on your iOS device
Choose Wi-Fi
Select the 2.4GHz network from the list of available networks
Enter your password
Tap on Join in the upper right hand corner to connect to the Wi-Fi network
Android Wi-Fi Settings:
Go to Settings on your Android device
Navigate to Wi-Fi Network
Select your 2.4GHz network from the list of available networks
Enter your password
Save to connect to the Wi-Fi network
*These steps may vary depending on your Android device. Consult with your phone's manual for further directions.
Still having trouble connecting?
There are steps you can take if your camera keeps losing Wi-Fi Connection after setup. If you continue to have trouble after taking those steps, don’t hesitate to reach out to our Support Team for further assistance.
Help Center Article
•
Cameras
How to Rename a SimpliSafe® Camera
There may be a point where you need to rename a camera for your SimpliSafe® System. Renaming a camera can be done easily through the SimpliSafe® Mobile App, but you can also rename a camera using your Web App. You can select a name from the list of prepopulated names within the SimpliSafe® Mobile app, or choose your own custom name. If using a custom name, we recommend avoiding the use of apostrophes within the camera name - as this can impact the ability to download recordings.
The following article will walk you through these steps for each platform so you can pick whichever one is easiest for you.
SimpliSafe® Mobile App:
Open the SimpliSafe® Mobile App on your phone or tablet
Navigate to the Cameras tab
Click on the Gear Icon in the upper right corner for Camera Settings
Tap on the Camera you wish to edit
Press the pencil icon next to your Camera to enter the editor
Choose from the list of preset names or select Custom Name to type in your own name
Depending on your device, you may also need to tap SAVE before exiting to save your selections
Web App:
Log in to the Web App using the browser of your choice on a computer
Select your property from the list on the Account Overview page, if applicable
Choose Devices from the left-hand navigation menu
Click on the Camera you wish to edit
A pop-up will appear to the right of your browser
Select the pencil icon next to your Camera’s name
Enter the new name you wish to use in the field
Select the check mark when done
Be sure to click on Save Changes from the bottom of the pop-up before exiting to save your selection
Help Center Article
•
Cameras
Smart Alarm Wireless Indoor Security Camera Wi-Fi Troubleshooting
This article will walk you through various scenarios where Wi-Fi troubleshooting may be needed to connect to and stream from your Smart Alarm Wireless Indoor Security Camera. You can scroll through the article, or click on one of the sections below to be taken directly to those steps:
Trouble Connecting To Wi-Fi
You’ll want to make sure that you are connecting to a 2.4GHz (802.11b/g/n) network, as the Smart Alarm Indoor Camera can only connect to this network type. The indoor camera is not compatible with 5GHz networks. If your network shows up on the list of available Wi-Fi networks to connect to on the App, it is 2.4GHz compatible. For the best results, we recommend connecting to the same Wi-Fi network as your Base Station and having all of the devices within a short distance of each other if you are having trouble with the Finish Setup step.
Next, let’s test the Base Station connectivity. From the Keypad, establish a fresh connection between your Base Station and network by re-entering your Wi-Fi password. You’ll do this by going to Menu > Entering your Primary PIN > System Settings > Wi-Fi > Edit Network. Then confirm the connection was successful by accessing System Settings > Diagnostics > Wi-Fi and look for Internet: Reachable. If the test was unsuccessful, please check your router’s settings to confirm that it is working properly for other devices on your network.
If the Base Station test was successful, please try the following to reset your camera.
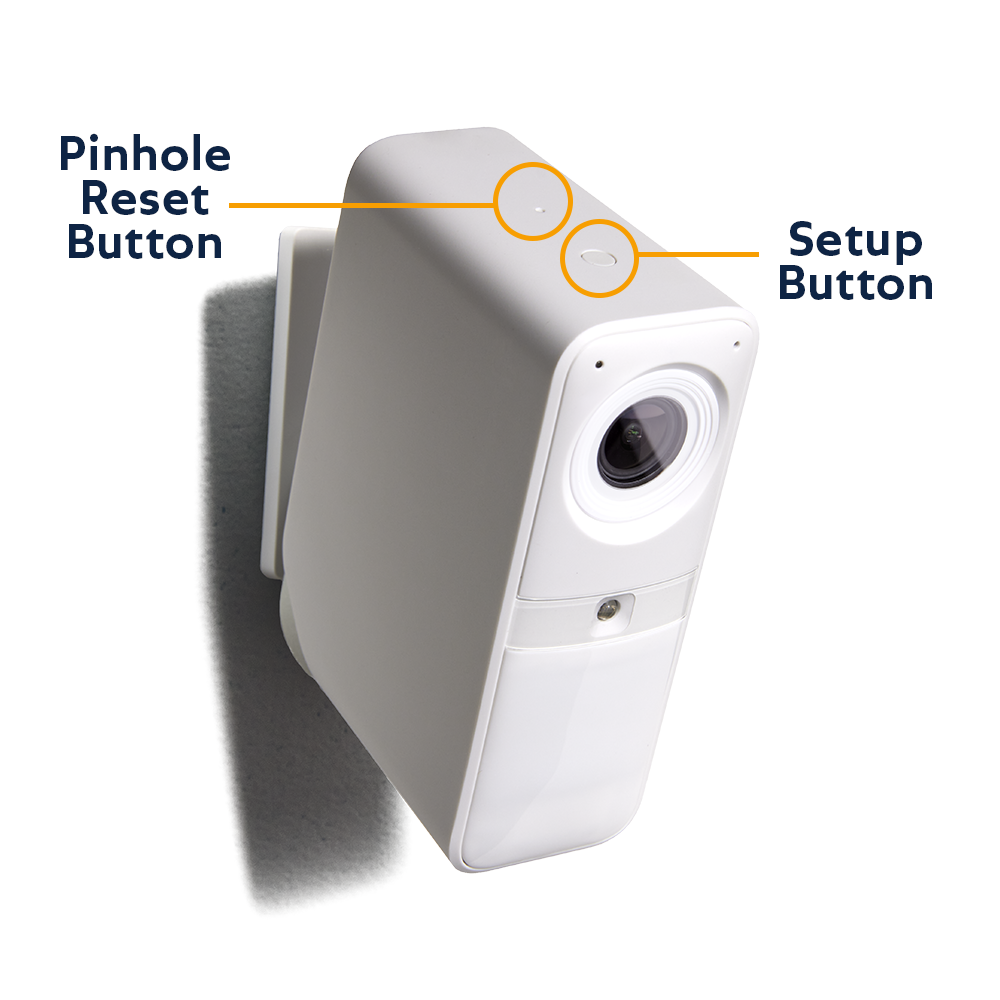
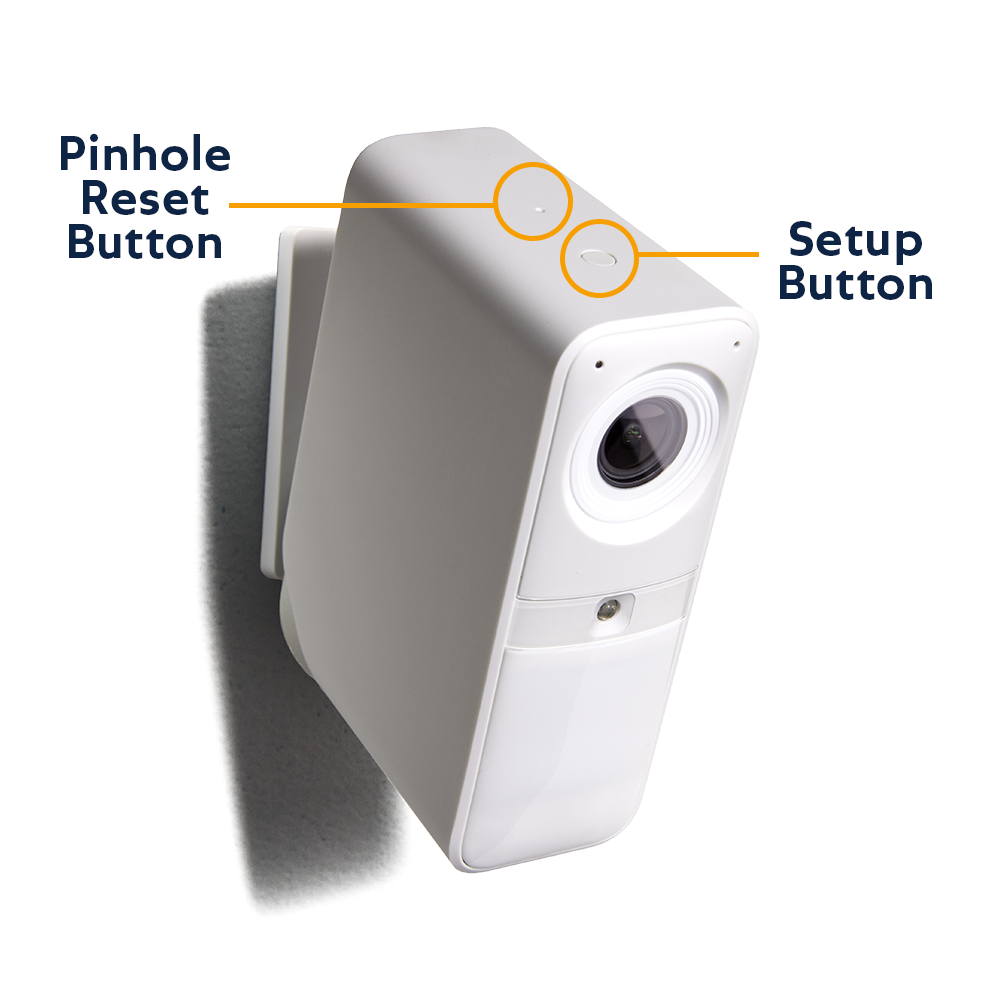
Press the tiny pinhole button down on the Smart Alarm camera for 1 second. This should do a soft reset on the camera
The small pinhole button can be found behind the larger setup button on top of the Smart Alarm Indoor Camera
Try the Finish Setup flow again by going to the Cameras tab, tapping on the camera you were setting up, and selecting Finish Setup.
If the camera fails to set up when clicking Finish Setup, please remove the camera from your system using the Keypad
If the camera still will not add, hold down the larger pairing button on the Smart Alarm Indoor Camera for 10-20 seconds, or until it chimes and starts blinking white. This will factory reset the camera
Begin the device setup flow from the very beginning using the SimpliSafe® Mobile App
Red LED During Setup
A solid red LED on your Smart Alarm Indoor Camera during setup may indicate that the camera is too far from the Base Station. Please move the camera closer to the Base Station to complete the setup.
‘Connecting’ Screen Times Out
If you’re connecting your Smart Alarm Indoor Camera to the same network as your Base Station and the ‘Connecting’ screen times out or fails, we recommend attempting to connect one more time.
If that fails, exit the app and press the pinhole reset button on the top of the Smart Alarm Indoor Camera (the pinhole reset button can be found behind the larger setup button on top of the Smart Alarm Indoor Camera). Then return to the app, and on the Cameras page, find the camera you began to set up and finish the setup.
Poor Connectivity Or Live Stream Quality
We recommend performing a connection check for your Smart Alarm Indoor Camera in the SimpliSafe® App. You can find this using the following steps:
Open the SimpliSafe® app on your phone or tablet
Select the Cameras tab from the bottom navigation bar
Choose the gear icon for Camera Settings in the upper right corner of the app
Tap on your Smart Alarm Indoor Camera
Scroll down and choose ‘Connection Check’
Then, run the Connection Check by tapping on the ‘Start Connection Check’ button
You’ll want to ensure that your results meet our Wi-Fi requirements for cameras.
You can try moving the camera closer to your router to see if this helps your connectivity to see if that improves the connection speeds or alternatively, you can reduce the Picture Quality for your camera to use less bandwidth. To lower the Picture Quality, go to:
Open the SimpliSafe® app on your phone or tablet
Select the Camera tab from the bottom navigation bar
Choose the gear icon for Camera Settings in the upper right corner of the app
Tap on your Smart Alarm Indoor Camera
Scroll down and select Video Quality
Choose a new resolution
Test your camera feed afterward to see if the performance has improved
Help Center Article
•
Smart Alarm Indoor Camera
How to Reset Your Smart Alarm Wireless Indoor Security Camera
If your Smart Alarm Wireless Indoor Security Camera encounters an error that can’t be fixed through normal troubleshooting, resetting the camera to its factory settings may help.
Step 1: Remove the Camera From Your System
To reset your Smart Alarm Indoor Camera, we first recommend that you remove your camera from your system, if applicable. You can remove your camera from within the SimpliSafe® Mobile App using the following steps:
Go to the Cameras tab at the bottom of the SimpliSafe® Mobile App
Tap the gear icon in the top right corner of the app
Select your camera
Choose 'Remove Camera' at the bottom of the screen
Tap 'Yes' to remove the camera from your system
If you are seeing an error message within the SimpliSafe® Mobile App that says Unfinished Setup, you’ll need to remove this camera from the Keypad before proceeding.
Press the Menu button on your Keypad
Enter your Primary PIN
Scroll to devices and press Open on the right
Scroll down and locate the camera in question
Select your camera by pressing the arrow to the right
Choose Remove by pressing the arrow to the right to delete this camera from your system
Step 2: Resetting Your Smart Alarm Indoor Camera
After your camera has been removed from your system (if applicable) you can now reset the camera.
Press the tiny pinhole button on the Smart Alarm Indoor Camera for 2 seconds using a small item like the tip of a pen or a paperclip
The pinhole reset is located behind the setup button on the top of the camera (see image below)
Press and hold the Setup Button (the larger button on top of the camera) until the camera chimes, or about ~30 seconds.
Your camera should return to a flashing white status after performing this step. If there is no light at all, we recommend charging the battery and repeating these steps again at a later time
Once the camera is flashing white again, you can start the installation process for your Smart Alarm indoor Camera again within the SimpliSafe® Mobile App
Still Need Help?
If the status light on the front of the camera does not flash white and the battery has been fully charged, please contact our support team for additional troubleshooting.
Help Center Article
•
Smart Alarm Indoor Camera
Can’t Connect Camera to Wi-Fi After Setup
If your camera had previously been set up but is now failing to connect to your Wi-Fi network, the Connection Check tool in the SimpliSafe® mobile app will tell you if there are any issues between your network and camera.
How to Run a Connection Check:
Open the SimpliSafe® mobile app
Tap on the Cameras tab on the bottom of the screen
Select the gear icon in the upper right corner
Choose your camera
Select Connection Check and follow the on-screen instructions to test your signal strength and upload speeds
Using your results, you can improve your camera’s connection with the tips below.
Camera Wi-Fi Requirements:
Signal strength should be above -55dBm. A lower number means a weaker connection between your camera and Wi-Fi router.
If you have a low signal strength, try troubleshooting your Wi-Fi network
Upload speeds need to be above 2Mpbs
If your upload speed is below 2Mbps, you may need to contact your Internet Service Provider (ISP) to upgrade your Internet package.
If your upload speed is exactly 2Mbps, you should take these steps to improve your upload speed.
Help Center Article
•
Cameras
Too Many Motion Alerts From the Smart Alarm Wireless Indoor Security Camera
The Smart Alarm Wireless Indoor Security Camera comes equipped with a passive infrared (PIR) sensor that allows it to sense contrasting temperature changes in its field of view, while also using Vision AI technology to determine if it should send you a motion alert.
If you are receiving too many motion alerts from your Smart Alarm Indoor Camera, there are placement, camera settings, and camera behavior changes you can make to decrease the amount of motion it captures.
Placement
We do not recommend placing your Smart Alarm Indoor Camera in an area where it faces a stairwell, window, or door, as it can pick up on excess motion. If your camera is facing any of those areas in your home, slightly adjust its placement so they are no longer in its field of view.
If you have any pets that the Smart Alarm Indoor Camera could pick up on, try moving the camera to a surface that’s at least 4 feet off the ground, angled straight out.
Camera Settings
There are additional settings you can change for your Smart Alarm Indoor Camera to help it detect fewer motion events.
Camera Behavior
You can configure your Smart Alarm to detect motion in each of the SimpliSafe® system’s armed modes: Off, Home, and Away. If your camera is consistently alerting you of motion in an armed state that you would not like it to, check to see if motion detection is turned on for your camera in that armed mode by taking the following steps:
Open up the SimpliSafe® Mobile App on your mobile device or tablet
Tap Cameras on the navigation bar at the bottom of the screen
Select the gear icon in the top right corner to open Camera Settings
Choose the Smart Alarm Indoor Camera you’d like to adjust
Under Camera Behavior, select the system’s armed mode that you do not want the Smart Alarm to detect motion in
Toggle Motion Detection off
Still Need Help?
If you’ve followed the steps above and your Smart Alarm Indoor Camera is still sending excess motion events, please contact our Support team for further troubleshooting.
Help Center Article
•
Smart Alarm Indoor Camera
What does “Unable to Stream Video” mean?
What it Means
An "Unable to Stream Video" error means that the app was unable to download and display the streamable video. As this is likely an issue on the app end, our team is notified of these errors and investigates promptly to ensure your video is back up for streaming as soon as possible. You can try streaming this video again later.
Is There Anything I Can Do?
As mentioned above, this is likely due to an error on our end. However, in the meantime you can also check your Wi-Fi connectivity strength and speed as that can affect your camera's ability to stream and record video. This article explains the difference between connection strength and speed, as well as how to make sure both are working as they should to support your SimpliSafe system.
If the issue persists, please contact out customer support team. We'll be happy to help!
Help Center Article
•
Cameras