

Conversation List
How To Check The Firmware Version of SimpliSafe® Devices
At SimpliSafe®, we are always working on our devices by releasing firmware and software updates for system-wide and device-specific improvements. We are always updating our customers on the latest firmware releases in the Device and System Firmware Updates article so you can be informed about the latest and greatest updates that are coming your way.
If you are ever curious about the firmware that your system and cameras are running, take the steps below.
Checking the Base Station’s Firmware
You can view which firmware version your Base Station is running using either the SimpliSafe® Mobile App or Keypad.
Using the SimpliSafe® Mobile App
Open the SimpliSafe® Mobile App on your smartphone or tablet
Select My System from the navigation bar at the bottom of the screen
Choose Base Station Settings
Next to Firmware, you will see which version your system is running
Using the Keypad
Press the Menu button on your Keypad
Enter your Master PIN
Select System Settings
Scroll down to Diagnostics
Press the right arrow until you see Base Station
Next to Version, you will see what firmware your system is running
Checking a Camera’s Firmware
You can view your camera’s firmware in the SimpliSafe® Mobile App
Open the SimpliSafe® Mobile App on your smartphone or tablet
Select My System from the navigation bar at the bottom of the screen
Choose Camera Settings
Select the camera you want to check
Scroll down to the bottom of the screen until you see Basic Info
Next to Software Version, you will see what firmware your camera is running
Related Articles
Help Center Article
•
Base Station
Why Does My Camera Keep Losing Its Wi-Fi Connection?
There are two main reasons that a camera may lose its Wi-Fi connection. It may be installed too far from your Wi-Fi router, or it may not have sufficient bandwidth.
If Your Camera Will Not Connect to Wi-Fi During Initial Setup
If you are having trouble connecting your camera to Wi-Fi during a first-time setup, we recommend making sure that your home network is configured to meet our system requirements.
Your Wi-Fi network must be broadcasting 2.4GHz
SimpliSafe® cannot connect to 5GHz networks
Your SSID and password cannot exceed more than 31 characters each
Your network must be configured as WPA2 or WPA3/2 Mixed Mode
WPA3 only networks are not compatible with SimplISafe® at this time
If Your Camera Will Not Connect After Its Setup
If your camera had previously been set up but is now failing to connect to your Wi-Fi network, the Connection Check tool in the SimpliSafe® mobile app will tell you if there are any issues between your network and camera.
How to Run a Connection Check:
Open the SimpliSafe® Mobile App
Tap on the Cameras tab on the bottom of the screen
Select the gear icon in the upper right corner
Choose your camera
Select Connection Check and follow the on-screen instructions to test your signal strength and upload speeds
Using your results, you can improve your camera’s connection with the tips below.
Camera Wi-Fi Requirements:
Signal strength should be above -55dBm. A lower number means a weaker connection between your camera and Wi-Fi router
If you have a low signal strength, try troubleshooting your Wi-Fi network
Upload speeds need to be above 2Mbps
If your upload speed is below 2Mbps, you may need to contact your internet service provider to upgrade your internet package.
If your upload speed is exactly 2Mbps, you should take these steps to improve your upload speed.
Help Center Article
•
Cameras
Video Doorbell Pro Overview and Installation Guide
Overview
The Video Doorbell Pro integrates seamlessly with your SimpliSafe® system, allowing you to see visitors and interact with them through its live streaming and two-way audio features, without needing to be home.
If you are subscribed to either our residential or business plans such as, Pro Plus, Pro, Core, or Self Monitoring with Camera Recordings, the Video Doorbell Pro will record video when motion is detected, and those recordings will be stored in your account for 30 days. These recordings can be downloaded from the SimpliSafe® Mobile App or Online Account.
The Video Doorbell Pro detects motion using advanced motion analytics during the day to recognize cars, people, and other objects. At night, the Video Doorbell Pro uses passive infrared (PIR) to detect moving, heat-generating objects in contrast to the environment. Since it is looking for warmer objects, you may see an uptick of motion events from the Video Doorbell Pro during the colder months.
Looking to purchase a Video Doorbell Pro? You can find it available for purchase on our website.
Video Doorbell Pro Requirements
Before installing your Video Doorbell Pro, it’s important to know that the device requires:
Existing doorbell wiring
A mechanical chime. The Video Doorbell Pro is not compatible with digital chimes
A transformer with 8-24VAC, 10-30VA
A Chime Connector. If you do not have a Chime Connector, please reach out to our Support team for one
Failure to meet these requirements may result in damage to your device and/or your home. If you’re unsure if your system meets these requirements, we recommend contacting a licensed electrician.
You can test the voltage of your doorbell using a multimeter or voltage tester. If you're unsure of how to do this, please consult with a licensed electrician in your area for further assistance.
Before Getting Started
You will need to have a 2.4GHz network connection available to complete the setup of this camera.
What’s in the box:
Video Doorbell Pro
Angled mount
Mounting bracket
Security Screw
Torx screwdriver
Mounting bracket screws
Wood screws
Wall anchors
You’ll also need to have your own Phillips Head screwdriver to complete the installation.
Watch the video below for a hands-on experience from our team of experts for the installation process.
Troubleshooting
User Manual
Related Articles
Help Center Article
•
Video Doorbell Pro
Activity Zones for Cameras
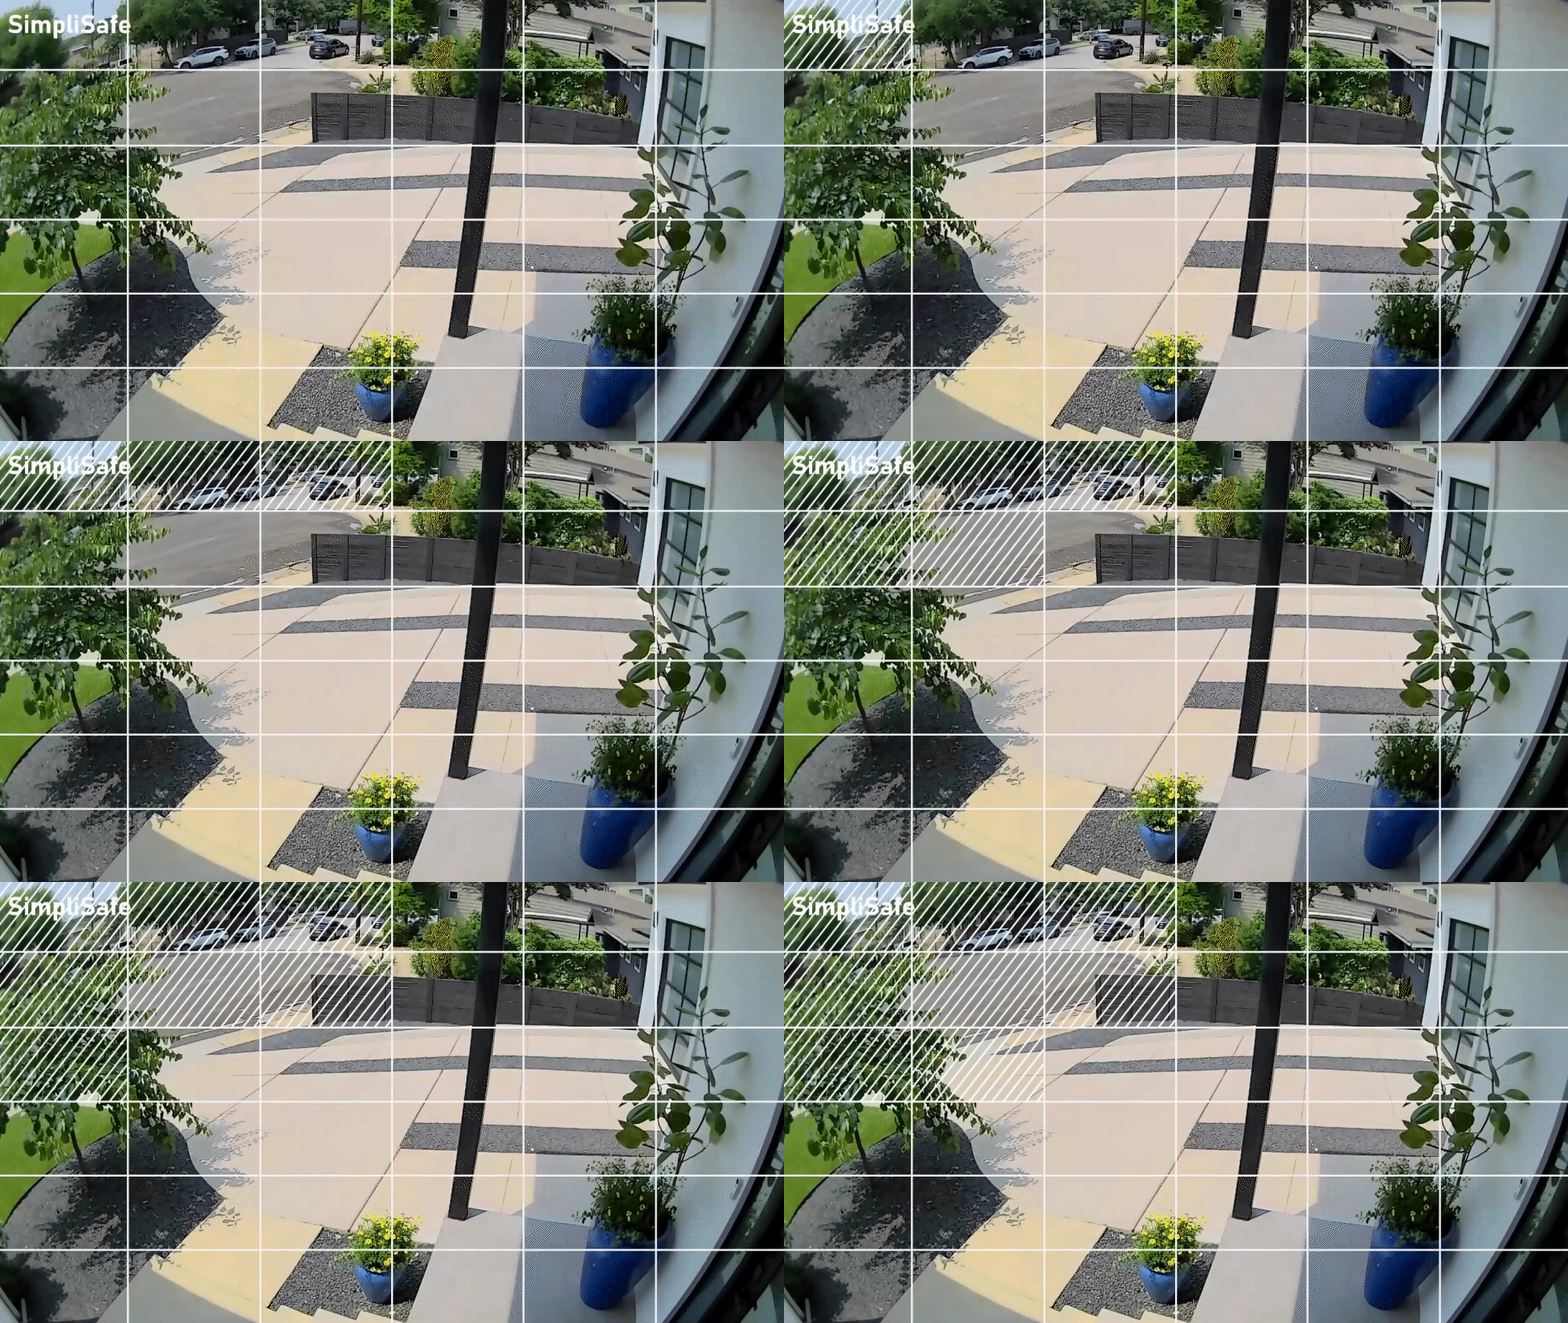
Activity Zones are a great way to limit the number of motion detection alerts you receive from your camera inside and outside of your home. You’ll simply tap on the squares within your Motion Detection settings to exclude zones from triggering a motion event.
Supported Cameras
The following cameras support this functionality:
Outdoor Camera Series 2
Outdoor Camera
Smart Alarm Wireless Indoor Security Camera
Video Doorbell Pro
Setting Up Activity Zones
Activity Zones are managed under the Motion Detection menu, within the Camera Settings page of the SimpliSafe® Mobile App. You can follow these exact steps to navigate to that menu:
Open the SimpliSafe® App on your phone or tablet and choose My System
Select Camera Settings
Tap on the supported camera from the list of available cameras
Choose Motion Detection and scroll down to Activity Zone
Tap on the squares you wish to exclude from motion detection. The diagonal lines that appear over the square mean that motion will no longer be detected in that zone
Note: you can tap on the squares again to remove the exclusion
Choose SAVE in the upper right corner of the app to save your selections
Note: Video Doorbell Pro will ignore Activity Zones when All Motion is selected on the Motion Detection settings. You will need to choose People Only for Video Doorbell Pro in order for it to respect your Activity Zone exclusions.
Turning Off Activity Zones
If you ever need to turn off the Activity Zone exclusions, you can do so at any time from within the SimpliSafe® Mobile App.
Open the SimpliSafe® App on your phone or tablet and choose My System
Select Camera Settings
Tap on the camera you wish to manage Activity Zones for, then select Motion Detection
Tap on the squares you wish to include in motion detection. The diagonal lines will disappear indicating that motion detection is now on for that zone
Choose SAVE in the upper right corner of the app to save your selections
Help Center Article
•
Cameras
Video Doorbell Pro Stopped Working
When the Video Doorbell Pro detects motion and begins to record, a steady blue light should appear as a ring around the button. Triggering a motion event is a good first step to determining if the Video Doorbell Pro is responsive and receiving power.
If your Video Doorbell Pro has power and is responsive, but isn’t working in the app – you’d want to further troubleshoot the Wi-Fi connectivity. If your Video Doorbell Pro appears to not have power or is unresponsive, this guide is for you. You’ll want to start by confirming your home or business meets the Video Doorbell Pro requirements. After that, continue section by section until your issue is resolved.
Video Doorbell Pro Requirements
The Video Doorbell Pro has a set of specific requirements in order to function. Not meeting these requirements can result in the Video Doorbell Pro not working out the gate, or for it to cease functioning after a period of time.
Existing doorbell wiring
A mechanical chime. Not compatible with digital chimes.
A transformer with 8-24VAC, 10-30VA
If your existing doorbell meets these requirements, it’s important to check the wiring and contacts, and the pins from your mounting plate and Video Doorbell Pro faceplate to ensure that things are connecting properly.
Checking the Wiring and Contacts:
First, cut power to the breaker for your doorbell, to ensure no power is going to it
Remove the Video Doorbell Pro faceplate by using releasing the security screw on the bottom of it with its included screwdriver
Ensure that proper contact is being made between the terminals/contacts and the wiring from your existing doorbell
You can adjust the wiring by loosening the screws to adjust the wiring
Checking the pins Between the Mounting Plate and Video Doorbell Pro:
First, cut power to the breaker for your doorbell, to ensure no power is going to it
Remove the Video Doorbell Pro faceplate by using releasing the security screw on the bottom of it with its included screwdriver
Ensure that the mounting plate isn’t too tight, or bending. This can prevent solid contact between the mounting plate and the gold pins on the backside of the Video Doorbell Pro
If the plate is bending, slightly loosen the screws
Ensure that the pins are all there, without any bends to them. Do not touch the pins, but simply observe them with your eyes – they are delicate!
Performing a Soft Reset
Performing a soft reset on the Video Doorbell Pro can help clear it from an unresponsive state, and will also test that the device has power.
To perform a soft reset:
Remove the Video Doorbell Pro from its faceplate by releasing the security screw on the bottom of the device with its included Torx screwdriver
Press and hold the larger button on the back of the Video Doorbell Pro for 30 seconds and then release it
After about one minute, the camera will reboot and go into setup mode
Secure the Video Doorbell Pro to the mounting plate once more, and insert the security screw using your screwdriver
You should see a solid yellow LED light come on, followed by a flashing white light with audible cues to get started
Open the SimpliSafe® Mobile App on your phone or tablet
You’ll now choose the Setup Camera prompt, or use our installation guide for step-by-step instructions on adding your camera back to your system
Performing a Factory Reset
If normal troubleshooting and a soft reset do not resolve the issues with your Video Doorbell Pro, you’ll want to try performing a factory reset on the device to flash it back to factory settings.
To perform a factory reset:
Remove the Video Doorbell Pro from its faceplate by releasing the security screw on the bottom of the device with its included Torx screwdriver
Press and release the smaller button on the back of the Video Doorbell Pro
Secure the Video Doorbell Pro to the mounting plate once more, and insert the security screw using your screwdriver
The LED on the Video Doorbell Pro should change to a solid yellow light
If the Video Doorbell Pro was previously connected to Wi-Fi, it should automatically reconnect to the app
If the Video Doorbell Pro does not reconnect, open the SimpliSafe® Mobile App on your phone or tablet
You’ll now choose the Setup Camera prompt, or use our installation guide for step-by-step instructions on adding your camera back to your system
Help Center Article
•
Video Doorbell Pro
How to Find the Serial Number for Your SimpliSafe® Device or Camera
During troubleshooting or for account verification purposes, you may be required to identify the serial number for a product within your system. You can easily find the serial number for your devices or cameras within the SimpliSafe® Mobile App.
Locating the Serial Number for your Base Station in the SimpliSafe® App
Open the SimpliSafe® Mobile App on your phone or tablet
Tap on the three-bar menu (hamburger menu) in the upper left corner of the app screen
Choose Help & Support
At the top of the menu you’ll see an Account Number
This is the serial number for your Base Station
Locating the Serial Number for your Devices or Cameras in the SimpliSafe® App
Open the SimpliSafe® Mobile App on your phone or tablet
Choose My System from the bottom navigation bar
Tap on the Device or Camera you wish to manage
Scroll down to Basic Info
Your device or camera’s Serial Number will be listed here
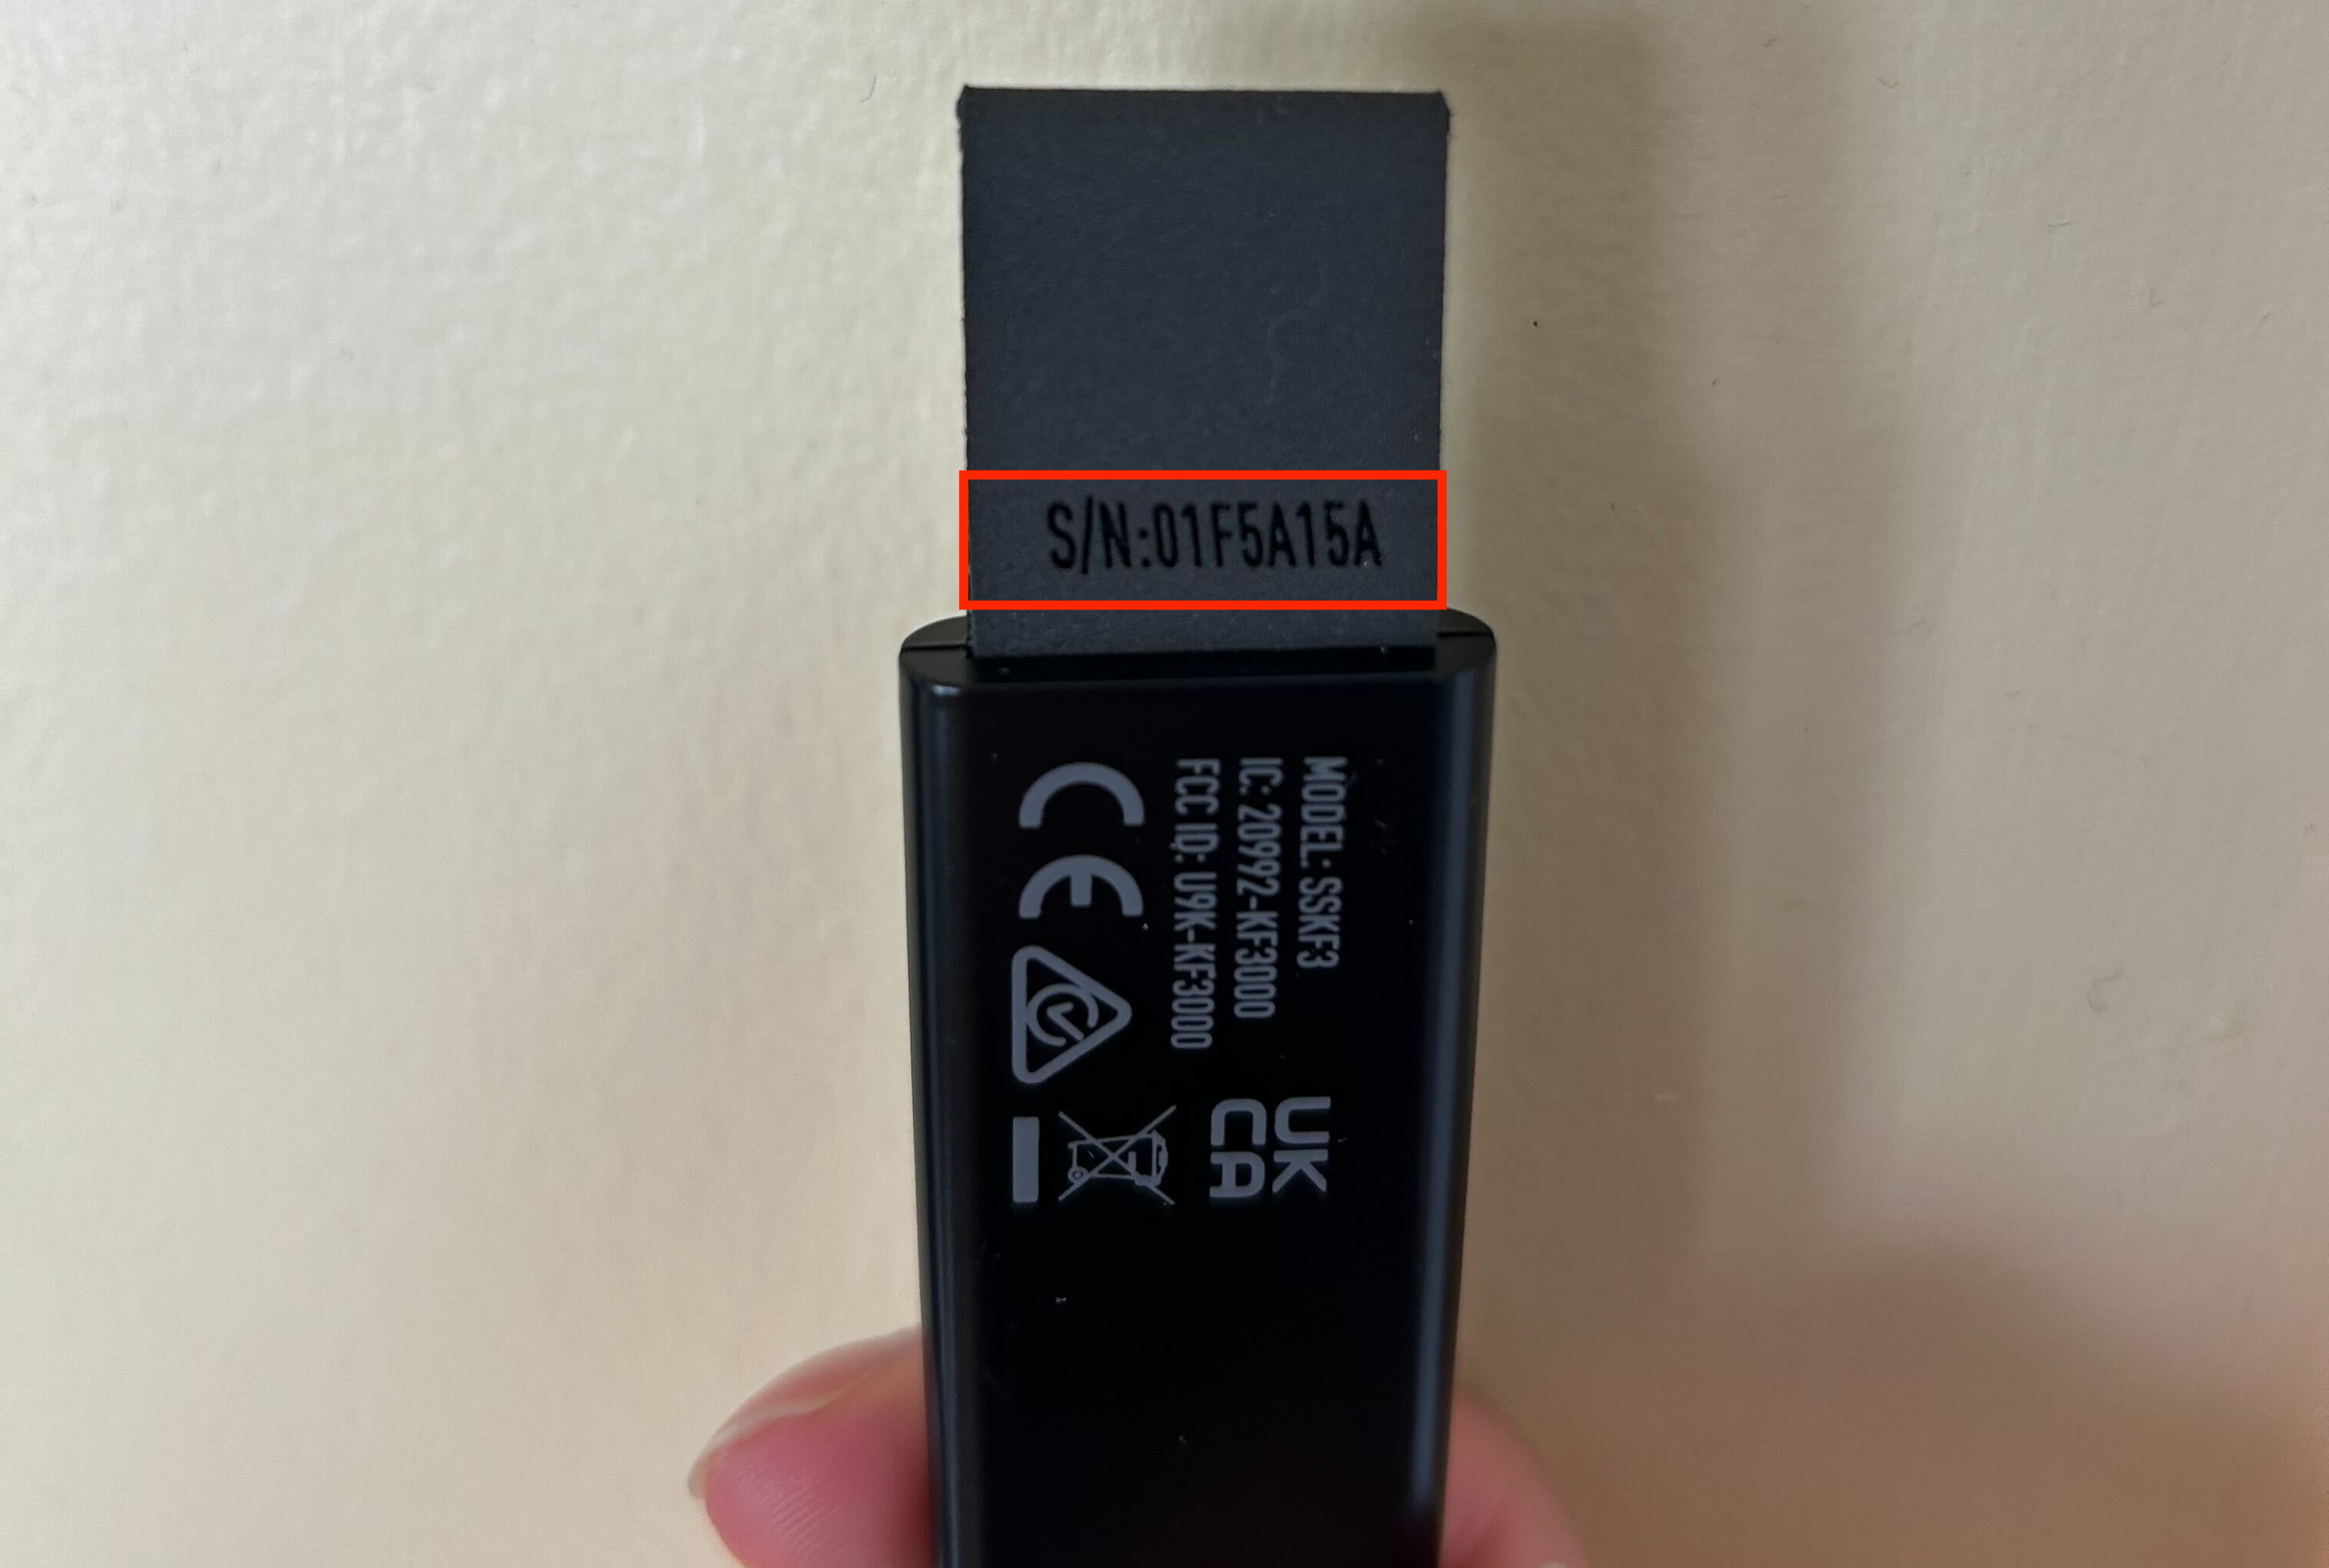
There may be a point where you need to find the serial number on the physical device itself. The rest of the article will guide you through finding the serial number for each product. Click to expand the collapsible section for the product type you wish to learn more about.
Help Center Article
•
Product Support
My Doorbell Won't Ring
When the Video Doorbell Pro is rung, you can hear it from two different places: the doorbell’s chime and the Base Station. If you do not hear a chime from one or both of these places, follow the troubleshooting steps below.
The Doorbell Chime Does Not Ring, or the Chime is Incomplete
If the Video Doorbell Pro doesn’t ring your chime, or the chime only “dings” but does not “dong”, that indicates that you may need a Chime Connector, which is an additional device to make sure enough power is sent to the Video Doorbell Pro.
If you need a Chime Connector*, our Support team can assist you. If you already have one, visit our Chime Connector Installation Guide for step-by-step instructions on the installation process.
*Please note that the Video Doorbell Pro and Chime Connector require:
Existing doorbell wiring
A mechanical chime. The Video Doorbell Pro and Chime Connector are not compatible with digital chimes.
A transformer with 8-24VAC, 10-30VA.
The Base Station Does Not Chime
If the Base Station does not chime when your Video Doorbell Pro is rung, make sure that the Base Station Chime for your Video Doorbell Pro is enabled or loud enough. You can check this in the SimpliSafe® App by taking the following steps:
Open the SimpliSafe® App on your phone or tablet
Select the My System gear from the navigation menu at the bottom of the screen
Select Camera Settings
Choose your Video Doorbell Pro
Select Base Station Chime
Drag your finger along the slider bar to your desired volume, and then tap Save
Help Center Article
•
Video Doorbell Pro




_Serial_N.png "Smart Lock (Original) Serial Number.png")