Conversation List
Night Vision Troubleshooting for Cameras
Night Vision is a feature that allows your camera to use infrared technology to see in low-light conditions. The setting for this feature can be found in the SimpliSafe® App by navigating to camera settings:
Open the SimpliSafe® App on your phone or tablet
Choose My System from the bottom navigation bar
Select Camera Settings
Tap on the desired camera
Select Night Vision
When On, the camera will always revert to using night vision regardless of the amount of light in the room. When set to Auto, the camera will intelligently switch between Night Vision and not depending on the amount of light in the room. In Off mode, the camera will only use available light to capture video and may result in dark video.
The Outdoor Camera does not have an Auto setting, but it does have Spotlight. When turned on, this allows the camera to record in color at night.
If the video quality is poor at night, we recommend trying the following steps:
Verify the camera's Night Vision setting in the SimpliSafe® Mobile App and set it to On or Auto
If you have an Outdoor Camera, verify that its Night Vision setting is set to Standard or Spotlight
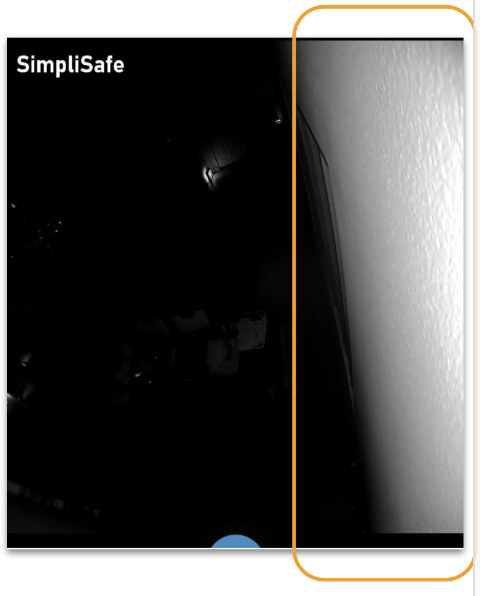
Ensure the camera is not pointed near a wall, ceiling, or a flat surface underneath. Large surfaces like this will reflect the IR light and wash out the remaining video. We recommend repositioning the camera in these scenarios. (see image below)
If the camera is on a shelf, place it near the edge to avoid any obstructions
Make sure that the camera is not directly facing a wall or looking out a window
Confirm that the protective film on the face of the camera has been removed
[Outdoor Camera Only] Turn on the Spotlight to help illuminate areas around the camera
If the above steps do not resolve the issue, we recommend testing the camera in a second location. If the issue disappears, try taking the above steps again in the camera’s desired location.
Still Need Help?
If the issue persists, try resetting the camera by following the directions below. Note: resetting the camera will erase any videos that you have captured as well as all camera settings. Instructions on how to download any camera recordings first before resetting.
Once the camera has been reset, begin the setup process over again using your camera’s installation guide.
Help Center Article
•
Cameras
Not Receiving Push Notifications for my Camera
This article will troubleshoot not receiving push notifications for your cameras only. If you are not receiving system push notifications, please see our Not Receiving Push Notifications on my Smartphone for SimpliSafe® article.
Push notifications for your camera are a great way to know when there is motion detected, or when someone rings your Video Doorbell Pro. To ensure that you will always receive push notifications for your camera(s), you’ll want to make sure that critical alarm notifications are enabled on your device so SimpliSafe® can deliver notifications even if your phone is on silent. Finally, if you have a work profile or focus mode enabled, push notifications may not work. You’ll want to consult with your phone’s manual for further configuration details in these modes.
Confirm that you are logged into the SimpliSafe® app
You will only receive push notifications if you are logged into the SimpliSafe® app. Open the app on your phone and log into your account if you are not already.
Enable Push Notifications for SimpliSafe® on your Smartphone
On iOS:
Go to “Settings”
Click “Notifications”
Find the SimpliSafe® Mobile App, and make sure notifications are turned on
On Android*:
Tap Apps > Settings > MORE
Tap Application Manager > DOWNLOADED
Tap on the SimpliSafe® Mobile App
Select or clear the check box next to Show Notifications to enable or disable push notifications
Steps may vary depending on your Android device. Please refer to your phone’s manual to identify where App Notifications may exist.
*Note: enabling Android Private Space for the SimpliSafe® Mobile App can prevent you from receiving push notifications. If you want to receive push notifications about your SimpliSafe® system, do not enable Android Private Space.
Ensure camera notifications are turned on
Open the SimpliSafe® app on your phone or tablet
Choose the My System tab on the bottom navigation bar
Choose Camera Setting, then the camera you wish to enable alerts for
Tap into Motion Detection to adjust your motion event notifications
Please note that the SimpliCam® and Smart Alarm Indoor Camera will only receive motion alerts when your camera has its privacy shutter open
Make sure your phone is not on Do Not Disturb
If your phone is set to Do Not Disturb, you will not be notified of any activity regarding your SimpliSafe® system. If you do want to receive notifications for your system when your phone is set to Do Not Disturb, take the following steps.
On iOS:
Open your phone’s Settings
Select Focus
This can be found in the second cluster of settings
Click through each of the Focus Modes to check if notifications are silenced
Click through each of the Focus Modes to add the SimpliSafe® Mobile App as an Allowed Notification
On Android:
Open your phone’s Settings
Select Modes and Routines
Check to see if an existing Mode or Routine is on
Add the SimpliSafe® Mobile App to allow notifications during Do Not Disturb
These steps may vary depending on the model of your device. If you have any questions regarding the steps to take, please refer to your devices owner’s manual.
Situations where you will not receive push notifications
Even if push notifications are enabled properly, there are two situations where you will not be notified of camera motion events.
If the SimpliSafe® Mobile App is open on your smartphone or running in the background
Push notifications, by design, alert smartphone users to look at an app by tapping into the notification. Due to this, if the SimpliSafe® Mobile App is active on your device, push notifications for camera motion detection will not be sent.
If there was a previous motion detection less than a minute ago
To prevent you from receiving too many notifications, all SimpliSafe® cameras have a quiet period. After a camera detects motion, you will not receive any other motion notifications from your camera for one minute.
During this quiet period all of your cameras will still detect motion and record as usual, and each motion detection event can still be seen in your timeline.
Further troubleshooting
If your notifications are set up correctly, then try closing the app and re-opening it.
If you still are not receiving notifications, try deleting the app and re-installing it.
Help Center Article
•
Cameras
What does “Unable to Stream Video” mean?
What it Means
An "Unable to Stream Video" error means that the app was unable to download and display the streamable video. As this is likely an issue on the app end, our team is notified of these errors and investigates promptly to ensure your video is back up for streaming as soon as possible. You can try streaming this video again later.
Is There Anything I Can Do?
As mentioned above, this is likely due to an error on our end. In the meantime, you can also check your Wi-Fi connectivity strength and speed as that can affect your camera's ability to stream and record video. You can learn more about improving your connectivity speeds on our Help Center.
Help Center Article
•
Cameras
How to Reset the Video Doorbell Pro
If you run into an issue with your Video Doorbell Pro that cannot be resolved through normal troubleshooting, you may need to reset* the device. A reset refreshes the camera's connection to the Base Station and clears out errors that may prevent it from working correctly.
*The Video Doorbell Pro cannot be reset remotely. You must physically be with the camera to reset it.
Performing a Soft Reset
Performing a soft reset on the Video Doorbell Pro can help clear it from an unresponsive state. It will also test that the device has power.
To perform a soft reset:
Remove the Video Doorbell Pro from its faceplate by releasing the security screw on the bottom of the device using its included T5 Torx screwdriver
Press and hold the larger button on the back of the Video Doorbell Pro for 30 seconds and then release it

After about one minute, the camera will reboot and go into setup mode
Secure the Video Doorbell Pro to the mounting plate once more, and insert the security screw using your screwdriver
You should see a solid yellow LED light come on, followed by a flashing white light with audible cues to get started
Open the SimpliSafe® Mobile App on your phone or tablet
You’ll now choose the Setup Camera prompt, or use our installation guide for step-by-step instructions on adding your camera back to your system
Performing a Factory Reset
If normal troubleshooting and a soft reset do not resolve the issues with your Video Doorbell Pro, you’ll want to try performing a factory reset on the device to flash it back to factory settings.
To perform a factory reset:
Remove the Video Doorbell Pro from its faceplate by releasing the security screw on the bottom of the device using its included T5 Torx screwdriver
Press and release the smaller button on the back of the Video Doorbell Pro

Secure the Video Doorbell Pro to the mounting plate once more, and insert the security screw using your screwdriver
The LED on the Video Doorbell Pro should change to a solid yellow light
If the Video Doorbell Pro was previously connected to Wi-Fi, it should automatically reconnect to the app
If the Video Doorbell Pro does not reconnect, open the SimpliSafe® Mobile App on your phone or tablet
You’ll now choose the Setup Camera prompt, or use our installation guide for step-by-step instructions on adding your camera back to your system
Help Center Article
•
Video Doorbell Pro
Two-Way Audio Troubleshooting for Cameras
Two-Way Audio is a great feature to have and use with our cameras, and can help deter potential intruders or bad actors. If you find your Two-Way Audio isn’t working, there are a few steps you can take to troubleshoot it.
Please keep in mind that Two-Way Audio works differently for some cameras when you are viewing a live stream. For the SimpliCam® and Video Doorbell Pro, you will hold down the speaker button when you want to talk and let go of it when you want to listen. For Outdoor Cameras and Smart Alarm Indoor Camera, simply tap the mic icon once to begin talking.
Please note: If you use Two-Way Audio through your Outdoor Camera or Smart Alarm Indoor Camera while it is recording, the audio will be included in the video. If you use Two-Way Audio through your SimpliCam® or Video Doorbell Pro while it is recording, the video will only include audio detected through the camera, not what was said through the SimpliSafe® Mobile App.
Step 1: Ensure the Microphone is Enabled for your Device
You will need to go into your phone or tablet’s settings for SimpliSafe® and ensure that the Microphone is enabled.
Using iOS:
Open your phone’s Settings app
Scroll down and select SimpliSafe®
Toggle Microphone ON
Using Android:
Open your phone’s Settings app
Click on Apps and scroll down to find SimpliSafe®
Select Permissions > Microphone
Set Microphone access for this app to “Allow only while using the app”
*Please note that steps may vary depending on your Android device.
Step 2: Ensure you Have the Volume Turned up on your Device
Ensure that you have the phone or tablet volume turned up when viewing a live stream or watching a video recording
Step 3: Clean your Camera of any Dust and/or Debris
Dust or debris can cause the microphone or speakers to become clogged on the camera, especially on Outdoor Cameras where they are subjected to the elements. To clean the lens of your camera products, use a microfiber lens cloth or lens cleaner. If you notice larger debris, gently blow away the larger particles or use a soft brush before wiping clean.
Step 4: Make Sure That Mic & Audio is Enabled within the SimpliSafe® Mobile App
You’ll need to review your camera's settings and ensure that Mic & Audio is enabled within the SimpliSafe® Mobile App.
Open the SimpliSafe® Mobile App on your phone or tablet
Choose My System from the bottom navigation bar
Select Camera Settings
Tap on the camera you wish to manage
Scroll down to General
Toggle Mic & Audio ON
Select SAVE in the upper right corner of the app to save your selections
Step 5: Test your Camera’s Connection
The Connection Check Tool for Cameras is a great way to better understand your signal strength and upload speed from the router to where your camera is located.
To use the Connection Check Tool:
Open the SimpliSafe® Mobile App on your phone or tablet
Choose My System from the bottom navigation bar
Select Camera Settings
Choose your camera from the list of available cameras
Under “Connection” select “Connection Check”
Tap “Start Connection Check” to find your camera’s connection strength
What do my Results Mean?
A good signal strength and/or upload speed means that there is a strong connection between your camera and Wi-Fi network.
A fair or poor upload speed means that you’ll want to reduce your camera’s video resolution. You can do this within the Camera Settings page for your camera in the SimpliSafe® Mobile App.
Open the SimpliSafe® Mobile App on your phone or tablet
Choose My System from the bottom navigation bar
Select Camera Settings
Choose your camera from the list of available cameras
Tap on Video Quality
Choose a lower resolution
Select SAVE in the upper right corner to save your selections
It may also be necessary to upload your Internet package with your Internet Service Provider (ISP) to improve upload speeds. We recommend reaching out to your ISP to learn more about their offerings.
A fair or poor signal strength means your camera may be too far away from your Wi-Fi router. We recommend moving them closer, if possible. If not, you can opt to install a Wi-Fi extender to help bridge the network connectivity gap between the two. You can also move SimpliSafe® to a dedicated network or guest network to alleviate congestion. To learn more about setting up a dedicated or guest network, contact your Internet Service Provider (ISP) or consult with your router’s manual.
Still Need Help?
If you still need help with your camera, don’t hesitate to contact our support team for additional troubleshooting or assistance.
Help Center Article
•
Cameras
How to use Two-Way Audio for Cameras
What is Two-Way Audio?
Two-Way Audio is a feature that works on all SimpliSafe® Cameras. While using the SimpliSafe® Mobile App, Two-Way Audio allows you to hear audio from your camera and speak through it while viewing live streams.
How to Turn On Two-Way Audio
To enable Two-Way Audio, you’ll need to ensure that the Mic & Audio setting is toggled on for your camera, in its respective camera settings.
Open the SimpliSafe® Mobile App on your phone or tablet
Choose My System from the bottom navigation bar
Select Camera Settings
Tap on the camera you wish to manage
Scroll down to General
Toggle Mic & Audio ON
Tap SAVE in the upper right corner to save your selections
How to Use Two-Way Audio
Outdoor Cameras and Smart Alarm Indoor Camera
To use Two-Way Audio with your Outdoor Camera and Smart Alarm Indoor Camera, simply tap the speaker button. If you press and hold the speaker button like you would with the SimpliCam® and Video Doorbell, Two-Way Audio will not work.
SimpliCam® and Video Doorbell Pro
To use Two-Way Audio with your SimpliCam® and Video Doorbell, press the microphone button in the SimpliSafe® Mobile App while talking and release it to hear what is being said. If you hold the microphone button while someone is speaking to you through the camera, you will not be able to hear them.
Please note: If you use Two-Way Audio through your Outdoor Camera or Smart Alarm Indoor Camera while it is recording, the audio will be included in the video. If you use Two-Way Audio through your SimpliCam® or Video Doorbell while it is recording, the video will only include audio detected through the camera, not what was said through the SimpliSafe® Mobile App.
Related Articles
Help Center Article
•
Cameras
Turn On or Off Night Vision for Cameras
Overview
Night Vision is a feature that allows the camera to use infrared technology to see in low-light conditions. This setting is especially helpful for capturing camera footage at night, or if your camera is located in a low-light setting such as a basement or darkened room.
Supported Cameras
Outdoor Camera Series 2
Night Vision is locked to Standard when the camera is enrolled in SimpliSafe® Active Guard Outdoor Protection
Wireless Outdoor Security Camera
Video Doorbell Pro
Smart Alarm Wireless Indoor Security Camera
SimpliCam® Wired Indoor Security Camera
Turn Night Vision On or Off Using the SimpliSafe® Mobile App
Open the SimpliSafe® Mobile App on your phone or tablet
Choose My System from the bottom navigation bar
Select Camera Settings
Tap on the camera you wish to manage
Choose Night Vision
Adjust the Night Vision settings as needed
Select SAVE in the upper right corner to save your selections
Camera Placement Tips for Night Vision
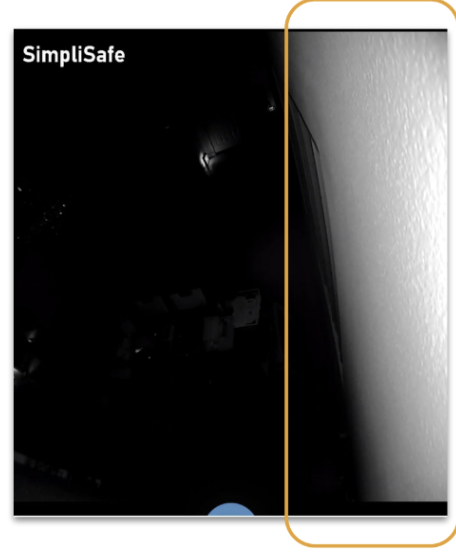
We recommend ensuring that your camera is not pointed towards or near a wall, ceiling, or flat surface underneath. Large surfaces like this reflect IR light and wash out the remaining video (see the image below for an example of this). If the camera is on a shelf, place it near the edge to avoid obstructions. Additionally, confirm that the protective film has been removed from the camera lens. This should have been done during the installation process, but sometimes this step can be missed and interfere with your camera capturing footage adequately!
Related Articles
Help Center Article
•
Cameras