

Conversation List
How To Change The Video Doorbell Pro's Chime Volume
The Video Doorbell Pro chimes through the Base Station, which has four different volume settings: Off, Low, Medium, and High, with Medium as the default setting. This setting can be changed at any time using the SimpliSafe® Mobile App.
Using the SimpliSafe® Mobile App:
Open the SimpliSafe® Mobile App on your phone or tablet
Choose My System from the bottom navigation bar
Select Camera Settings
Tap on your Video Doorbell Pro
Scroll down to the Doorbell Chime section
Tap on Base Station Chime
Adjust the slider here to Off, Low, Medium or High
Select SAVE in the upper right corner of the app to save your selections
You can also receive push notifications whenever a visitor rings your doorbell. Use the toggle on the Video Doorbell Pro settings menu to toggle Visitor Notification ON or OFF as needed. Once you toggle it, be sure to choose SAVE in the upper right corner to save your selections.
Help Center Article
•
Video Doorbell Pro
How to Remove a Camera from your SimpliSafe® System
You can remove a camera from your system in a few easy steps within the SimpliSafe® Mobile App.
We recommend that you download recordings from your system's timeline before removing the camera from your system, to ensure you preserve any video you may need in the future.
Remove a Camera from the SimpliSafe® Mobile App:
Open the SimpliSafe® Mobile App on your phone or tablet
Choose My System from the bottom navigation bar
Select Camera Settings
Tap on the camera you wish to remove from the list of available cameras
Scroll down and choose X Remove Camera
Help Center Article
•
Cameras
Video Recordings for Camera not showing up on Timeline
Video recordings are only available to users who are subscribed to select monitoring plans. If you do have a monitoring subscription and are not seeing videos from your cameras on your timeline in the SimpliSafe® Mobile App, you’ll need to ensure that “Motion Events” are turned ON within the motion detection settings.
Open the SimpliSafe® Mobile App on your phone or tablet
Choose My System from the bottom navigation bar
Select Camera Settings
Choose the camera you wish to make changes for
Select Motion Detection
Toggle Motion Events ON
Click Save in the upper right corner to save your settings before exiting
Help Center Article
•
Cameras
My Video Doorbell Pro Stopped Connecting to Wi-Fi After Setup
The Video Doorbell Pro will have a blinking red light when it is not connected to your Wi-Fi network. If you had successfully setup your Video Doorbell Pro before and it is now experiencing issues connecting to your network, we recommend checking your Wi-Fi network to ensure it’s transmitting a 2.4GHz band, and that your SSID and password are not longer than 31 characters each.
If your Video Doorbell Pro is no longer connected to your Wi-Fi and its status light is showing a different color, refer to the table in the Video Doorbell Pro LED Usage Status Light Colors article.
If the Video Doorbell is not connected to Wi-Fi and its status light isn’t blinking at all, check that the mounting plate has good contact with the gold pins on the doorbell. Make sure that the mounting plate isn’t too tight that it is bending, preventing good contact with the gold pins. If something looks off or you’re not sure the Video Doorbell Pro is installed correctly, check out our installation guide for help.
If you are still having trouble reconnecting your Video Doorbell Pro to Wi-Fi after taking the above steps, we recommend running a Connection Check test in the SimpliSafe® mobile app to see if there are any issues between your network and Video Doorbell Pro.
How to Run a Connection Check
Open the SimpliSafe® mobile app
Tap on the Cameras tab on the bottom of the screen
Select the gear icon in the upper right corner
Choose your Video Doorbell
Select Connection Check and follow the on-screen instructions to test your signal strength and upload speeds
Using your results, you can improve your Video Doorbell Pro’s connection with the tips below.
Camera Requirements
Signal strength should be above -55dBm. A lower number means a greater connection between your camera and router.
If you have a low signal strength, you can try to troubleshoot your Wi-Fi network and improve your signal strength.
Upload speed needs to be above 2Mbps for 720p video
If your upload speed is below 2Mbps, you may need to contact your Internet Service Provider (ISP) to upgrade your internet package.
If your upload speed is exactly 2Mbps, you should take these steps to improve your upload speed.
Help Center Article
•
Video Doorbell Pro
How to Take a Photo of Video Footage from within the SimpliSafe® Mobile App
Photo capture within the SimpliSafe® Mobile App allows you to easily take a photo or screenshot of a video recording from your system timeline. You can also use the filters at the top of the timeline to filter by Date or by a specific camera to better locate the footage you wish to view.
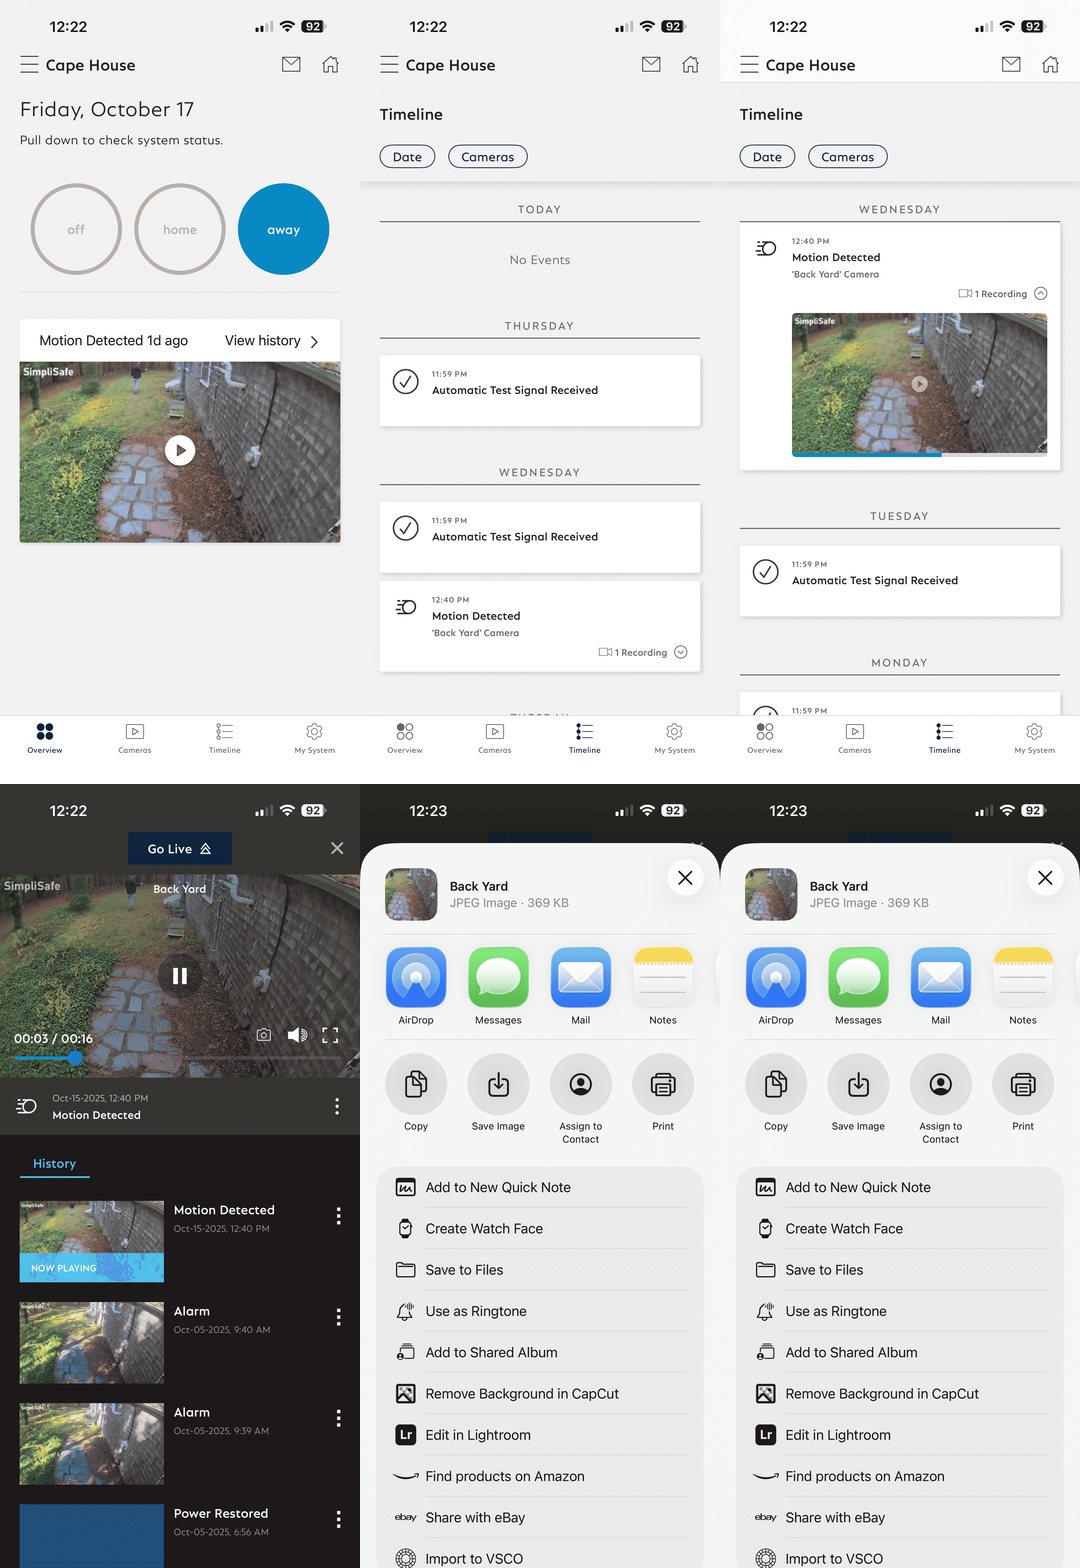
To Use Photo Capture
Open the SimpliSafe® Mobile App on your phone or tablet
Choose Timeline from the bottom navigation bar
Tap on any motion event from your historical timeline
Press the camera icon on the video control overlay of the video
Choose Save Image to save the snapshot to your device
Note, you may need to allow SimpliSafe® permission to your photos prior to being able to save the image locally.
Help Center Article
•
Cameras
Troubleshooting a Blinking Yellow LED on the Video Doorbell Pro
Overview
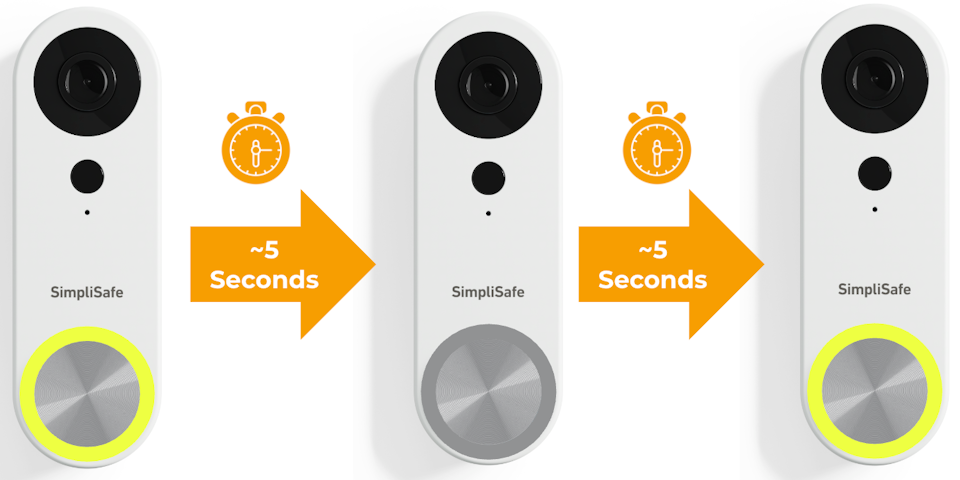
Your Video Doorbell Pro is equipped with a ring light around the doorbell button, to alert you to various statuses for your doorbell. In this scenario, you’ll see the LED turn yellow for about 5 seconds, then turn off for another 5 seconds - all while repeating this sequence.
Confirm your Doorbell’s Wiring Meets our Requirements
As a first step, you’ll want to confirm that the wiring for your location’s doorbell remains unchanged. Ensure that you have a mechanical chime, and that your transformer is rated for 8-24 volts. Remember, these are a strict requirement for the Video Doorbell Pro. If you made any changes to your chime or got a new transformer, confirm that they still meet our requirements or contact a licensed electrician for further assistance.
Perform a Soft Reset on the Video Doorbell Pro
If your home or business meets the requirements for Video Doorbell Pro, as a next step you’ll perform a soft reset on the device to attempt to clear the unresponsive state and get it up and running again.
How to Perform a Soft Reset on the Video Doorbell Pro:
Using a T5 Torx Screwdriver (included with your Video Doorbell Pro), remove the security screw from the bottom of the Video Doorbell Pro to take off the faceplate
Press and release the larger button on the back of the Video Doorbell Pro
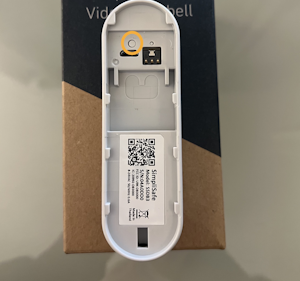
Secure the Video Doorbell Pro back onto its mounting plate by placing the faceplate back onto the device and reinserting the security screw
The light should turn solid yellow, followed by flashing white with audio cues - indicating that it’s ready for set up
The Video Doorbell Pro may need to be reinstalled using the SimpliSafe® Mobile App
Still Need Help?
If you require further assistance, our support team is here to help.
Related Articles
Help Center Article
•
Video Doorbell Pro
Unable to Set Up a Camera Because it is Already Associated With Another Account
Why does this error happen?
This error usually occurs because this camera is already associated with another account. To deter theft, we do not allow a camera to be added to an account without being fully removed from the original account.
This tends to occur when a camera is purchased second-hand. The previous owner may have forgotten to remove the camera from their account. Unfortunately, SimpliSafe is unable to override this. The previous owner must remove the camera from their account.
How can I resolve this?
If you are able to contact the previous owner and ask them to remove the camera from their account, you should be able to resolve this matter rather quickly. The previous owner would need to visit the settings page of the camera in question, scroll to the bottom, and press the button for “Remove Camera”.
Help Center Article
•
Cameras
