Conversation List
Video Doorbell Pro Stopped Working
When the Video Doorbell Pro detects motion and begins to record, a steady blue light should appear as a ring around the button. Triggering a motion event is a good first step to determining if the Video Doorbell Pro is responsive and receiving power.
If your Video Doorbell Pro has power and is responsive, but isn’t working in the app – you’d want to further troubleshoot the Wi-Fi connectivity. If your Video Doorbell Pro appears to not have power or is unresponsive, this guide is for you. You’ll want to start by confirming your home or business meets the Video Doorbell Pro requirements. After that, continue section by section until your issue is resolved.
Video Doorbell Pro Requirements
The Video Doorbell Pro has a set of specific requirements in order to function. Not meeting these requirements can result in the Video Doorbell Pro not working out the gate, or for it to cease functioning after a period of time.
Existing doorbell wiring
A mechanical chime. Not compatible with digital chimes.
A transformer with 8-24V, 1 Amp
If your existing doorbell meets these requirements, it’s important to check the wiring and contacts, and the pins from your mounting plate and Video Doorbell Pro faceplate to ensure that things are connecting properly.
Checking the Wiring and Contacts:
First, cut power to the breaker for your doorbell, to ensure no power is going to it
Remove the Video Doorbell Pro faceplate by using releasing the security screw on the bottom of it with its included screwdriver
Ensure that proper contact is being made between the terminals/contacts and the wiring from your existing doorbell
You can adjust the wiring by loosening the screws to adjust the wiring
Checking the pins Between the Mounting Plate and Video Doorbell Pro:
First, cut power to the breaker for your doorbell, to ensure no power is going to it
Remove the Video Doorbell Pro faceplate by using releasing the security screw on the bottom of it with its included screwdriver
Ensure that the mounting plate isn’t too tight, or bending. This can prevent solid contact between the mounting plate and the gold pins on the backside of the Video Doorbell Pro
If the plate is bending, please contact our support team for a replacement
Ensure that the pins are all there, without any bends to them. Do not touch the pins, but simply observe them with your eyes – they are delicate!
If any pins are bent or missing on the Video Doorbell Pro, please contact our support team for additional assistance
Performing a Soft Reset
Performing a soft reset on the Video Doorbell Pro can help clear it from an unresponsive state, and will also test that the device has power.
To perform a soft reset:
Remove the Video Doorbell Pro from its faceplate by releasing the security screw on the bottom of the device with its included Torx screwdriver
Press and hold the larger button on the back of the Video Doorbell Pro for 30 seconds and then release it
After about one minute, the camera will reboot and go into setup mode
Secure the Video Doorbell Pro to the mounting plate once more, and insert the security screw using your screwdriver
You should see a solid yellow LED light come on, followed by a flashing white light with audible cues to get started
Open the SimpliSafe® Mobile App on your phone or tablet
You’ll now choose the Setup Camera prompt, or use our installation guide for step-by-step instructions on adding your camera back to your system
Performing a Factory Reset
If normal troubleshooting and a soft reset do not resolve the issues with your Video Doorbell Pro, you’ll want to try performing a factory reset on the device to flash it back to factory settings.
To perform a factory reset:
Remove the Video Doorbell Pro from its faceplate by releasing the security screw on the bottom of the device with its included Torx screwdriver
Press and release the smaller button on the back of the Video Doorbell Pro
Secure the Video Doorbell Pro to the mounting plate once more, and insert the security screw using your screwdriver
The LED on the Video Doorbell Pro should change to a solid yellow light
If the Video Doorbell Pro was previously connected to Wi-Fi, it should automatically reconnect to the app
If the Video Doorbell Pro does not reconnect, open the SimpliSafe® Mobile App on your phone or tablet
You’ll now choose the Setup Camera prompt, or use our installation guide for step-by-step instructions on adding your camera back to your system
Still Need Help?
If your Video Doorbell Pro does not have power after taking the above steps, please contact our support team for further assistance.
Help Center Article
•
Video Doorbell Pro
How to Find the Serial Number for Your SimpliSafe® Device or Camera
During troubleshooting or for account verification purposes, you may be required to identify the serial number for a product within your system. You can easily find the serial number for your devices or cameras within the SimpliSafe® Mobile App.
Locating the Serial Number for your Base Station in the SimpliSafe® App
Open the SimpliSafe® Mobile App on your phone or tablet
Tap on the three-bar menu (hamburger menu) in the upper left corner of the app screen
Choose Help & Support
At the top of the menu you’ll see an Account Number
This is the serial number for your Base Station
Locating the Serial Number for your Devices or Cameras in the SimpliSafe® App
Open the SimpliSafe® Mobile App on your phone or tablet
Choose My System from the bottom navigation bar
Tap on the Device or Camera you wish to manage
Scroll down to Basic Info
Your device or camera’s Serial Number will be listed here
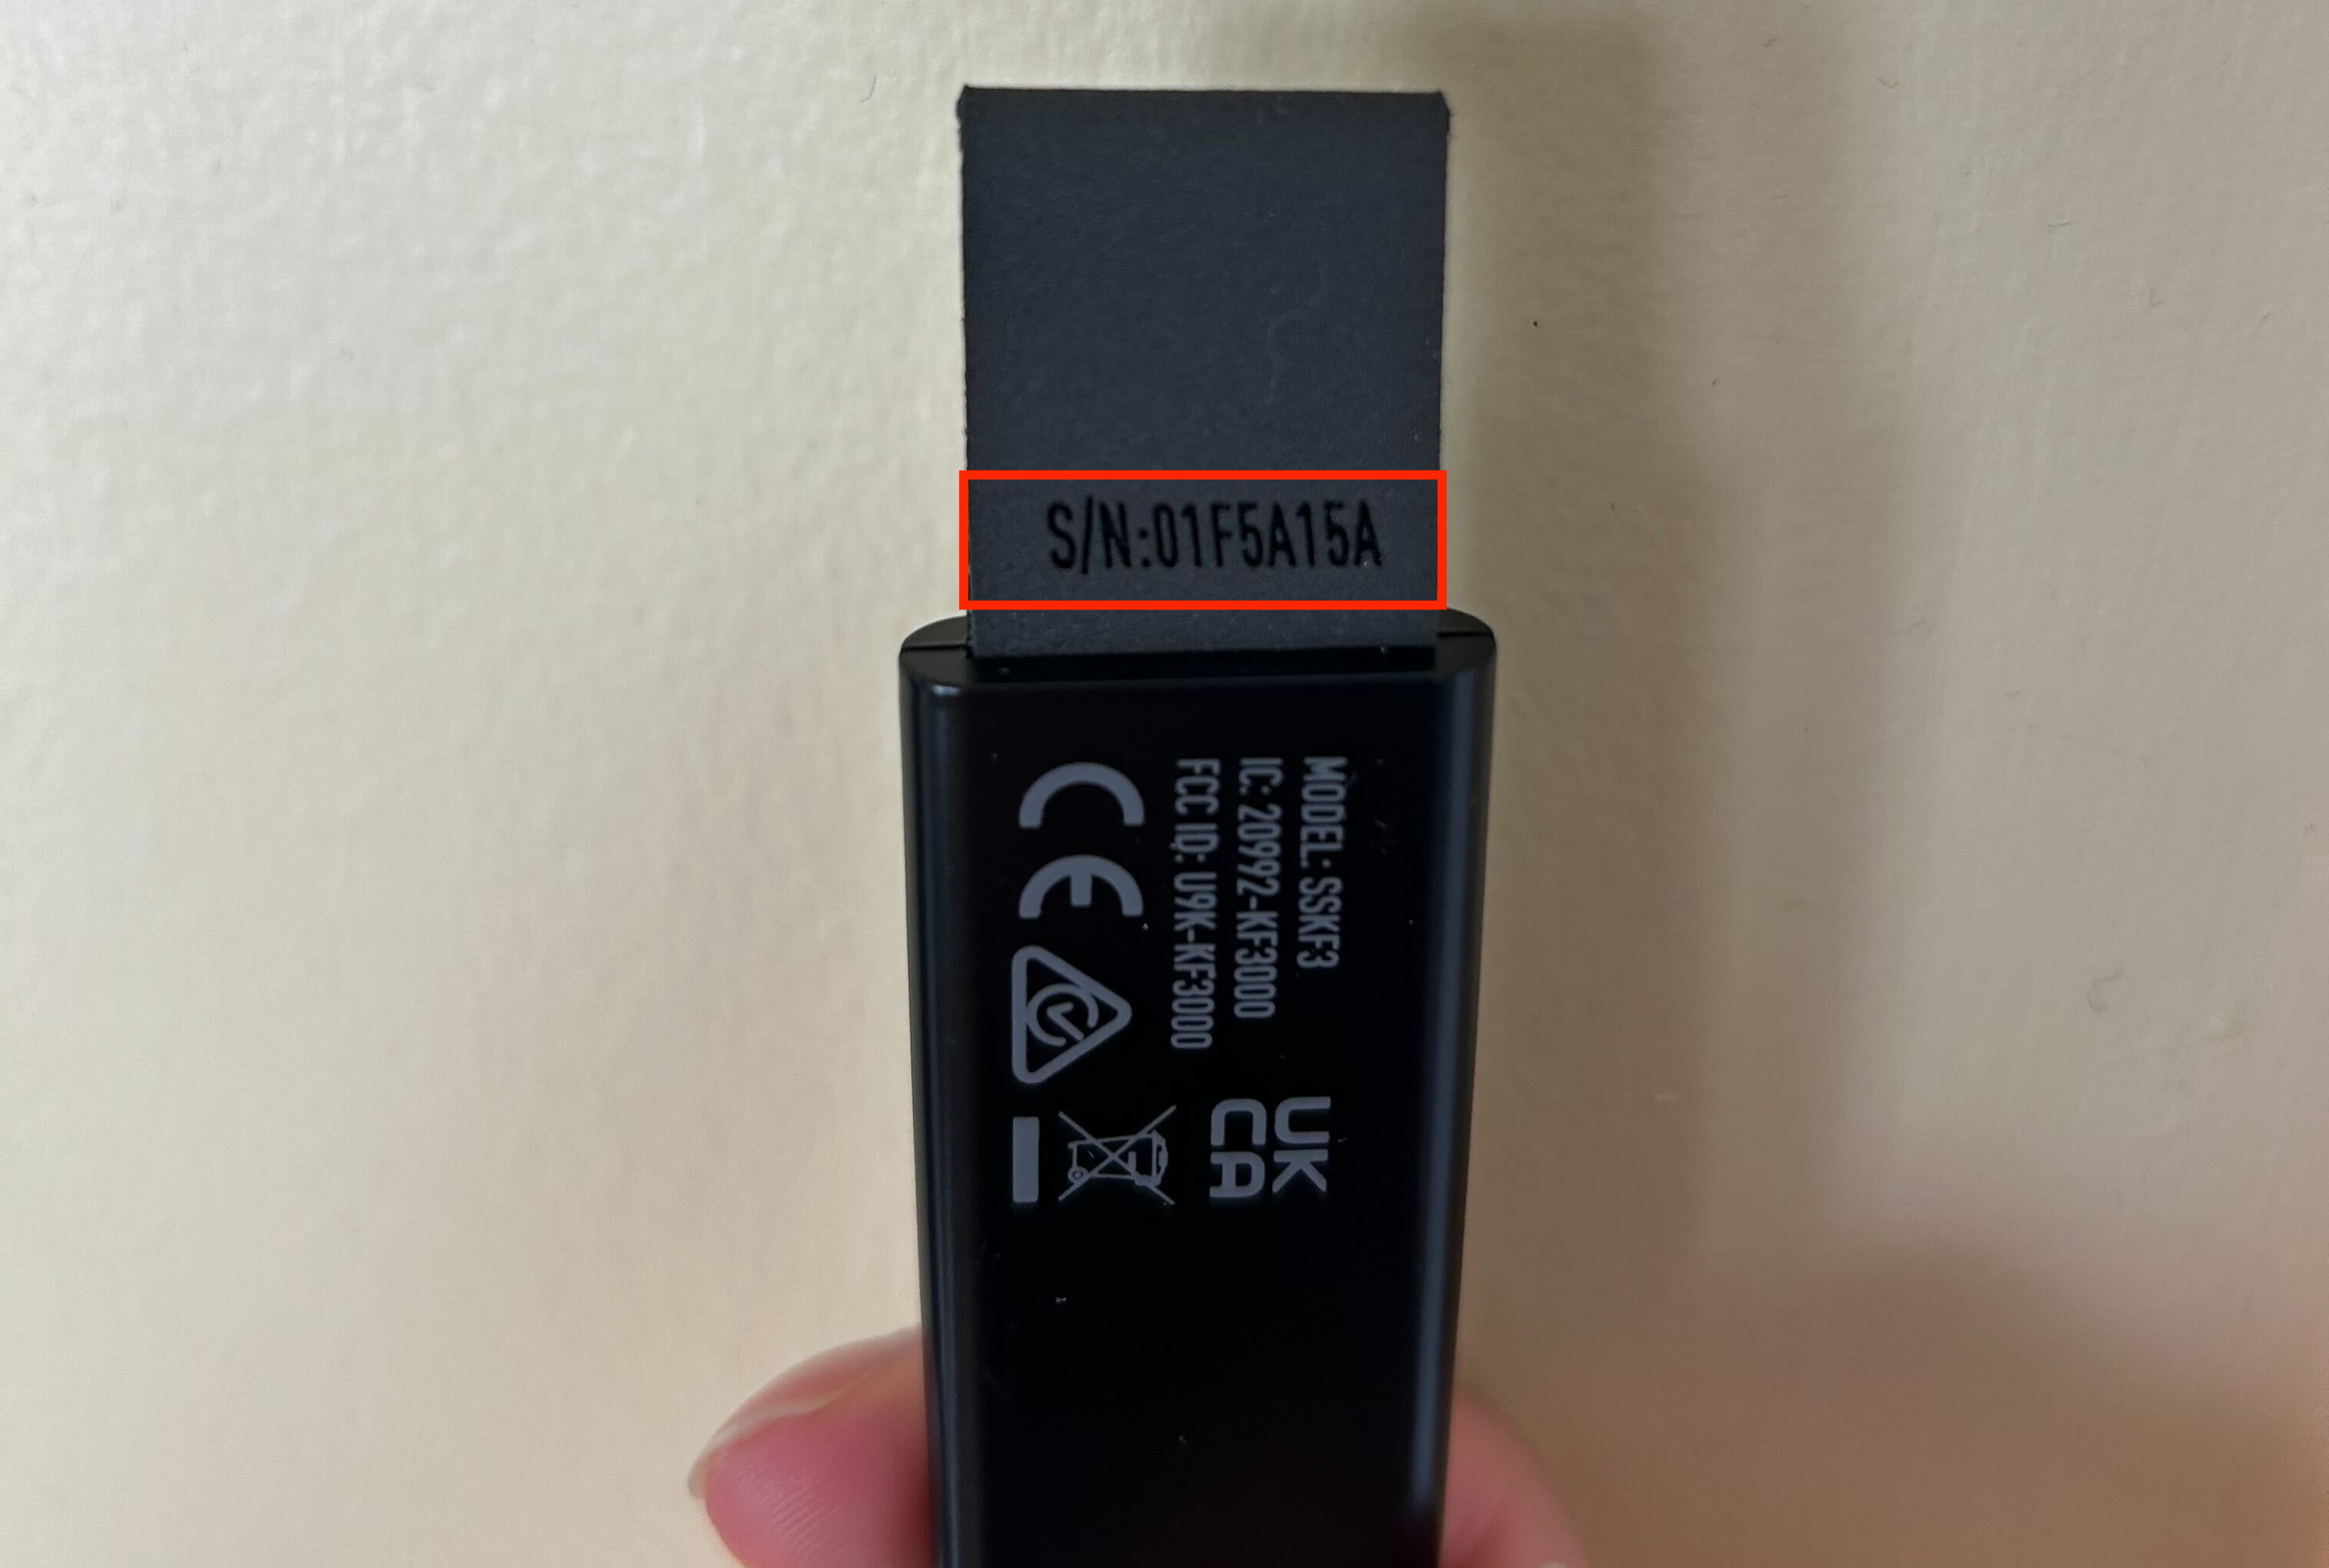
There may be a point where you need to find the serial number on the physical device itself. The rest of the article will guide you through finding the serial number for each product. Click to expand the collapsible section for the product type you wish to learn more about.
Help Center Article
•
Product Support
My Doorbell Won't Ring
When the Video Doorbell Pro is rung, you can hear it from two different places: the doorbell’s chime and the Base Station. If you do not hear a chime from one or both of these places, follow the troubleshooting steps below.
The Doorbell Chime Does Not Ring, or the Chime is Incomplete
The Chime Connector is an additional device to make sure enough power is sent to the Video Doorbell Pro.
A Chime Connector may be necessary if:
The Video Doorbell Pro doesn’t ring your chime, but the livestream video and other features still work.
You hear constant buzzing from the mechanical doorbell’s chime.
The chime only “dings” but does not “dong” or has other unusual behavior.
A Chime Connector will be shipped with every Video Doorbell Pro we sell, however if you do still require this please contact our Support team. If you need help installing this, visit our Chime Connector Installation Guide for step-by-step instructions on the installation process.
Please note that the Video Doorbell Pro and Chime Connector require:
Existing doorbell wiring
A mechanical chime. The Video Doorbell Pro and Chime Connector are not compatible with digital chimes.
A transformer with 8-24V, 1 Amp.
My Base Station Doesn't Chime
If the Base Station does not chime when your Video Doorbell Pro is rung, make sure that the Base Station Chime for your Video Doorbell Pro is enabled or loud enough. You can check this in the SimpliSafe® App by taking the following steps:
Open the SimpliSafe® App on your phone or tablet
Select the My System gear from the navigation menu at the bottom of the screen
Select Camera Settings
Choose your Video Doorbell Pro
Select Base Station Chime
Drag your finger along the slider bar to your desired volume, and then tap Save
Help Center Article
•
Video Doorbell Pro
OhmKat Installation Guide
Overview
OhmKat is a 3rd party supplier of Built in Transformer Power Supplies and Wireless Digital Chimes to support the SimpliSafe Video Doorbell pro.
The OhmKat Power Supply provides a DIY installation alternative, ensuring the Video Doorbell Pro is accessible to all SimpliSafe customers. It is simply a case of plugging in the power supply to a nearby outlet, and doesn't require a certified electrician to install.
Customers can chose to add the wireless digital chime that simply slots into the power supply set up. The OhmKat Wireless Chime has a choice of 37 different tones/melodies.
OhmKat products do not work in conjunction with any existing hard wired setup.
You can purchase this product online or through one of our expert sales agents.
Installation
Setting up the OhmKat Power Supply:
Thread the power cable through the back of the doorbells mounting plate, and then place the two ends of the split red & blue connection under the screws. Once the exposed wire is making sufficient contact, then begin to tighten the screw (Note: there is no requirement in which screw you should install red/blue wired.)
Connect the transmitter as seen in the installation diagram
Plug the chime receiver into an outlet within 50 feet of the transmitter, and then plug in the the Ohmkat power supply.
Give the doorbell some time to power on. The button will light up orange while it is booting up, then turn to white when ready to set up in the SimpliSafe app.
Open the SimpliSafe app, press on the hamburger menu in the top right, and then select “Add Device or Camera”
Then proceed to select Video Doorbell from the options, and follow the on screen instructions.
Once installation is completed, press the doorbell button. I chime should be heard from the doorbell itself, as well as the chime receiver. (Note: if the chime receiver fails to chime, relocate the chime receiver closer to the transmitter)
Setting up the Wireless Chime & Receiver:
While plugged in, change the volume and chime tune on the chime receiver as desired. These are the first and second buttons respectively.
Press and hold the volume button on the chime receiver. You will hear two beeps. The receiver is now in pairing mode.
While still holding the volume button, ring the doorbell three times quickly. You should hear one beep from the chime receiver. This indicates successful pairing. Release the volume button.
Your chime is now paired. Ring the doorbell to test.
Pairing additional Wireless Chimes:
You can pair up to 10 chimes to a single transmitter.
Plug in the second non-paired receiver into a outlet. With the transmitter plugged in at the split connection, do the following:
Press and hold the volume button. (Do not hold it for more than 5 second or all pairing will be deleted.)
Then simultaneously press the doorbell button three times quickly in succession so that the transmitter sends a pairing communication to the receiver. You should hear the chime ring. As soon as the chime rings release the volume button. Just make sure that in the SimpliSafe app the chime setting is on.
Repeat no. 3 if not successful. Once it rings, it is paired.
Once paired both receivers will ring when the bell is pressed. Repeat the process for any
Troubleshooting:
Help Center Article
•
OhmKat
OhmKat Power Supply Troubleshooting
Overview
All OhmKats feature a patented OTPT (One Touch Power Test) technology that allows you to self test them for their full operational capability.
Troubleshooting
While the Ohmkat Power Supply is plugged in, an Amber light will illuminate on the adaptor to indicate power. Remove the OhmKat wires from behind the doorbell, and touch the two wires together. (Don't worry - you won't be shocked).
Keep the wires connected whilst you confirm the amber light on the transformer has dimmed to approximately 20% brightness.
If the light dimmed, this confirms the OhmKat Power Supply is working as expected.
Connect the power supply back the Video Doorbell Pro.
If the Video Doorbell Pro does not power back on follow these steps.
Related Articles:
Help Center Article
•
OhmKat
Maximising the Battery Life of the Outdoor Security Camera Series 2
The Outdoor Security Camera Series 2 has a battery life of up to 3 months, depending on settings and usage. To help maximise the life of the camera’s battery, we recommend making the following adjustments to its settings and location.
Camera Location
Your camera is activated by a motion sensor for accurate alerts. If your camera is in the vicinity of a high-traffic area, like a busy road or pavement, the motion sensor will be triggered more frequently for unnecessary movement, which can cause the battery to drain.
If your camera is in a high-traffic area:
Reposition the camera so its field of view does not include the busy road or pavement. You can also set up Activity Zones to avoid monitoring these areas.
Make sure that there are no tree branches or large plants obstructing the camera’s view.
Be sure to mount your camera 6-8 feet above the ground, with the lens facing downward at a 30-degree angle.
Camera Settings
There are multiple settings that can be adjusted to help extend the battery life of your camera. To access these settings in the SimpliSafe® Mobile App:
Select My System from the navigation bar at the bottom of the screen
Choose Camera Settings
Select your Outdoor Camera Series 2
Battery-saving Settings:
Lower your camera’s motion sensitivity settings to Medium or Low - this will impact how frequently the camera is triggered.
Enable People-Only motion detection to ensure your camera only captures humans, and is not unnecessarily triggered by other moving objects or animals.
Set up Activity Zones to control the areas that the camera will monitor. This is helpful if there is a high-traffic zone in the view that you do not need to monitor.
Use Standard Night Vision instead of the Spotlight feature.
Charge the Camera’s Battery Fully
Charge it Completely
If the battery for the Outdoor Camera Series 2 isn’t completely charged, it will give the appearance of draining quickly. The camera’s battery takes up to 6 hours to charge completely. When the battery is charging, you will see a blinking white light. You’ll know that the battery is fully charged once all 3 lights are illuminated and no longer blinking.
Use the Correct Power Adapter
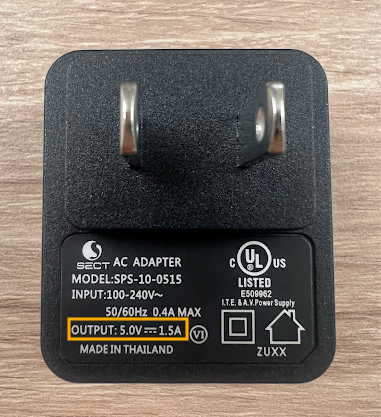
The battery for the Outdoor Camera Series 2 requires a USB power adapter with an output of 5.0V, 1.5A+. Failure to use the correct power adapter can result in the battery not charging completely.
A list of power adapters that fit this requirements are:
The SimpliCam® Wired Indoor Security Camera’s adapter
The Smart Alarm Wireless Indoor Security Camera’s adapter
Most iPhone adapters
Most Android adapters
If you don’t know the output of your power adapter, most models will have it printed on the device itself - as seen in the image below.
If you are using the correct power adapter, make sure that you are plugging it into an outlet directly in a wall. Using a USB power strip or USB power hub may not supply efficient power to charge the battery.
Help Center Article
•
Outdoor Camera Series 2 UK
Outdoor Camera Power Cable Specifications
The Outdoor Camera Power Cable is a great way to keep your Outdoor Camera powered at all times. The Outdoor Camera Power Cable is 25 feet long and is IP65 water-resistant cable. The Outdoor Camera Power Cable comes with cable clips that can be applied to a clean surface with the built-in adhesives, or permanently attached to that surface using screws. We recommend a 5/64” drill bit to adhere the cable clips to a surface when not using the adhesive option.
When the Outdoor Camera is plugged in with the power cable, you’ll see faster live streams and enjoy pre-roll recordings with Performance Mode.
Need to purchase an Outdoor Camera Power Cable? You can find it available for purchase on our website.
Help Center Article
•
Cameras