Conversation List
Motion Sensor Gen 2 Offline
NOTICE: To ensure optimal performance of your sensor, we recommend updating your Base Station firmware to 2.21.4.6. You can manually run an update by using the SimpliSafe® Mobile App and navigating to My System > Base Station Settings > Firmware and tapping on Update Available. If you're experiencing this issue and are already on 2.21.4.6, please follow the troubleshooting steps in this article.
If your Motion Sensor Gen 2 is showing as offline on the SimpliSafe® Mobile App, this is an indicator that the battery within the device needs to be replaced.
The Motion Sensor Gen 2 takes a single (1) CR-123A Lithium 3V battery and has a life expectancy of up to 4 years depending on placement and usage.
To replace the battery, slide the sensor up and off its’ bracket. Then replace the lithium battery and slide the sensor back onto its’ bracket.
Please note that the error may take up to 24 hours to clear from the SimpliSafe® Mobile App after taking these steps. If you want to bypass that timeframe, there are two steps you can take to remove the error from the SimpliSafe® App.
First, place your system into Test Mode and test the sensor to reestablish a connection.
To place your system into Test Mode:
Using your Keypad go to Menu > Enter your Primary PIN > Test Mode
Press and release the button on the Motion Sensor. The Base Station should announce “Motion Sensor” and the timeline on the SimpliSafe® App should show “Motion Sensor Test”.
If the Test Mode step does not work, it’s possible that your sensor has been offline for too long. The best step would be to remove the sensor from the SimpliSafe® App and then add it back to your system.
To remove your Motion Sensor Gen 2:
Open the SimpliSafe® mobile app on your phone or tablet
Choose My System from the bottom navigation bar
Select Device Settings
Tap on the sensor you wish to remove
Choose ‘Remove Device’
Once you have removed your sensor, you can add it back using our Installation Guide.
Help Center Article
•
Motion Sensor Gen 2
Motion Sensor Gen 1 Offline
NOTICE: To ensure optimal performance of your sensor, we recommend updating your Base Station firmware to 2.21.4.6. You can manually run an update by using the SimpliSafe® Mobile App and navigating to My System > Base Station Settings > Firmware and tapping on Update Available. If you're experiencing this issue and are already on 2.21.4.6, please follow the troubleshooting steps in this article.
If your Motion Sensor is showing as offline on the SimpliSafe® Mobile App, this is an indicator that the battery within the device needs to be replaced.
The Motion Sensor takes a single (1) CR-123A Lithium 3V battery and has a life expectancy of up to 5 years depending on placement and usage.
To replace the battery, slide the sensor up and off its’ bracket. Then replace the lithium battery and slide the sensor back onto its’ bracket.
Please note that the error may take up to 24 hours to clear from the SimpliSafe® Mobile App after taking these steps. If you want to bypass that timeframe, there are two steps you can take to remove the error from the SimpliSafe® App.
First, place your system into Test Mode and test the sensor to reestablish a connection.
To place your system into Test Mode:
Using your Keypad go to Menu > Enter your Primary PIN > Test Mode
Press and release the button on the Motion Sensor. The Base Station should announce “Motion Sensor” and the timeline on the SimpliSafe® App should show “Motion Sensor Test”.
If the Test Mode step does not work, it’s possible that your sensor has been offline for too long. The best step would be to remove the sensor from the SimpliSafe® App and then add it back to your system.
To remove your Motion Sensor Gen 1:
Open the SimpliSafe® mobile app on your phone or tablet
Choose My System from the bottom navigation bar
Select Device Settings
Tap on the sensor you wish to remove
Choose ‘Remove Device’
Once you have removed your sensor, you can add it back using our Installation Guide.
Help Center Article
•
Motion Sensor Gen 1
How To Replace Motion Sensor Gen 1 Battery
The Motion Sensor takes a single CR-123A Lithium 3V battery and has a life expectancy of up to 5 years depending on placement and usage.
To change your Motion Sensor battery, slide the sensor up and off its bracket. Then replace the battery and slide it back onto its bracket.
If your sensor is still offline after taking these steps, skip to the section below for troubleshooting steps.
Is your Motion Sensor Gen 1 still offline after replacing the battery?
If the sensor does not come back online after changing the battery, it’s possible that your sensor has been offline for too long. The best step would be to remove the sensor from the SimpliSafe® Mobile App and then add it back to your system.
To remove your Motion Sensor Gen 1:
Open the SimpliSafe® Mobile App on your phone or tablet
Choose My System from the bottom navigation bar
Select Device Settings
Tap on the sensor you wish to remove
Choose ‘Remove Device’
Once you have removed your sensor, you can add it back using our Installation Guide.
Help Center Article
•
Motion Sensor Gen 1
Enabling Secret Alerts for your SimpliSafe® Sensors
What are Secret Alerts?
Secret Alerts* are private notifications sent to you by specific sensors you designate to be on a special “alert-only” setting. Sensors on this setting won’t trigger a system alarm or chime to the Base Station, but send a discreet notification directly to you instead. All of your SimpliSafe® cameras will also film a short recording so you have footage of what tripped the sensor.
Requirements
A supported monitoring subscription:
Pro Premium
At least one of the following SimpliSafe® Sensors
Entry Sensor
Motion Sensor
Glass Break Sensor
How do I Enable Secret Alerts?
On iOS (Apple) Devices:
Open the SimpliSafe® Mobile App on your phone or tablet
Select My System from the bottom navigation bar
Choose Device Settings
Then tap the sensor you wish to customise
Choose Off, Home, or Away from under ‘Alarm Mode’
Next, choose ‘Secret Alert’ and then ‘Send to Base’ to save this setting
Repeat for each mode, as necessary
On Android Devices:
Open the SimpliSafe® Mobile App on your phone or tablet
Select My System from the bottom navigation bar
Choose Device Settings
Then tap the sensor you wish to customise
Choose Off, Home, or Away from under ‘Alarm Mode’
Next, choose ‘Secret Alert’ and then ‘OK’
Once you are done, tap ‘SAVE’ on the top right corner of the screen to save this setting
Repeat for each mode, as necessary
To ensure that you are notified whenever a sensor triggers a Secret Alert, make sure that you have push notifications enabled.
Help Center Article
•
Sensors
How to Rename a SimpliSafe® Sensor
There may be a point where you need to rename a sensor for your SimpliSafe® System. Renaming a sensor can be done easily through the SimpliSafe® Mobile App, but you can also rename a sensor using your Keypad. The following will walk you through these steps for each platform so you can pick whichever one is easiest for you.
SimpliSafe® Mobile App:
Open the SimpliSafe® Mobile App on your phone or tablet
Select My System from the navigation bar at the bottom of the app screen
Choose Device Settings
Choose the sensor you would like to modify
Tap the pencil icon next to Name
iOS: Select one of the pre-selected names from the list, or scroll to the bottom and select Custom Name* to input your own name for your sensor
Android: Use the backspace button to delete the existing sensor name. Once removed, you can choose a new name from the drop down menu, or type in the empty field a Custom Name* for your sensor
Be sure to tap on Send to Base or Save to save your settings before exiting
*Note, Custom Names for the Entry Sensor are not supported by Entry Sensor Alert.
Web App:
Log in to the Web App using the browser of your choice on a computer
Select your property from the list on the Account Overview page, if applicable
Choose Devices from the left-hand navigation menu
Click on the sensor you wish to edit
A pop-up will appear to the right of your browser
Select the pencil icon next to your sensor’s name
Enter the new name you wish to use in the field
Select the check mark when done
Be sure to click on Save Changes from the bottom of the pop-up before exiting to save your selection
*Note, Custom Names for the Entry Sensor are not supported by Entry Sensor Alert. To confirm which names are available, please use the SimpliSafe® Mobile App to rename your sensor.
Keypad:
Press Menu
Enter your Primary PIN
Using the arrow keys, choose Devices and then Open to enter the Devices menu
Scroll down to select the sensor you wish to modify
Press the right arrow to choose rename
Choose one of the preset names from the list using the arrow keys, or select Other at the end of the list to enter a Custom Name*
*Note, Custom Names for Entry Sensor are not supported by Entry Sensor Alert at this time.
The Keypad uses ABC mode for typing. In this mode, you'll cycle through the corresponding characters (numbers, symbols, punctuation, letters) using the keys numbered 0-9 on your Keypad.
1 Press
1*
2
3
4
5
6
7
8
9
0
2 Presses
(Space)
a
d
g
j
m
p
t
w
(Space)
3 Presses
!
b
e
h
k
n
q
u
x
4 Presses
"
c
f
i
l
o
r
v
y
5 Presses
#
A
D
G
J
M
s
T
z
6 Presses
$
B
E
H
K
N
P
U
W
7 Presses
%
C
F
I
L
O
Q
V
X
8 Presses
&
R
Y
9 Presses
'
S
Z
10 Presses
(
*For the '1' key, more characters will appear after 10 presses and in this specific order:
) * + , - . / : ; < = > ? @ [ \ ] ^ _ ' { | } ~
Help Center Article
•
Sensors
Water Sensor Not Responding
The warning ‘Sensor Not Responding’ for a Water Sensor can be caused by a couple of things, including a low battery or a weak connection between the device and the Base Station.
As a first step, we’d recommend ensuring that the battery is correctly installed. To do this:
Slide the Sensor off its’ bracket by pushing it towards the wall and up
Remove the battery from the Water Sensor
Wait 15 seconds, then reinstall the battery again
Then, test the Water Sensor by placing your system into Test Mode using your Keypad.
Menu > Enter Master PIN > Test Mode
Press and release the button on the Water Sensor. The Base Station should announce “Water Sensor” and the timeline should show “Water Sensor Test” on the SimpliSafe Mobile App.
If you do not hear the Base Station respond, the battery within the Water Sensor may need to be replaced.
The Water Sensor takes a single CR-2032 Lithium 3V battery. To replace the battery, twist the bottom and top apart to expose the battery compartment. You can also follow the steps here.
If you have replaced the battery and are still encountering the ‘Sensor Not Responding’ error, it likely is the result of a weak connection to the Base Station. A weak connection to the Base Station can often be caused by something environmental, like brick walls or dense home construction.
To test this, temporarily move the Water Sensor closer to the Base Station and see if the error stops. If the sensor does work in a new location, it is likely the result of the environment near the prior location that is causing the conflict. You’ll have two options from here; Keep the sensor in its’ new location closer to the Base Station, or try to identify and clear the interference in the sensor's existing location. If you choose to keep the sensor in the location where it has encountered the error, you’ll want to look for environmental factors, such as dense building materials, or wireless devices that are nearby that could be interfering with the RF signal between the sensor and the Base Station. If you have any devices that output a wireless signal, we recommend trying to keep them at least 3-5 feet away from your sensor. That should help to clear up communication between the device and the Base Station.
Help Center Article
•
Water Sensor
Why Is My Entry Sensor Shown As Open When My Door Is Closed?
If you are consistently seeing a warning that one of your Entry Sensors is open, despite all of your doors and windows being closed, one of the following items is likely the cause:
Your Entry Sensor is too far away from its corresponding magnet piece
Your Entry Sensor and/or its corresponding magnet are placed on a metallic surface
Troubleshooting
First, double-check that the serial number printed on the sensor matches with the number reported in the warning. If the warning only shows a name, you can access that individual sensor’s settings through the SimpliSafe® Mobile App to find the sensor number by taking the following steps:
Open up the SimpliSafe® Mobile App on your smartphone or tablet
Select My System from the navigation bar at the bottom of the screen
Select Device Settings
Tap through the Entry Sensors on your system - their serial numbers will be displayed at the top of the screen
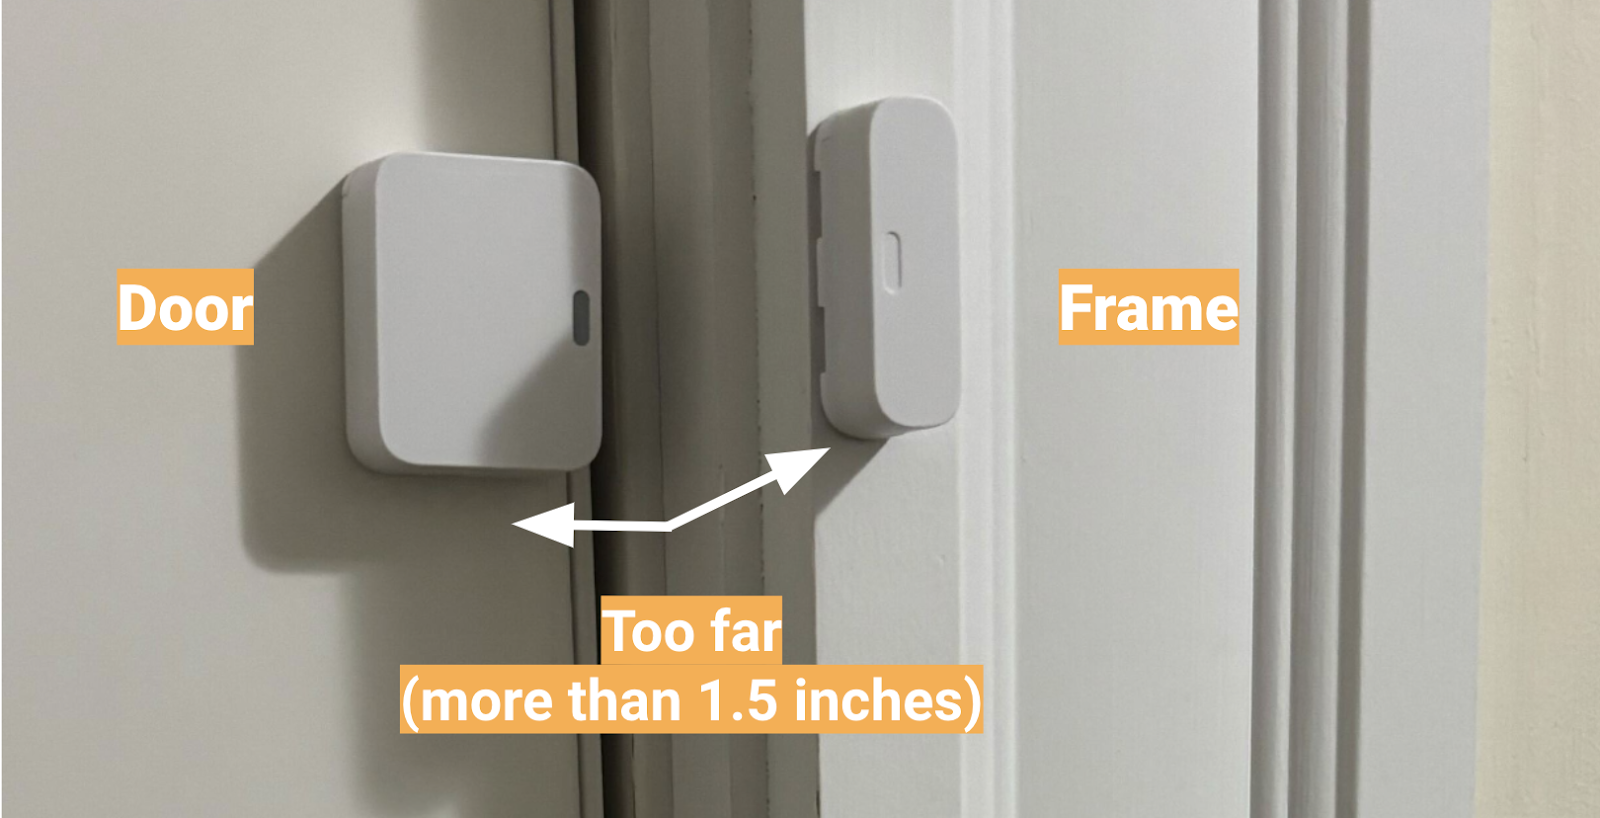
Next, confirm that the door or window where this Entry Sensor is located is closed. If it is closed, make sure that your Entry Sensor and its corresponding magnet are no more than 1.5 inches apart. If they are any farther apart, as seen in the image below, the sensor will be considered open.
You should also make sure that this Entry Sensor is not placed on a metal or steel surface, as that can cause the system to incorrectly register an Entry Sensor as open. If the door or window where this issue is occurring is metal, place a buffer between both parts of the Entry Sensor and the surface. This can be anything like a second layer of adhesive, thin cardboard, or velcro.
Help Center Article
•
Entry Sensor