Conversation List
How to Recharge the Outdoor Security Camera Series 2 Battery
The Outdoor Security Camera Series 2 has a rechargeable battery that lasts up to 3 months depending on settings and usage. To remove the battery, simply untwist the front of the camera off of your Outdoor Camera Series 2. Then, use the pull tab on the battery to gently remove it from the battery compartment.
You can purchase an Outdoor Camera Power Cable to keep it charged
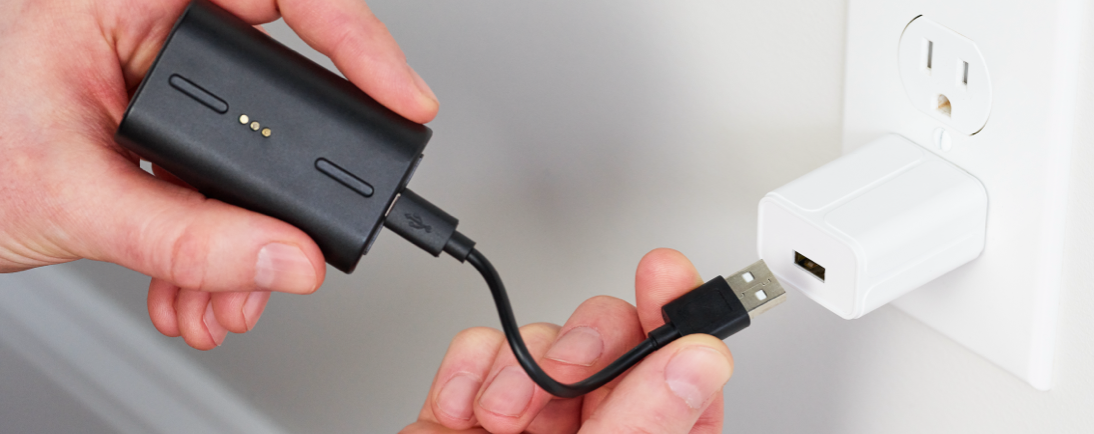
To charge your battery, you’ll need a USB power brick that supports 5V, 1.5A+ (7.5W+) charging. Using the supplied cable, plug the battery into the power brick to charge your battery. To fully charge your battery, it can take up to 6 hours. You’ll know the battery is fully charged once all 3 lights are illuminated and no longer pulsing.
To replace your battery, slide it back into the battery compartment in the Outdoor Camera Series 2 with the 3 gold circles on the battery facing up and the battery’s tab facing outwards. Then, twist the cap back onto the Outdoor Camera Series 2 clockwise until you hear it click.
You’ll know that your Outdoor Camera Series 2 has been assembled properly once it makes a high-pitched chime.
Help Center Article
•
Outdoor Camera Series 2 UK
Smart Alarm Wireless Indoor Security Camera LED Status Light Colours
The status light (located on the front of your Smart Alarm Wireless Indoor Security Camera indicates the mode of the camera. It can tell you at a glance if your camera is updating, recording, or if someone is live streaming the feed. Below is a chart of the light colours that you can expect to see when using the Smart Alarm Indoor Camera in your home.
LED Colour
State/Speed
Activity
Blue
Slow Pulse
Camera is active and in use by user OR Camera is recording due to detected motion
Yellow
Solid
Firmware update
Red
Fast Pulse
Wi-Fi Disconnected
Help Center Article
•
Smart Alarm Indoor Camera
Outdoor Camera Permanent Mount Installation Guide
The Outdoor Camera Permanent Mount is a great way to install your camera anywhere with an extra-sturdy screw-in mount. This mount is perfect for walls and overhangs, bringing you peace of mind that your camera is harder to tamper with.
The following article will walk you through the installation process of the Outdoor Camera Mount. Installation video coming soon!
Need to purchase an Outdoor Camera Permanent Mount? You can find it available for purchase on our website .
Before Getting Started
We recommend installing the Outdoor Camera Mount with a power drill, instead of a Phillips head screwdriver. You’ll need a 7/64" drill bit for pilot holes or 3/16" for the anchors. If you are installing the Outdoor Camera Mount onto brick, stone, or stucco, you may also need wall anchors (not included in the box).
Placement Tips for the Outdoor Camera Mount
Ensure that the Outdoor Camera is placed no lower than 6 feet from the ground, but no more than 8 feet high
We recommend mounting your Outdoor Camera at 7-8 feet for best performance
The Outdoor Camera should be angled down slightly, roughly a 30-degree angle
If the Outdoor Camera is mounted upside down, the motion sensitivity is halved from ~30 feet to just about ~15 feet
The Outdoor Camera is most sensitive to side-to-side motion, so the camera should be positioned towards areas where people will walk across its field of view, rather than walking towards the camera.
You’ll also want to identify factors that could dramatically change in temperature or interference regarding the Outdoor Camera’s heat signature detection. For example, driveways that can get very hot in the summer, or a flag moving in the wind and causing a cool shadow.
Outdoor Camera Mount Installation Guide
If you are installing into brick, stone, or stucco - you may need to pre-drill holes with your 3/16” drill bit. Once the holes have been drilled, hammer in the wall anchors to support the installation of the screws.
Attach the mount to the wall or overhang with the included screws
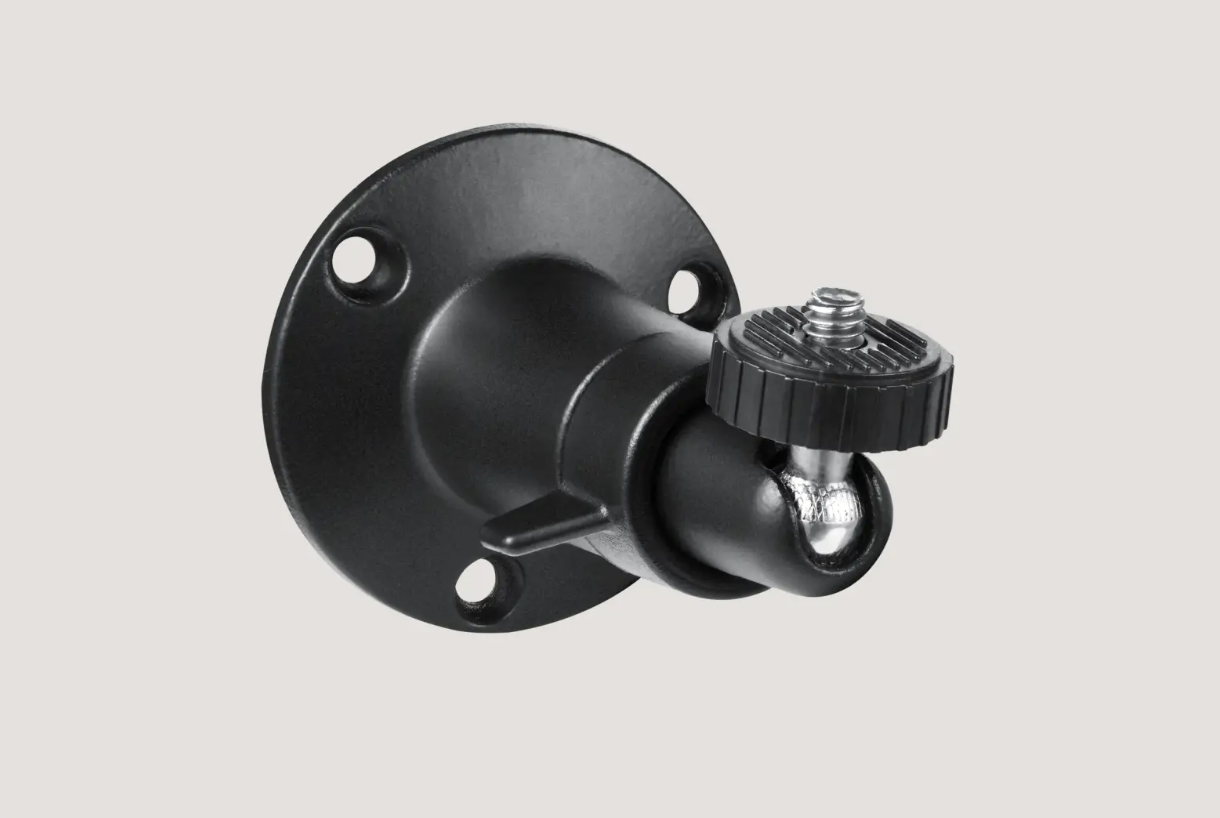
Secure the Outdoor Camera to the threaded screw on the mount by rotating the camera clockwise. Continue to rotate the camera onto the threaded screw until it cannot rotate anymore. This will ensure that it’s fully threaded onto the screw and secured to the mount.
Tighten the lock nut against the Outdoor Camera to prevent the camera from unscrewing. Rotate the lock nut counterclockwise until it’s tight against the Outdoor Camera.
Rotate the mount wing nut counterclockwise to loosen the torque on the mount, allowing the camera to move freely
Adjust the camera to the position you want it to be in to provide coverage for your home or business
For optimal performance, we recommend installing the camera 6-8 feet off the ground and angle it 30 degrees down. In this orientation, the camera can detect up to 30 feet of motion.
If mounting the camera upside down (such as on an overhang) the camera will be able to detect up to 15 feet of motion.
Once you are happy with the position of the camera, rotate the wing nut clockwise and tighten it firmly. You’ll want to tighten it as much as possible, to ensure that the camera will not lose its orientation over time.
Hold onto the camera while doing this to ensure the camera maintains its orientation.
That’s it! Your Outdoor Camera Mount has been installed! If you haven’t done so yet, please install your Outdoor Camera using our Installation Guide.
Troubleshooting the Outdoor Camera Mount
The most common issues stem from the lock nuts and wing nuts not being adequately tightened. You’ll want to rotate these to ensure they are tight, and cannot be tightened further. That will prevent the camera from rotating on the screw, or prevent drooping of the camera over time.
Help Center Article
•
Cameras
What is the Difference Between the SimpliCam® Wired Indoor Security Camera and Smart Alarm Wireless Indoor Security Camera
The SimpliCam® Wired Indoor Security Camera is our entry-level indoor security camera designed to monitor what’s happening when you’re not home.
The Smart Alarm Wireless Indoor Security Camera is our most advanced indoor security camera yet - offering next-level protection that can help verify crime and get authorities to you.
SimpliCam® Wired Indoor Camera
Smart Alarm Indoor Camera
1080p HD video, 10x digital zoom, night vision
16:9 image
1536p HD video capture, 10x digital zoom, night vision
1:1 (square) image
120-degree field of view; great for small rooms and spaces
125-degree field of view; great for small and large rooms
Motion detection sends alerts
Advanced, AI-powered motion detection that sends alerts and triggers alarms
Agents review recorded video (30-sec clip) after an alarm is triggered with Video Verification*
Agents review recorded video (30-sec clip) after an alarm is triggered with Video Verification*
2-way talk (walkie-talkie style)
2-way audio with echo cancellation for clearer audio.
No Siren
Built-in 80 dB siren
Wired
Wireless, with up to 3 months of battery on a single charge
Motion detection
Smart person detection and pet rejection
*With Pro Premium Monitoring Plan
Help Center Article
•
Smart Alarm Indoor Camera
Video Doorbell Pro Requirements
The Video Doorbell Pro is designed to replace an existing wired doorbell with a mechanical chime. If your home does not have a wired doorbell, you will need to install wiring first in order to use the Video Doorbell Pro.
Below is a list of what is needed to install Video Doorbell Pro within your home or business:
Existing doorbell wiring
A mechanical chime. Not compatible with digital chimes.
A transformer with 8-24VAC, 10-30VA
In addition to the above, you’ll need to make sure that you have a 2.4GHz Wi-Fi connection, and an Android or iOS phone or tablet that meets our system requirements.
A monitoring subscription is not required to use the Video Doorbell Pro, however, with one you can take advantage of videos being recorded to your timeline, and features like Video Verification.
Help Center Article
•
Video Doorbell Pro
How Does the Alarm Trigger for the Smart Alarm Wireless Indoor Security Camera?
The Smart Alarm Wireless Indoor Security Camera is the first camera from SimpliSafe® that can trigger an alarm. By default, the alarm trigger is only on when the system is set to away and can trigger depending on the motion type that was selected in settings (People Only or All Motion).
When the camera detects motion and the alarm trigger is on, the camera will use AI to verify the motion type and then trigger the alarm if necessary. By default, the camera will enter the entry countdown before sounding the siren and notifying our monitoring center. You also have an option to bypass the entry countdown by turning on Instant Trigger located under Camera Behavior in settings. In this case, the camera and system will sound the siren immediately and notify our monitoring center.When your camera is enrolled in Video Verification, the monitoring centre will also be notified of the alarm at your location and an agent will be able to verify whether the alarm is true or false to ensure the right dispatch action is taken.
Help Center Article
•
Smart Alarm Indoor Camera
Chime Connector Installation Guide
Overview
The Chime Connector is a useful part of the Video Doorbell Pro’s setup. It helps to prevent the Video Doorbell Pro from producing a constant buzzing sound, or from not sounding at all when its button is pressed. All Video Doorbells sold in the UK will have this sent with the product, however, If it becomes lost or is missing please contact our Support team and they will send one to you free of charge.
Video Doorbell Pro Requirements
To ensure that your Video Doorbell Pro works as intended, it’s also important to make sure that its setup aligns with its requirements. The Video Doorbell Pro and Chime Connector require:
Existing doorbell wiring
A mechanical chime. The Video Doorbell Pro and Chime Connector are not compatible with digital chimes.
A transformer with 8-24VAC, 10-30VA.
Installing the Chime Connector
You can install your Chime Connector by taking the following steps:
Important: Use your circuit breaker to turn off the power to your existing doorbell. To locate the correct switch, try turning off each switch one at a time until your doorbell no longer rings
Find the doorbell chime and remove its cover
Some covers can be lifted off, others may need to be unscrewed
If your chime has batteries, the Chime Connector cannot support it
Locate the screw terminals on the chime. The terminals might be listed as Front/Trans/Rear, A/B/C, or 1/2/3. You will need to use the middle (“Trans”) and left or right (“Front”) terminal, which should have wiring attached to them
Loosen the screw to disconnect the “Front” wire and clip it into the Chime Connector’s blue wire connector
Note: Trim the “Front” wire to 1/4 inch before inserting it into the wire connector

Attach the other blue wire from the Chime Connector to the “Front” terminal

Loosen the screw to disconnect the “Trans” wire and clip it into the Chime Connector’s white wire connector
Note: Trim the “Trans” wire to 1/4 inch before inserting it into the wire connector

Attach the other white wire from the Chime Connector to the “Trans” terminal

Find a place to put your Chime Connector, then replace the cover. You can use the adhesive backing to stick the Chime Connector outside the box, or tuck it inside if there’s room. Make sure it won’t interfere with moving parts and muffle your chime
Turn the power back on and make sure your doorbell still rings. If it doesn’t, double check that the wire connections are tight
If you are still having trouble, please contact our Support team for additional help.
Help Center Article
•
Video Doorbell Pro